A few days ago I talked about some of my goals for 2016, and part of those goals centered around the word focus, as in focusing on the tasks I have to do each day and staying on track. The best way to do this is to be organized and to plan out your days. As with most things, there’s no one-size-fits-all way to plan your day. A lot of people thrive on order and having each hour of the day mapped out on their planner, and a lot of people have jobs that actually depend on a schedule like this, but if you work from home, or if you’re a homeschool mom, this type of scheduling may not work for you. That is why I am trying more of a Goal Based Schedule. [Read more…]
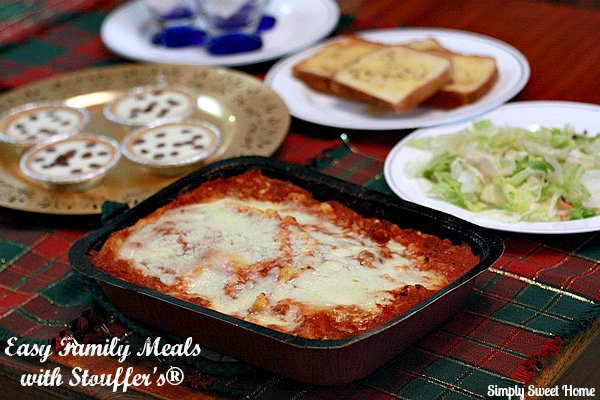
Mini Cannoli Pies + Easy Family Meals with Stouffer’s®
This shop has been compensated by Collective Bias, Inc. and its advertiser. All opinions are mine alone. #StouffersHoliday #CollectiveBias
The holiday season is here! It is such a fun time, but it’s also a busy time for me. Of course, we have all the extra holiday events with family and school. And then additionally this is the busiest time of year for my Etsy shop. Between that and my usual blogging and other responsibilities, the month of December is a whirlwind! Perhaps more than ever, this is the best time to have some easy family meal options!
Thanks to Stouffer’s®, I am able to serve a complete Italian meal to my family, including a round of Mini Cannoli Pies, with very little prep work at all! [Read more…]
Target Breakfast Twist with 5 Easy Breakfast Ideas
Whether you’re a cereal person, a bacon & egg lover, or more of a bagel and cream cheese girl, it can get tiresome making the same things day after day for breakfast. But let’s face it, most mornings parents are in a hurry and don’t have the time to fix an elaborate breakfast. But you can actually create some delicious twists on everyday breakfast items in just minutes! No need to break out the old recipe book or pull up that new recipe you saw on Pinterest. Just look in your pantry and use your imagination! Today I have 5 easy breakfast ideas to show you what I mean. [Read more…]
That Works For Me Ebook Giveaway
If you guys are a fan of the popular blog We Are That Family, then you probably know about their weekly blog carnival Works for Me Wednesday. They recently launched an book ebook based on the carnival, titled That Works for Me. The book is filled with tips submitted by participants of the weekly event.
I was excited a few months ago when I was contacted about having a couple of my tips included in the book! I’m always thrilled when someone decides to feature one of my posts or projects, and this time to actually be featured in someone’s ebook, is a real honor. Also, since I’ve been participating in this event since it was first hosted by Rocks in My Dryer, and as it was one of the first blog parties, I ever partipated in, that made it even more special for me.
Fun with Veggies and Country Crock

This post is sponsored by Country Crock. I was selected for this opportunity as a member of Clever Girls Collective, and the content and opinions expressed here are all my own.
With so many food choices out there from pizza and chips to pasta and hamburgers, there’s no wonder so many of us don’t get the recommended daily amount of vegetables in to our diet.
And it’s especially difficult this day and age to get picky kids to eat their vegetables. But did you know that 8 of 10 kids think veggies with Country Crock are delicious?
And Country Crock Chronicle has tons of great recipes to help you bring delicious flavor to the table.
Pittsburgh Steeler Cupcakes
I’m linking up at these fun linky parties.
Organizing Round-Up: My Recipe Binder

This month’s Organizing Round-Up Project was recipes. Last year I started printing out recipes from the internet, and placing them in a simple binder, complete with page protectors, as seen below:
(For tips on organizing your own recipe binder you can read my post from earlier this week.)
Back in January, in an effort to rid by computer of dozens of bookmarked recipes, I copied all the best recipes I had saved and placed them in a word document to be printed. I then sorted through all my recipes and divided them into categories.
I used colored tab sheets to divide the binder into sections. My categories are: Appetizers, Soups, Main Dishes/Casseroles, Breads/Sides, Cakes/Pies, Cookies/Candies, and Misc.
In addition to my recipe binder, I have two recipe boxes. And I decided to place my recipe cards into the binder so that all my recipes would be in one place. The Hershey’s box shown below is now empty. (I haven’t yet decided what to use it for.) And now I’m storing blank recipe cards in the green box.
Below are some recipe cards from one of the boxes. I sorted all the cards into piles so that they could be placed in the appropriate section of the binder.
And I used 4X6 photo pages to insert the recipe cards in. If you want you can place 2 cards in the same pocket back to back. But for cards that had a photo on one side and a recipe on the other, I placed a single card in a pocket, so that I can see the recipe and the photo, just by flipping the page and without removing the card from the page.
Head over to Org Junkie to see how others organized their recipes.
-Jerri
The Secret To My Success (With Filing)
As many of you know, Laura at Org Junkie hosts a monthly Organizing Round Up. The project for January is filing cabinets. Before each round-up (assuming I participate in all of them) I thought it would be informative to do a post, telling some strategy that I use or something that I learned while doing the current project. So this month I decided to share with you the secret to my success (at least in the area of filing and ridding your desk of clutter).
My secret is the Temporary File Box. When I worked as a receiving clerk, I had several file trays and racks that held folders (all labeled nicely of course), and each folder or tray had a specific purpose and was a temporary home for a particular kind of paper work until it could be processed. I also had a box with green hanging folders (just like the one above) to hold all the recieved purchase orders until I had time to file them away.
After getting married we were plagued with paper! Mail would sit on my desk, my husband’s desk, the kitchen counter, and of course the kitchen table! So I decided to buy a simple file box and put some folders in it; the folders would help me, not only to organize the paperwork, but hide it away!
And unlike other solutions I tried in the past, I like this one because the box stays out in our office, and the folders are labeled, so the box itself is a constant reminder to stay on task and process and file paperwork!
The labels for the folders obviously depend on your own individual needs. But to get you started, here are some of my folders and their purposes:
- Bills – Where I place new bills until they are paid
- To Be Filed – Where I placed any paper work that needs to be filed (of course), and where bills and all the other paperwork goes after it’s processed (if I don’t have time to file immediately)
- Personal Reciepts – Where I place grocery store, resturant, and other receipts, until I can enter the amounts into my expense spreadsheet.
- Business Receipts – Where I put receipts from my husband’s business and other tax deductible receipts until I have time to enter & file them.
- Requires Action/To Do – For paperwork that needs to be signed or filled out and mailed off or something we have to call about.
- I also have a folders labeled “Misc,” “Scrap Paper” (for doodles), and “To Shred.” My husband and I also have our own individual folders, and I have a folder that’s labeled “Blogging” for ideas that I get or find, and I have a folder labeled “Etsy.”
By sorting all incoming mail and paperwork into folders as I have described, it is very easy to stay organized, and when it comes time to pay bills, file, and do other office tasks, you don’t have to waste time trying to figure out what everything is and what needs to be done with each piece.
-Jerri
This post is featured on Rocks in My Dryer.


