Recipe of the Week: Flag Cake

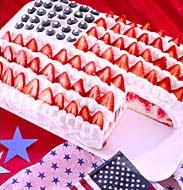
This week’s recipe comes from Duncan Hines. It’s a very festive and patriotic looking cake that would be perfect for the Fourth of July. It’s a fairly light dessert that will add color and style to your buffet or dinner table, and it’s sure to taste great!

Ingredients:
• 1 White Cake Mix
• 1 (3 oz) pkg red flavor gelatin
• 1 (8 oz) container whipped topping
• 1 cup boiling water
• 1/2 cup cold water
• 1 pint strawberries
• 1 cup blueberries
• 1 cup miniature marshmallows
• aluminum foil/fancy foil – color of your choice
• star shaped stickers
• miniature American candy flags
Baking Instructions:
1. Preheat oven to 350 °F. Grease and flour a 13×9-inch pan.
2. Prepare, bake and cool cake according to package directions.
3. Use a large fork to make holes in the cake about every 1/2-inch.
4. Pour gelatin into a large bowl. Add boiling water and mix until gelatin is completely dissolved. Stir in cold water. Pour gelatin over the cake allowing it to run into the holes.
5. Refigerate cake for 3 to 4 hours before serving.
6. Cover a cake tray with aluminum foil then place on tray to decorate.
7. Frost the sides and top with whipped topping. Then arrange strawberries, blueberries and marshmallows on the cake to create a ‘stars & stripes’ pattern. Use the blueberries to create a blue background in the upper left hand corner.
8. Take your foil stars and minature American flags and decorate the sides of the cake. Once you have finished decorating the cake, place in the refrigerator until you are ready to serve it.
Sweet Thursday: 4th of July Edition

I haven’t done a Sweet Thursday post in quite a while, so I thought this would be a great time for it, particularly since the 4th of July is next Friday. So I found a handful of recipes that looked good to me. Here I’ve included the pictures along with links to the recipes.

If you’re having a 4th of July party, or you’re going to a party and need to bring a dish, you should check these out. These recipes are all very easy to make, and they’d all look great on your buffet.

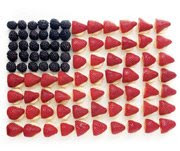
Very cute presentation to replace your average “fruit tray.”

Lady Liberty Cupcakes
Something a little different, a cute & creative treat that the kids will love.

Poundcake, fruity pie filling, and little whipped topping adds up to a light & yummy treat.

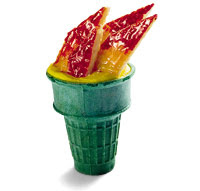
Frozen Uncle Sams

Another cute (& easy) treat that you can make for the kids. Very festive!

Red, White, & Blue Mold

Another light & sweet treat that’s easy to make.

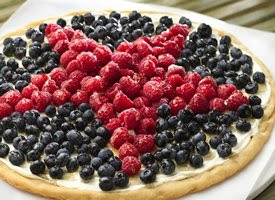
Patriotic Cookie Pizza
Presentation is everything with this cookie & fruit pizza. Very pretty!

Red, White, & Blue Dessert

This trifle made from cream cheese, whipped cream, and fruit will not only taste delicious, but it will look fabulous on the dessert table at your 4th of July party. And you can have it ready in 20 minutes!

Recipe of The Week: Uncle Sam’s Red, White, & Blue Parfaits

I finally made it back home early this morning. I’m still in the process of unpacking and settling back in, but I wanted to come on here tonight to post the photo of the recipe…it’s just not the same without the picture, is it?

Hope you all had a great holiday, and I hope you enjoy this cool treat.
2 cups boiling water, divided
1 pkg. (4-serving size) JELL-O Brand Gelatin, any red flavor
1 pkg. (4-serving size) JELL-O Brand Berry Blue Flavor Gelatin
2 cups cold water, divided
1 tub (8 oz.) COOL WHIP Whipped Topping, thawed
STIR 1 cup boiling water into each flavor dry gelatin in separate large bowls 2 minutes until completely dissolved. Stir 1 cup cold water into gelatin in each bowl.
POUR each gelatin flavor into separate 8-inch square pans.
REFRIGERATE 4 hours or until firm. Cut gelatin in each pan into 1/2-inch cubes. Layer alternating flavors of gelatin cubes and the whipped topping in 10 dessert glasses. Store in refrigerator.

Celebrate National Military Appreciation Month, Armed Forces Day, and Memorial Day by Supporting Our Troops

Now is the month of Maying. Spring is here. The school year is drawing to a close, and we are beginning to plan for summer barbecues, parties, vacations, and days in the sun.

With so much stuff going on in May and with spring fever going around, it is often forgotten or unknown that May is also National Miliary Appreciation Month. Then there is Armed Forces Day on May 17, and of course, Memorial Day is a week from Monday.

I had a history professor that always told us to enjoy our holiday weekend, but he also encouraged us to think and reflect about why we were getting a holiday in the first place. He also encouraged us to avoid the holiday sales, as he felt that our soliders did not fight and die so that retailers could make a buck. While I don’t like telling others what they should or should not do, (as I don’t like being told myself) I think it is something to think about and consider over the next week and a half, as we celebrate.

And for my own part, in the sprit of giving and in the spirit of honoring the military, I decided to post a few links to some charities and causes that you might be interested in donating to. I think it’s very important that we honor all of our Veterans and those who are currently serving. They put themselves in harm’s way every day so that we can be free, and they deserve our thanks and so much more.
America Supports You – here you’ll find a whole host of charities and services to aid the military .

10 Mother’s Day Gift Ideas

Sometimes it seems like women (namely, mothers) are the hardest people to buy for. Since Mother’s Day is coming up this week, I decided to do a few posts on gift ideas. Here’s a list of general gift ideas for you to keep in mind this week as you search for the perfect gift for your own mom, or for other moms you know.

1. Flowers – A boquet, or better yet a potted plant that your mom can take care of.
2. A picture frame – What mom doesn’t love picture frames? And for a personalized touch, include a family photo a picture of your little ones.
3. Coffee cups, shirts, and other personalized items – I just love all these kits out on the market today, where you can take a photograph and have it printed on a picture frame, a coffee cup, and other items.
4. Clothing, jewelry & handbags – If your mom doesn’t buy a lot of clothes and other items for herself, this could be a good gift idea for you.
5. Knick knacks & collectibles – My mom is a big collector…everything from Barbies to antiques to Halmark Ornaments and Beanies, to Mickey Mouse toys and Bird plates…. She’s hard to buy for because she has everything she needs, so when all else fails, I get her something to add to her collection.

6. Candies, cakes, and treats – Get your mom some fancy chocolates or a gourmet cheesecake, or present her with your own homebaked masterpiece.

7. Photo album or scrapbook – Mom’s and grandmoms love pictures of the kids. Put together a photo album or scrapbook of the kids. This way your mom will have all their photos preserved without all the work.

8. Craft and scrapbook supplies – If your mom sews, scrapbooks, or does any other kind of crafting, you could buy her some supplies or get her a gift certificate to the craft store.

9. Salon/Spa Day – Get your mom a gift certificate for a day at the spa or a beauty salon, or better yet make it a mother-daughter day of it. Take your mom out for a morning at the salon, followed by lunch and an afternoon of shopping. Or share a day of pampering at a dayspa.

10. Dinner – Take your mom out for dinner, invite her over to your place for dinner, or bring the homecooked meal to her.

Get a Kiss For the Cook with these Irish Recipes

As promised, here are a couple of recipes for those who want to have an Irish menu for St. Patrick’s Day. The recipes I’ve chosen are Irish Soda Bread and Corned Beef & Cabbage.

I’m not sure that I’ve ever eaten any of this stuff. My dad loves cabbage, but I’ve never been a fan, and I just can’t recall eating corned beef ever. As for the bread, in my family I’m known as the “bread eater.” My family jokes that I practically lived off of bread when I was a kid. And I must admit, to this day whether it’s rolls, biscuits, or baked breads on the table, I always help myself and eat my fair share (if not more). So I’ll definitely be trying this Irish Soda Bread!

Irish Soda Bread

Ingredients
2 cups all-purpose flour
1 teaspoon baking powder
1/2 teaspoon baking soda
3 tablespoons butter or margarine
1/4 cup raisins (optional)
1 egg white, slightly beaten
3/4 cup buttermilk
Nonstick cooking spray
1/4 teaspoon salt

Directions
1. In a medium mixing bowl stir together flour, baking powder, soda, and salt. Cut in margarine or butter until mixture resembles coarse crumbs. Stir in raisins, if desired. Make a well in the center of the mixture.

2. In a small mixing bowl combine egg white and buttermilk. Add all at once to dry mixture. Stir just until moistened.
3. On a lightly floured surface knead dough 10 to 12 strokes until nearly smooth. Shape into a 7-inch round loaf.

4. Lightly coat a baking sheet with cooking spray Place bread dough on baking sheet. With a sharp knife, make 2 slashes in the top to form an X.
5. Bake in a 375 degree F oven about 30 minutes or until golden. Serve warm. Makes 1 loaf (16 servings).

Corned Beef and Cabbage

Ingredients
1 3-pound corned beef brisket
1/2 cup sliced onion (1 small)
1 bay leaf
1/2 teaspoon whole black peppercorns
3 cups water
1 1-1/2-pound cabbage, cut into 6 wedges

Directions
1. Trim any visible fat from the meat. Set aside.

2. Place rack in a 4- to 6-quart pressure cooker. Add the meat, onion, bay leaf, black peppercorns, and water.

3. Lock lid in place. Place pressure regulator on vent pipe (if you have a first-generation cooker). Over high heat, bring cooker up to pressure. Reduce heat just enough to maintain pressure and pressure regulator rocks gently; cook for 50 minutes.

4. Allow pressure to come down naturally. Carefully remove lid. With a slotted spoon remove the meat and onions to a serving platter; set aside.

5. Place the wedges of cabbage in the pressure cooker. Lock lid in place. Place pressure regulator on vent pipe (if you have a first-generation cooker). Over high heat, bring cooker up to pressure. Reduce heat just enough to maintain pressure and pressure regulator rocks gently; cook for 2 minutes.

6. Quick-release the pressure. Carefully remove lid. With a slotted spoon remove the cabbage wedges. Serve with meat and onions. Makes 6 main-dish servings.

Luscious Lime Angel Squares

Last night I came across this recipe from Taste of Home. I was going to wait and post it later this coming week, but I liked it so much that I just couldn’t wait! It’s called Luscious Lime Angel Squares. The name, itself, makes me hungry, and the picture is even better. I’ve made a couple of desserts that are quite similar to this, but they didn’t include angel food cake in the recipe. I must say, this is a great combination. I’ll be making it soon!

The colors are perfect for St. Patrick’s Day, Easter, or any spring event, and it’s a sweet, yet light dessert, so it should be enjoyable and diet-friendly for most people.

I also have to say that this would be a great recipe to try with different flavors of gelatin. I think using strawberry gelatin would be fantastic and then you could even top it with strawberries and whipped cream, to give it more of a strawberry shortcake feel. (of course you’d have to leave out the lemon juice and peel for this) But any way you choose to do it, this is a great recipe, especially if you love lime like I do and you’re looking for something bright and festive looking.

luscious lime angel squares

Luscious Lime Angel Squares

INGREDIENTS:
1 package (.3 ounces) sugar-free lime gelatin
1 cup boiling water
1 prepared angel food cake (8 inches), cut into 1-inch cubes
1 package (8 ounces) reduced-fat cream cheese, cubed
1/2 cup sugar
2 teaspoons lemon juice
1-1/2 teaspoons grated lemon peel
1 carton (8 ounces) reduced-fat whipped topping, thawed, divided

DIRECTIONS:
In a bowl, dissolve gelatin in boiling water. Refrigerate until mixture just begins to thicken, about 35 minutes. Place cake cubes in a 13-in. x 9-in. x 2-in. dish coated with cooking spray; set aside.
In a small mixing bowl, beat cream cheese until smooth. Beat in sugar, lemon juice and peel. Add gelatin mixture; beat until combined. Fold in 1-1/2 cups whipped topping. Spread over cake, covering completely. Refrigerate for at least 2 hours or until firm. Cut into squares; top with remaining whipped topping.

Recipe of the Week: Clover Cookies


Hello everybody. I’m proud to say that this is my 100th post! (yea!) It’s a small step for some, but a pretty big step and a great beginning for me. Thanks for visiting, and I hope you guys will continue to come back and read all my future posts.

Now it’s time for the recipe of the week. This week’s featured recipe is from Martha Stewart. On her website you will find not only the recipe but a video showing you how to make the cookies. Even if you have written instructions it’s always a plus to have a visual.

These Clover Cookies are cute, sweet, and fun! And you don’t have to be an artist to decorate them! The recipe is for St. Patrick’s Day (or spring, in general), but it is yet another recipe that can be applied to any holiday. I wish I had this recipe back around Christmas or Valentine’s Day! Enjoy and Good Luck!

Makes 50
4 cups sifted all-purpose flour, plus more for dusting
1/2 teaspoon salt
1 teaspoon baking powder
1 cup (2 sticks) unsalted butter
2 cups granulated sugar
2 large eggs
2 teaspoons pure vanilla extract
Green sanding sugar

Sift together flour, salt, and baking powder into a large bowl; set aside. Combine butter and granulated sugar in the bowl of an electric mixer fitted with paddle attachment; cream on high speed until fluffy. Beat in eggs

Reduce speed to low. Add flour mixture in two additions, mixing until well combined. Mix in vanilla. Divide dough in half, and cover with plastic wrap; refrigerate 30 minutes.
Preheat oven to 350 degrees. Roll out 1 piece of dough on a lightly floured work surface 1/8 inch thick. With a 3-inch cookie cutter, cut out 25 rounds. Working with 1 round at a time, place clover stencil on top; sprinkle surface with sanding sugar.
Arrange rounds on parchment- or nonstick baking mat-lined baking sheets. Refrigerate until firm, about 15 minutes, or until ready to bake. Repeat process with remaining dough.

Bake, one sheet at a time, until edges just start to brown, 10 to 12 minutes. Let cool completely on sheets on wire racks. Store cookies in an airtight container for up to 5 days.

Tips for Making and Keeping Resolutions

The time has come to make resolutions for the new year. Just about everyone makes promises to themselves to accomplish some goal in the New Year, whether it’s to lose weight, keep the house clean, take vitamins, or start a new business. Unfortunately the vast majority of people don’t follow through with their resolutions. Why? It’s true that a lot of people procrastinate on various projects throughout the year, yet we still manage to accomplish a lot. Why is it so difficult to keep New Year’s resolutions? I believe one reason is that we choose the wrong resolutions to make, and the other reason is poor planning.

Here are some tips on choosing and keeping your resolutions:

1. Resolve to do something that’s actually important to you. If you choose to do something that is actually important to you, you’ll be more likely to make your resolution a priority and stick with it. (For example, you cannot lose weight or stop smoking unless you actually want to.)

2. Make specific goals. (For example, instead of saying, “I’m going to lose weight,” say, “I’m going to lose 25 pounds.”)

3. Make realistic and obtainable goals. It’s okay to aim high, but pick something you can actually do.

4. Take a few minutes to write down your resolutions on paper. Consider posting the list on your refrigerator or at your desk, or some other place where you can see it. You’ll be much more likely to do the items on your list if you see a constant reminder.

5. Create a plan of action. Think about how long it will take you to achieve your resolution and what you’ll have to do to make your resolution a reality. Then write it down. One main reason a lot of businesses fail is because they do not make a plan; the same can be said for resolutions. When writing down your plan be very specific. Consider creating a timeline for your goals: What do you want to accomplish by the end of January? By the end of May? (and so forth)

6. Keep a calendar/planner. Keeping a calendar can be a helpful tool for you to write down your goals in, and a calendar will help you to chart your progress.

7. Make an extra effort in January & make the resolution a part of your daily/weekly routine. Just like with anything else, the first few days and weeks are the toughest. But after you’ve made your a plan and made your resolution a part of your routine and you’ve gotten in the habit of working on your resoultion, the rest should be a down hill effort. (For example, if you resolve to take a multi-vitamin everyday, and you decide to take your vitamin first thing every morning, then after just a couple of weeks, the resolution should be second nature to you. This concept will also work with other resolutions that are a continuous effort, such as quitting smoking, changing your diet, keeping your house clean or organized, exercising, ect.)