Recipe of The Week: Uncle Sam’s Red, White, & Blue Parfaits

I finally made it back home early this morning. I’m still in the process of unpacking and settling back in, but I wanted to come on here tonight to post the photo of the recipe…it’s just not the same without the picture, is it?

Hope you all had a great holiday, and I hope you enjoy this cool treat.
2 cups boiling water, divided
1 pkg. (4-serving size) JELL-O Brand Gelatin, any red flavor
1 pkg. (4-serving size) JELL-O Brand Berry Blue Flavor Gelatin
2 cups cold water, divided
1 tub (8 oz.) COOL WHIP Whipped Topping, thawed
STIR 1 cup boiling water into each flavor dry gelatin in separate large bowls 2 minutes until completely dissolved. Stir 1 cup cold water into gelatin in each bowl.
POUR each gelatin flavor into separate 8-inch square pans.
REFRIGERATE 4 hours or until firm. Cut gelatin in each pan into 1/2-inch cubes. Layer alternating flavors of gelatin cubes and the whipped topping in 10 dessert glasses. Store in refrigerator.

Recipe of the Week: Graduation Cup-caps

Going along with the graduation theme, here’s a very cute cupcake recipe. These would be so great for kindergarden and pre-school graduates, but the big kids and adults should like them too.

Graduation Cup-caps
1 pkg. (2-layer size) yellow or white cake mix
1 env. KOOL-AID Orange Flavor Unsweetened Soft Drink Mix
2/3 cup (1/2 of 7-oz. tub) BAKER’S Real Dark Semi-Sweet Dipping Chocolate, melted
12 HONEY MAID Honey Grahams, broken crosswise in half (12 squares)
2 cups thawed COOL WHIP Whipped Topping
2 chewy fruit snack rolls, any color
24 jelly beans
PREHEAT oven to 350°F. Line 24 muffin pan cups with paper liners. Prepare cake batter as directed on package. Stir in drink mix until well blended. Spoon into muffin cups. Bake 20 to 25 min. or until toothpick inserted in center comes out clean; cool.
SPREAD 1 tsp. melted chocolate onto each graham square to cover entire top of cracker. Place on baking sheet. Refrigerate until hardened. Remove paper from cupcakes. Turn upside down. Using wooden spoon handle, make small tunnel from top to bottom in center of cupcake. Place whipped topping in small resealable plastic bag. Snip corner; pipe small amount of whipped topping into each cupcake. Place remaining whipped topping on top. Top with chocolate covered graham to make “cap”.
SEE tip below to make tassels. Place each tassel on top of cap with jelly bean in center, using a small amount of whipped topping as glue.

Sweet Thursday: The Great Powdered Donut Experiment


I realize that the posts on spring cleaning, taxes, and other stuff have caused me to neglect my Sweet Thursday posts, so I decided to do one for this week. And I honestly couldn’t decide what to post on for the longest, and then I got inspired this morning and decided to have some fun and do a little “taste testing.”

My husband loves powdered donuts and bought a bag at the store the other day, and as I struggled to think of what I would post on today, I saw the bag of donuts on the counter and decided to be a little wacky and put some toppings on the donuts to try out. The toppings included chocolate syrup, caramel syrup, peanut butter, pancake syrup, and strawberry syrup. (yes, I just happened to have all of that on hand, and no, I don’t weigh 500 pounds. But I do love ice cream and sweets, as you can probably tell! Luckily I have a high metabolism.) Well, anyway here are the “highly scientific” results of this experiment.

Chocolate Syrup Donut – This was quite good. It reminded me of a chocolate turnover in a lot of ways, and it reminded me of a lot of the chocolate desserts w/ powdered sugar that you get in resturants. I actually think you could make a plate of these, and it would be a really cute (and easy) dessert for the kids.

Caramel Syrup Donut – This was not bad, but somehow the powdered sugar just seemed to overpower the taste of the caramel. Maybe if I had some of that extra thick caramel like the kind they use at some resturants and fast food joints, it would have been better. But in this case, I wasn’t very satisfied.

Peanut Butter Donut – I actually used some peanut “syrup” that they sale in a bottle for ice cream. It basically tastes just like regular peanut butter, only maybe a little sweeter. I really did this one just for fun, but it was actually a lot better than I expected. It had an “interesting” taste that I’m not sure how to explain, and it was actually one of my favorites over all.

Pancake Syrup Donut – On this one, my results are inconclusive. I didn’t really care for this combination. However, this was the last thing that I tasted, and I think by that time I was getting a little “donut-ed out.” Also, it may not have been the combination but the kind of syrup I used. I had a different brand of syrup from what I usually get, and incidentally I tasted the syrup by itself and didn’t care much for it. So perhaps with my usual brand (log cabin) I would have liked the combination better.

Strawberry Syrup Donut – This was made with Hershey’s Strawberry Syrup, which I highly recommend to you, if you’ve never tried it. (by the way, add it to vanilla ice cream and milk for an awesome strawberry shake!) But back to the donuts, I figured that the strawberry syrup would taste good. I mean, if donuts, strawberry, and powdered sugar can’t go together, what can? I’m usually more of a chocolate person myself, but I actually liked this better than the chocolate. It reminded me of strawberry shortcake. In fact, I imagine you could top these donuts with a little bit of strawberry syrup, a handful of strawberries, and a little whipped cream, and it would be excellent. So….yeah, I think this was probably the best overall. And again, you could make a tray of these, and it would look like a bunch of little gourmet desserts.


All in all, this was a fun little activity, and the food wasn’t too bad either. If you like powdered donuts, you might want to give it a try. Hope you guys enjoyed the post!

Festa Italiana: Cannolis

Proud Italian Cook and Find la Dolce vita are hosting Festa Italiana on March 22. Write a post on your favorite Italian Recipe and join the festival. It should be quite fun.

I’m submitting the following recipe for cannolis. (yum….love these!)

Ingredients

Shells
4 cups sifted all-purpose flour
2 tablespoons sugar
1/4 teaspoon salt
3 tablespoons butter, softened
2 egg yolks
3/4 cup white wine
shortening, for frying
Filling
4 cups whole milk ricotta cheese
1 1/2 cups powdered sugar
1 tablespoon vanilla extract
1/4 cup semisweet mini chocolate chips
1 cup heavy whipping cream, optional

Directions
To make shells, mix flour, sugar and salt in a bowl. Cut in butter. Add egg yolks; stir with a fork. Stir in wine, 1 tablespooon at a time, with a fork until dough clings together. Form a ball with the dough and let stand for 30 minutes.

Roll dough almost paper thin, on a well-floured surface. Using the rim of a glass (about 3-4 inches across), make circle imprints into rolled dough. Using a paring knife, make sure circles are cut all the way through. Roll each circle of dough around a metal cannoli tube, overlaping the ends and press to seal, flaring out the edges slightly. Fry one or two at a time in hot melted shortening (about 360°F) for approximately 1 minute, turning to brown all sides. Remove from hot grease and drain on paper towels, seam side down.

Let cool a minute or two before trying to remove metal tube. To remove the tube hold cannoli shell down on the paper towel and carefully slide the tube out one end. Leave cannoil shells on paper towel, seam side down to cool completely.
For filling, drain ricotta cheese over cheesecloth if ricotta is watery. Combine ricotta cheese, powdered sugar, and vanilla extract until combined.

Stir chocolate chips into the ricotta mixture, being careful not to over mix.
For a lighter filling, you may whip 1 cup of heavy whipping cream to form stiff peaks, and fold into filling mixture at this step.
Chill filling for about 30 minutes before piping into cooled cannoli shells.

You may garnish the cannoli by sprinkling powdered sugar on top. Use whipped cream, a cherry, and shaved chocolate to garnish. Keep refrigerated until time of serving.

Recipe of the Week: Easter Bunny Cake

Hello all. This week’s Recipe of the Week is Easter Bunny Cake. This recipe is from Betty Crocker. (The link is below the pic) However, there are several other versions of the Bunny Cake all over the net. It’s a great treat for kids and adults of all ages.

I just love looking at all these great crafts & desserts for spring. Yesterday, when I wrote the Sweet Thursday post, I couldn’t help but hum to myself…..”in your Easter bonnet, with all the frills upon it.” Now suddenly I’ve got “The Bunny Song” from Vegetales in my head…and “Here Comes Peter Cotton Tale.” Is anyone else with me? No? Oh well, enjoy the recipe!

Bunny Bake

1 box cake mix. (the recipe calls for carrot, but I like yellow or white)
Water, vegetable oil and eggs called for on cake mix box
Tray or cardboard, covered with foil
1 container white frosting
1 cup shredded coconut
Construction paper
Jelly beans or small gumdrops
1 cup shredded coconut
Green food color

1. Heat oven to 350°F (325°F for dark or nonstick pans). Make and cool cake as directed on box for two 8-inch or 9-inch round pans.
2. Reserve 1 layer for another use or to make a second bunny. Cut 1 layer in half as shown in diagram. Put halves together with frosting to form body. Place cake upright on cut edge on tray.
3. Cut out a notch about one-third of the way up one end of body to form head (small end) as shown in diagram. Attach half of cutout piece from tail with toothpicks. Frost with remaining frosting, rounding body on sides. Sprinkle with 1 cup coconut. Cut ears from construction paper; press into notch on top. Use jelly beans for eyes and nose.
4. Shake 1 cup coconut and 3 drops food color in tightly covered jar until evenly tinted. Surround bunny with tinted coconut. Add additional jelly beans if desired. Store loosely covered.

High Altitude (3500-6500 ft): Follow High Altitude directions on cake mix box for two 8- or 9-inch round pans.

Sweet Thursday: Fun Easter Sweets

Welcome to a special Easter edition of Sweet Thursday. If you’re looking for something to serve at your child’s Easter party or a special homemade treat for your child’s Easter basket, look no farther! These recipes are fun and easy to make, and they are filled with vibrant spring colors that your kids are sure to love.

1 package brownie mix (with chocolate syrup pouch)
Water, oil and eggs called for on brownie mix package
24 wooden sticks with rounded ends
1 package (6 ounces) semisweet chocolate chips (1 cup)
2 teaspoons shortening
candies or sprinkles

1. Heat oven to 350°F. Line 13×9-inch pan with foil so foil extends about 2 inches over sides of pan. Spray foil with cooking spray. Make brownies as directed on package for 13×9-inch pan; cool completely, about 1 hour.

2. Place brownies in freezer 30 minutes. Remove brownies from pan by lifting foil; peel foil from sides of brownies. Cut brownies into 24 rectangular bars, 6 strips lengthwise and 4 rows across, each about 1 1/2 by 3 1/4 inches. Gently insert stick into end of each bar, peeling foil from bars.

3. In microwavable bowl, microwave chocolate chips and shortening uncovered on High about 1 minute; stir until smooth. If necessary, microwave additional 5 seconds at a time. Dip top third to half of each brownie into chocolate; sprinkle with decors. Lay flat to dry.

Easter Egg Candies

1 package (10 to 12 ounces) vanilla or white chips
1 package (3 ounces) cream cheese, cubed
1 teaspoon water
1/2 teaspoon vanilla extract
Colored sprinkles, colored sugar and/or jimmies
Directions: In a microwave-safe bowl, melt the chips at 50% power. Add the cream cheese, water and vanilla; stir until blended. Chill for 1 hour or until easy to handle. Quickly shape into 1-1/4-in. eggs. Roll in sprinkles, colored sugar or jimmies. Store in an airtight container in the refrigerator. Yield: About 4 dozen (1-1/2 pounds).

Easter Basket Cupcakes
Cupcakes like these are easy to create. Simply bake up a batch of your favorite cupcakes, and cover them with the icing of our choice. I recommend using white icing w/ green food coloring, though any spring color would work just as good. Then decorate the cupcakes with your favorite candies. For the basket handle, use Twizzlers, Airheads, or Fruit Roll Ups. For the “eggs” use jelly beans, mints, chocolate footballs/eggs, Whopper eggs, or whatever you like. These are colorful, fun treat for kids!

Easter Bunny Pudding Cups

2 cups cold milk
1 pkg. (4-serving size) JELL-O Vanilla Flavor Instant Pudding & Pie Filling
8 CAMEO Creme Sandwich Cookies
8 each jelly beans and gumdrops
8 pieces red string licorice, cut into thirds
decorating icings and gels
POUR milk into medium bowl. Add dry pudding mix; beat with wire whisk 2 minutes. Let stand 5 minutes.
SPOON evenly into 4 dessert dishes. Refrigerate until ready to serve.
INSERT 2 cookies into 1 side of each dish to make the “bunny’s ears, then decorate with candies, licorice and decorating icings and gels as desired for the faces.

Luscious Lime Angel Squares

Last night I came across this recipe from Taste of Home. I was going to wait and post it later this coming week, but I liked it so much that I just couldn’t wait! It’s called Luscious Lime Angel Squares. The name, itself, makes me hungry, and the picture is even better. I’ve made a couple of desserts that are quite similar to this, but they didn’t include angel food cake in the recipe. I must say, this is a great combination. I’ll be making it soon!

The colors are perfect for St. Patrick’s Day, Easter, or any spring event, and it’s a sweet, yet light dessert, so it should be enjoyable and diet-friendly for most people.

I also have to say that this would be a great recipe to try with different flavors of gelatin. I think using strawberry gelatin would be fantastic and then you could even top it with strawberries and whipped cream, to give it more of a strawberry shortcake feel. (of course you’d have to leave out the lemon juice and peel for this) But any way you choose to do it, this is a great recipe, especially if you love lime like I do and you’re looking for something bright and festive looking.

luscious lime angel squares

Luscious Lime Angel Squares

INGREDIENTS:
1 package (.3 ounces) sugar-free lime gelatin
1 cup boiling water
1 prepared angel food cake (8 inches), cut into 1-inch cubes
1 package (8 ounces) reduced-fat cream cheese, cubed
1/2 cup sugar
2 teaspoons lemon juice
1-1/2 teaspoons grated lemon peel
1 carton (8 ounces) reduced-fat whipped topping, thawed, divided

DIRECTIONS:
In a bowl, dissolve gelatin in boiling water. Refrigerate until mixture just begins to thicken, about 35 minutes. Place cake cubes in a 13-in. x 9-in. x 2-in. dish coated with cooking spray; set aside.
In a small mixing bowl, beat cream cheese until smooth. Beat in sugar, lemon juice and peel. Add gelatin mixture; beat until combined. Fold in 1-1/2 cups whipped topping. Spread over cake, covering completely. Refrigerate for at least 2 hours or until firm. Cut into squares; top with remaining whipped topping.

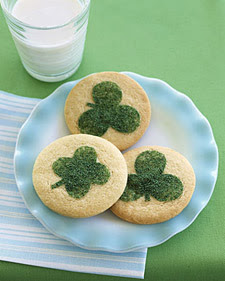
Recipe of the Week: Clover Cookies


Hello everybody. I’m proud to say that this is my 100th post! (yea!) It’s a small step for some, but a pretty big step and a great beginning for me. Thanks for visiting, and I hope you guys will continue to come back and read all my future posts.

Now it’s time for the recipe of the week. This week’s featured recipe is from Martha Stewart. On her website you will find not only the recipe but a video showing you how to make the cookies. Even if you have written instructions it’s always a plus to have a visual.

These Clover Cookies are cute, sweet, and fun! And you don’t have to be an artist to decorate them! The recipe is for St. Patrick’s Day (or spring, in general), but it is yet another recipe that can be applied to any holiday. I wish I had this recipe back around Christmas or Valentine’s Day! Enjoy and Good Luck!

Makes 50
4 cups sifted all-purpose flour, plus more for dusting
1/2 teaspoon salt
1 teaspoon baking powder
1 cup (2 sticks) unsalted butter
2 cups granulated sugar
2 large eggs
2 teaspoons pure vanilla extract
Green sanding sugar

Sift together flour, salt, and baking powder into a large bowl; set aside. Combine butter and granulated sugar in the bowl of an electric mixer fitted with paddle attachment; cream on high speed until fluffy. Beat in eggs

Reduce speed to low. Add flour mixture in two additions, mixing until well combined. Mix in vanilla. Divide dough in half, and cover with plastic wrap; refrigerate 30 minutes.
Preheat oven to 350 degrees. Roll out 1 piece of dough on a lightly floured work surface 1/8 inch thick. With a 3-inch cookie cutter, cut out 25 rounds. Working with 1 round at a time, place clover stencil on top; sprinkle surface with sanding sugar.
Arrange rounds on parchment- or nonstick baking mat-lined baking sheets. Refrigerate until firm, about 15 minutes, or until ready to bake. Repeat process with remaining dough.

Bake, one sheet at a time, until edges just start to brown, 10 to 12 minutes. Let cool completely on sheets on wire racks. Store cookies in an airtight container for up to 5 days.

Sweet Thursday: Why eat Chocolate Cake when you can have Chocolate Chocolate Cake?


This post is two-fold. It is an opportunity to tell you about one of my favorite desserts, but it’s also a chance for me to tell you about a couple of great organizations.

I couple of weeks ago, I told you guys that I was attending the The Arc of Morgan County’s “Kids on the Block” Chocolate & Dessert Festival. The Arc is an advocacy organization that works with people who have diabilities & provides counseling and assitance to their families. The Kids on the Block is an organization that began in the late 70s, and one of the things it does it that it travels around and does puppet shows at schools and other locations. The shows are aimed at promoting tolerance and understanding to those who have disabilities. And they promote positive behavior, with an anti-gang, & anti-drug & alcohol message. I remember being a kid in elementary school and seeing the show at a few school assemblies. It was entertaining & it was also a learning experience. Little did I know of how big the organization would be and just how much they were doing, even beyond the puppet show.

The festival I attended takes place each year just before Valentine’s Day. Local businesses participate and bring desserts to be sampled, which gives them promotion, and visitors purchase a ticket to come in and sample all the great food, and all the money goes to charity. It’s a win-win situation for everyone involved.

Now just so you know I am not affiliated with O’Charley’s. My mother is employed at O’Charley’s, however, she does not even know I’m writing this post. Anyway, this year the O’Charley’s booth featured Key Lime Pie & O’Charley’s Chocolate Chocolate Cake. By the way, the Key Lime Pie is outstanding. It tastes like something your mom or grandmother would make, and I highly recommend it.

As for the Chocolate Chocolate Cake…yum! I love this cake. It is one of my favorite desserts to get a resturant and overall one of my favorite desserts period. It almost has sort of a dark & decadant taste to it, but it is also sweet & rich. I sometimes tell my husband, “I have to get a bite of icing to tone down the richness is of the cake.” And the great thing about this cake is that you can get it to go, and it’s good just out of the refrigerator, & it’s also a great dessert to heat up in the microwave. (I prefer it cold personally) And as far as resturant desserts go, this is a way better value than most. One slice is big enough to share between at least two people if not three or four. In fact I went out to lunch with 3 ladies that I worked with, and we all split a piece of the cake and still had a little left over. I will say, the cake may be a little rich for some, but if have a sweet tooth and you’re a chocolate lover, you’ll like this cake.
If you’re interested, check out O’Charley’s menu & current specials:
O’Charley’s Desserts – (I recommend the Cinnamon Sugar Donuts & the Caramel Pie as well)

Recipe of the Week: Lovin’ Sweetcakes

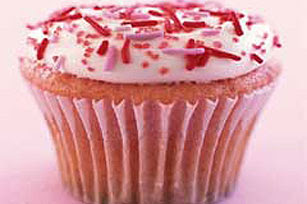
This week’s recipe comes from Kraft. This is another very cute and tasty, yet very easy dessert to make. The recipe calls for strawberry flavored jello and uses pink and red sprinkles for a Valentine’s Day kind of feel. If you made Valentine cookies or some other dessert with sprinkles, then this recipe could be the perfect opportunity to use up the leftover sprinkles & stuff. And of course you can always use other flavors of jello or other colors of sprinkles to make cupcakes for all occasions. In fact this is the perfect light and fluffy recipe for spring time and great for St. Patrick’s Day or Easter. Enjoy!

1 pkg. (2-layer size) white cake mix
1 pkg. (4-serving size) JELL-O Brand Strawberry Flavor Gelatin, or any other flavor
1 tub (8 oz.) COOL WHIP Whipped Topping, thawed
1/4 cup seasonal colored sprinkles

PREPARE cake batter as directed on package. Stir in dry powered gelatin until well blended.
LINE 24 medium muffin cups with paper liners. Pour batter evenly into cups, filling each cup 1/2 full. Place a small marble or 1/2-inch ball of foil between each liner and one side of the cup, pushing the paper in to form a heart shape. Bake as directed on package for cupcakes. Cool completely; remove marble or foil.
SPREAD 2 Tbsp. whipped topping onto top of each cupcake. Decorate with sprinkles as desired. Store cupcakes in refrigerator.