Work At Home Wednesday: Valentine Gift Baskets

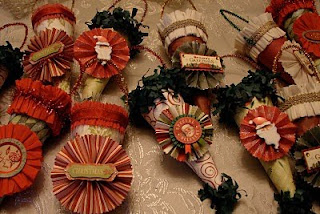
It’s amazing to see how a few small items can be packaged together to create something wonderful. Homemade Gift Baskets are the perfect gift idea for those of you who want to buy something nice from a retail store and still maintain a personalized and thoughtful touch. And the best thing about them is that they are easy to make regardless of your crafting skills and they can be made even on the smallest budget. Today I’ll be sharing some baskets I put together and listing some things you can put in your baskets, along with some tips.


What You Need:
Baskets
Stuffing – tissue paper and paper/foil shreds or “grass”
Ribbons/bows (optional)
Cellophane (optional)
Gift Tag (optional)
Little Items to put in the baskets

Items to Put In Baskets:
Candy
Stuffed animals/Toys
Themed pens/pencils
Notepads
Lotions/Perfumes/Soaps
Candles
Jewelry
Baked Items
Coffee cups
Books/magazines
Puzzle Books
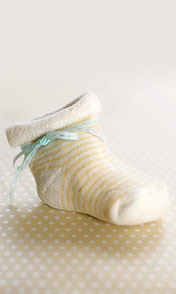
Cute Socks or Slippers
Picture Frames
Photo Album
Glass figurines & collectibles
Hobby stuff
Specialty coffees or teas
Homemade items


Places to find Inexpensive Items: If you’re on a budget there are a lot of places to get your supplies for fairly cheap.

The Dollar Tree is a great place to get cheap baskets, your basket “stuffing,” and the gift items to put in your basket.

Hobby Lobby and Micheal’s also carry baskets and the supplies you’ll need to beautify your baskets, and you should be able to get these items on sale in the next two weeks.

Wal-Mart & Target are great places to get your basket supplies. And if you’d like to make some gift baskets but are on a budget, the Dollar Bin at Target always has an excellent selection of seasonal items.


Shopping Ahead: Since I’ve started blogging, I often get a lot of holiday ideas after I’ve already made what I’m going to make for the current holiday, so I find myself saving a lot of ideas for later. If this is the case with you as well, and you like buying stuff ahead of time, I recommend going to Wal-Mart the day after Valentine’s and buying some stuffed animals while they’re 50% off. Then you can pack them up and use them in gift baskets next year.


-Jerri

—————————–
I’m posting a link to this post at:
It’s So Very Creative hosted by
It’s So Very Cheri
Make it for Monday hosted by
Cottage Instincts
Made it Mondays hosted by
The Persimmon Perch
Making the World Cuter Monday hosted by Making the World Cuter
Make Your Monday hosted by Twice Remembered
Metamorphosis Monday hosted by
Between Naps on the Porch
DIY Day at
A Soft Place to Land
WFMW at We Are That Family
Strut Your Stuff Valentine’s Party at Somewhat Simple

WAHW: Hot Chocolate Gift Sets

My mom gave me this chocolate set a little while back. She won it at a charity event. Isn’t it cute? I love going through store aisles and seeing all the gift sets available at Christmas and Valentine’s, but when you stop and think about it, they sell a lot of these not because it’s a great value for the money but because it’s convenient.

But if we all just took a little time, we could make our own gift sets and make something that’s a lot more personal, and we could save money along the way. So I decided I would use the items out of this gift set and put together a couple of tutorials so that you guys can make your gift sets for Valentine’s Day or even for next Christmas (if you’re thinking that far ahead).


Gift Option One: Option one would make a great couples gift. Or give it to that special friend who just adores chocolate.

What You Need:

1 or 2 coffee cups (You can usually find something cute at the dollar store.)
bottles or jars (Buy new at wal-mart. Or rinse out and reuse a sauce jar.)
hot chocolate packets
marshmallows
sugar or sprinkles (optional)
labels (make these with scrapbook supplies or create them using your photo/print shop programs)
1 basket
tissue or paper shreds to line the basket
funnel (if using bottles)

Instructions: Empty a few hot chocolate packets into a jar or bottle. (I like Swiss Miss.) If you desire, do the same with marshmallows and/or granulated sugar (or sprinkles–pink or red would be really cute for Valentine’s!)


Use scrapbook supplies or your photoshop software to create your own custom labels. Print these out on sticker paper for easy application. If you don’t have sticker paper, use regular paper and attach with glue or mod podge. If you desire you can also make a tag with heating instructions (get these off your hot chocolate packets.)

Line a gift basket with tissue paper, paper shreds, Valentine “grass,” or other material. Arrange your jars/bottles and mugs in the basket as desired. For a little extra pizazz, decorate the basket with bow, or wrap with cellophane and bow.


Here’s the example I made: This one just contains the two coffee cups and one bottle of hot chocolate mix. And I really do like the bottle because it seems very romantic…sorta reminds me of wine or champagne set. But I know the jars would be just as cute!


Gift Option 2: If you want an even less expensive and quick gift. Or if you’re looking for something that you can make in bulk for coworkers, teachers, or church friends, try this option. (Sorry, I have no pics for this.)

What You Need:

1 Coffee Cup

2 or 3 packs hot chocolate mix

Clear plastic treat bags

Ribbon

Tags (design these with photoshop)

cellophane (optional)

Instructions: Empty your hot chocolate mix into a treat bag, and tie the bag up with ribbon. Place the baggie inside your coffee cup. Then create a tag with heating instructions for the hot chocolate. Print out your tag. Punch a hole in the corner of the tag, and use a ribbon to tie it to your cup handle or attach it to the baggie. (You could also wrap up the cup with cellophane. Tie it with a ribbon, and attach your tag to the outside.)

Above is another basket. It’s a little bigger than the first one. And of course, you could always add some candies to the basket or anything else you deem appropriate (perhaps a book), if you need something to make the basket seem more full.

If you like gift baskets, be sure to come back next week, as I’ll be sharing several that I’ve made.

-Jerri

—————————–

I’m posting a link to this post for next week’s editions of:

It’s So Very Creative hosted by
It’s So Very Cheri

Make it for Monday hosted by
Cottage Instincts

Made it Mondays hosted by
The Persimmon Perch

Making the World Cuter Monday hosted by
Making the World Cuter

Make Your Monday hosted by
Twice Remembered

Metamorphosis Monday hosted by
Between Naps on the Porch

DIY Day at
A Soft Place to Land

WFMW at We Are That Family

Valentine Party hosted by Hoosier Homemade

You Can Make This – Feature & Giveaway


Hey Crafters! Here’s something special for you. Just in time for Valentine and Spring Projects, You Can Make This offers patterns and instructions for anything and everything you’d ever want to make for gift giving! Today’s post will feature just a few of the many projects that can be made with craft bundles from You Can Make This.

And today, as a special treat I’ll be giving two of my readers a chance to win 4 Ebooks from You Can Make This. With these ebooks you can make all of today’s featured projects and more cute stuff! And for more fun ideas, check out the blog at You Can Make This.

I love personlized stuff! Wouldn’t you love to make a Personalized Name Pillow for your child? So cute!

With the Portrait Peasant Tops and Dresses ebook, you get all the patterns and instructions to make short or long peasants. You choose the sleeve length too and the type of ruffles.

Make pants, shorts, and capris with the patterns found in the Easy Fit Pants for Girls & Boys ebook.

I know everyone would love to lounge around in these easy fit pants. With this ebook: Easy Fit Pants for Tweens, Teens, Adults: XXS-3XL you can learn to make easy fit pants for the whole family.

Giveaway Closed.


-Jerri

New Shop & Blog Launch

Photobucket

While hubby’s been out of town as at a training conference, I’ve been a busy bee!

The new Simply Sweet Creations blog and shop have now been launched! Yay! The shop only has a few listings but you have to start somewhere. Right? And I promise there will be much more to come.

The new shop URLs are http://jhrivers.etsy.com/ or http://www.etsy.com/shop/jhrivers

You can also access the new jewelry blog here: http://simplysweetcreationsblog.blogspot.com/

New Newsletter:

If you’re interested, I’ve added a new newsletter to go along with the new blog. I’m not sure if I noted previously when I added the business blog or not, but in case I didn’t, I should note: Each of the three blogs has it’s own separate newsletter. So if you’re subscribed at Simply Sweet Home, you will only get Simply Sweet Home Updates. If you want be subscribed to 2 or all three of them, you will need to subscribe separately at each blog.

The Simply Sweet Creations newsletter will only come out once a month (unlike the SSH newsletter which comes out once a week). And it will include the latest post updates, new products, and sales. Also, if you subscribe to the newsletter, I’ll occasionally send out special coupon codes and subscriber-only sales. (If Hubby were here he’d say, “Oooh! How exclusive!”) And since Simply Sweet Home is my main blog, sometimes I’ll send out similar offers to the SSH subscribers as well.

New Button: Also, I was asked if there would be a new button for the shop. The answer is yes. You can find the new button code right beneath my Simply Sweet Home Button, or you can get it from the new SSC blog. Thanks to everyone who decides to display any of my buttons on your page. I really appreciate the promo!

Sneak Peak at Future Listings: I’m planning to add new listings gradually over the next few weeks. Here’s a sneak peak of some of the things I’ll be adding in the near future.

-Jerri


Preview of Simply Sweet Creations Shop & Blog

Hello everyone! If you’ve looked at my profile in the last several months, you probably noticed that I have a blog listed under my profile, in addition to this one titled, “Coming Soon.”

Well, the blog that’s “Coming Soon” is going to be a blog where I’ll be sharing jewelry I’ve made and other craft projects I’m working on. The name of the blog is…..you guessed it: Simply Sweet Creations. I’m also opening my own shop on etsy where I’ll be selling jewelry and other items. I’ve been planning to launch this for months, but things just kept coming up. But now I’m ready to take the plunge and add some items to the shop.

The shop is going to start out small. I have a ton of stuff that I’ve made, but I know it will take a while to get traffic, so I’m planning to add more stuff gradually. I also have a ton of ideas for new things to make in the future, but I’m on a tight budget right now, so I have to be a little selective of the materials and things that I buy.

I hope to open the new blog and shop up to the public in the few days. When I have it launched, I’ll be sure to post the links here so that you can come take a look at my items, and I look forward to reading your comments. Please wish me luck in this new endeavor, and don’t forget to tell your friends about it!

Today I’m giving you a small preview of my items. As I look through my stock, I see huge variety of colors and styles…I’m not even sure what to feature! So please bare in mind this is just a small preview!

-Jerri


Work at Home Wednesday: Sock Sachets

This week I’m letting my resolutions and goals for the year begin, which includes coming up with a new schedule for my blogging and working to make this site a little more organized and structured.

On Wednesdays my plan is to do posts dealing with work at home topics. This could be anything from housekeeping tips and household projects to organizing or craft projects and even business ideas, tips, etc.for work-at-home-moms. And if I’m able to stay consistent with it and people like the future, I may turn it in to a linky event. What do you think?

For today’s post we have a simple and frugal project, and if you’re a packrat like me, you’ll definitely appreciate this. If you have old socks or baby booties around your house, why not turn them into sachets?
Sachets are so great to place around your home and in drawers for a fresh and pleasant scent, and by using socks or booties, you can save money and even create a personal keepsake.
Just take a really cute baby booty or sock that your child has outgrown and fill it with a little potpourri. (Find this at Wal-mart or the Dollar Store.) You could also use other scented items, including spices from your pantry. Cinnamon or nutmeg would be nice, and I read about an example where they used oregano & basil…interesting!
Or you could use anything else around your house with a pleasant scent. We had some lavender scented bath crystals, so I used some of these to make a sachet. Also, if you’re allergic or don’t like scented potpouri, you can put baking soda inside your sachets. There’s no fragrance to irritate you, and it will help deodarize your drawers and home.
After you’ve filled your sock or booty, tie it up with a cute ribbon. It makes a great keepsake for your home, or you could use them as gifts. Grandmothers would love to get one of these, and you could always add a couple of these to baby shower gift basket.
If you don’t have any kids, or you’re not too concerned with making anything cute, this is also a great project to use with just plain old socks. (You know the ones that should have been thrown away months ago!) Just take some scissors and cut off the toes off the sock (basically halfway between the toes and the heel. Then fill the sock with desired fragrance, and use a ribbon to tie it up, or tie the sock in a simple knot.

Does anyone else know some of some frugal craft or household projects made with things found around the house? I’d love some new ideas!

-Jerri


————————
I am pleased to link up this post at the following:
Works for Me Wednesday at We Are THAT Family
Hooked on Fridays at
Hooked on Houses
DIY Monday at
A Soft Place to Land

It’s So Very Creative hosted by It’s So Very Cheri
Make it for Monday hosted by Cottage Instincts
Made it Mondays hosted by The Persimmon Perch
Making the World Cuter Monday hosted by Making the World Cuter
Make Your Monday hosted by Twice Remembered
Metamorphosis Monday hosted by Between Naps on the Porch

Holly Bloggy Christmas Crafts

I don’t do very much crafting…probably because in school my art was never very good. I always excelled more at music and writing. I just started making jewelry this year, and in the past I’ve occasionally done a craft project or two. But I do want to try more stuff. I see so many tutorials out there, and I think to myself, “I can do that! It may not be as easy for me as they make it look, but still I think I could possibly do this!”

So one of my goals next year is to try some of these projects, or at least start small: try one or two and get really good at them. Then that should make it easier for me to learn more things in the future. Heidi from Blue Eyed Blessings hosted a fabulous craft party for us last week. Today I’m featuring just a few of the projects that were submitted to the event. I know you guys will love these! And after you check these out, be sure to go over to Heidi’s blog and check out all the other wonderful ideas! It may be too late to make some of these. Although if you’re needing a last minute gift, several of these are actually projects that you can do fairly quickly. And if all else fails, you’ll get some fabulous ideas to bookmark for next year.

Jingle Bell Shadow Box from Blue Eyed Blessings

Elegant Pine Cone Ornament from A Scrap Mom’s Musings

Monogram Ornament from: Sweet Pea

Decoupage Ornaments from: Sweetly Southern

Light Bulb Ornament from: Crafts by Amanda

Blue & Silver Wreath from: Eug

-Jerri


Holly Bloggy After Party: Homemade Gifts

As promised, all week I’ll be featuring some ideas from the Holly Bloggy. Here are just a few of the fabulous ideas that were submitted to the Homemade Gift Event over at Tater Tots and Jello. It was nearly impossible to pick just a few items to feature. Everything looks so great! I finally managed to pick out a handful, but I must say, if you haven’t been over to Jen’s place yet, you have to go over there and take a look around and all the great ideas!

From: Cosmogirl’s Emporium
I just love these cones. The creator filled these with candy and set them out on the table at resturant where she was meeting friends. What a creative idea! And hangers would also make them a perfect tree ornament after all that candy is gone!

From: {AE Filkens}
Isn’t this plate adorable? I just love personalized stuff. I really need to try some of this mod podge stuff. I’m always seeing the coolest projects made with it!

From: The Boatwright Family
And more mod podge! These coasters were made with wrapping paper! So if you like to do mod podge or any kind of paper crafts but you’re on a budget, this is an inexpensive option for you! I just love the designs used here! So festive!

From: Harried Mom of Four
These little bowls look so elegant, and when you add a candle inside they give off a beautiful glow! Jen’s also created a lovely star, which I’d love to have on my tree!

From: Paper Glue Etc.
You guys never cease to amaze me with your creativity! This message board was made from an old window! I love that it’s a decorative yet purposeful gift, and it’s also personalized! Fantastic!

From: Tidy Mom
Cheryl made these great sugar scrubs! I’ve seen a lot of homemade spa gifts but none made with sugar! This is definitely on my list of future projects to try!

From: Tater Tots and Jello
Here’s another project I’ve been wanting to try! I just love these jars full of delicious ingredients. Jen filled these with everything you need to make spiced hot chocolate. Yum! And aren’t accents cute?

-Jerri

Holly Bloggy Christmas Crafts: Beaded Mouse Ornaments

For day 3 of the Holly Bloggy we are sharing crafts! If you have a Christmas craft to share, be sure to link up over at Heidi’s blog: Blue Eyed Blessings. And don’t forget to come back here tomorrow to share your Christmas recipes!

I’ve had a lot going on at our house in the last few weeks, and I didn’t have the time to make anything new, but I really wanted to post something for the event, so I decided to share these beaded mouse ornaments that I made a while back.

As you know I have a big collection of mouse ornaments. Well, when I found a mouse ornament kit at Wal-Mart I just had to have it! Today I’ll be posting a tutorial on how to make your own mice ornaments. Please keep in mind that craft instruction is not my forte, and on top of that I have no photos of the mouse making process…..however I will try my best to make my instructions as clear and easy to follow as possible.

Here’s what you need to make one mouse:

23 clear, round beads (4 mm)

3 clear “star” beads (20 mm)

1 clear “star” bead (10 mm)

2 red “star” beads (10 mm)

1 round bead (10 or 12 mm)

1 pipe cleaner

1 piece of string

String one 4mm bead on the pipe cleaner. Loop the end of the pipe cleaner around the bead so that the beads don’t fall off. Add one of the red star beads. Add 10 more round beads. Bend the pipe cleaner, making a 90 degree angle. Add the three clear star beads (20mm), followed by the 10mm clear star bead, and then the red star bead. Add the 10mm round bead.

At this point you’ve made the mouse tail, body, and head. Next add 6 more 4mm beads, and loop the pipe clear around so that it looks like an ear. Twist the pipe cleaner around itself. Then add 6 more beads. Loop the pipe cleaner around again to make the second ear. Then twist the pipe cleaner around itself again, so that it’s tight and the beads won’t fall off. If you have excess pipe cleaner, use wire cutters to remove it. Then take your string; loop it through the mouse ears and tie it in a knot. Finally bend the tail into your desired shape/position.

Thanks for stopping by! Hope to see you tomorrow for the Christmas Recipe Party!

-Jerri

Not-So-Scary Halloween Giveaway


Is everyone busy getting ready for Halloween? You Can Make This has a ton of projects and ideas for Halloween and all occasions!

And this week I’m happy to announce that you can win a $50 bundle of Halloween downloads from You Can Make This! This is the perfect prize for all you crafty ladies out there, and if you’re a little crafty-challenged, then you could pass it on to the crafter in your life!

Your $50 Bundle of Halloween downloads will include the following books:

Fancy Filled Tutu with Bonus 40 Tutu “Recipes”

Pumpkin Polly Patterns

Paper Piecing Project: Pumpkin Patch Pillow

Frayed Applique: Too Cute to Spook!

Little Miss Spider Applique Patterns

How to Applique the Easy Way

Hocus Pocus Patterns

Just a Little Something for a Happy Halloween Table Runner

One Simply Sweet Home reader will win this $50 bundle of “No So Scary” Halloween ebooks from You Can Make This. To win visit You Can Make This and leave a comment on this post, telling us an idea or project that you would like to try.

Giveaway Closed. Thanks for entering!

-Jerri