Flower Arrangement and Vase Revamp

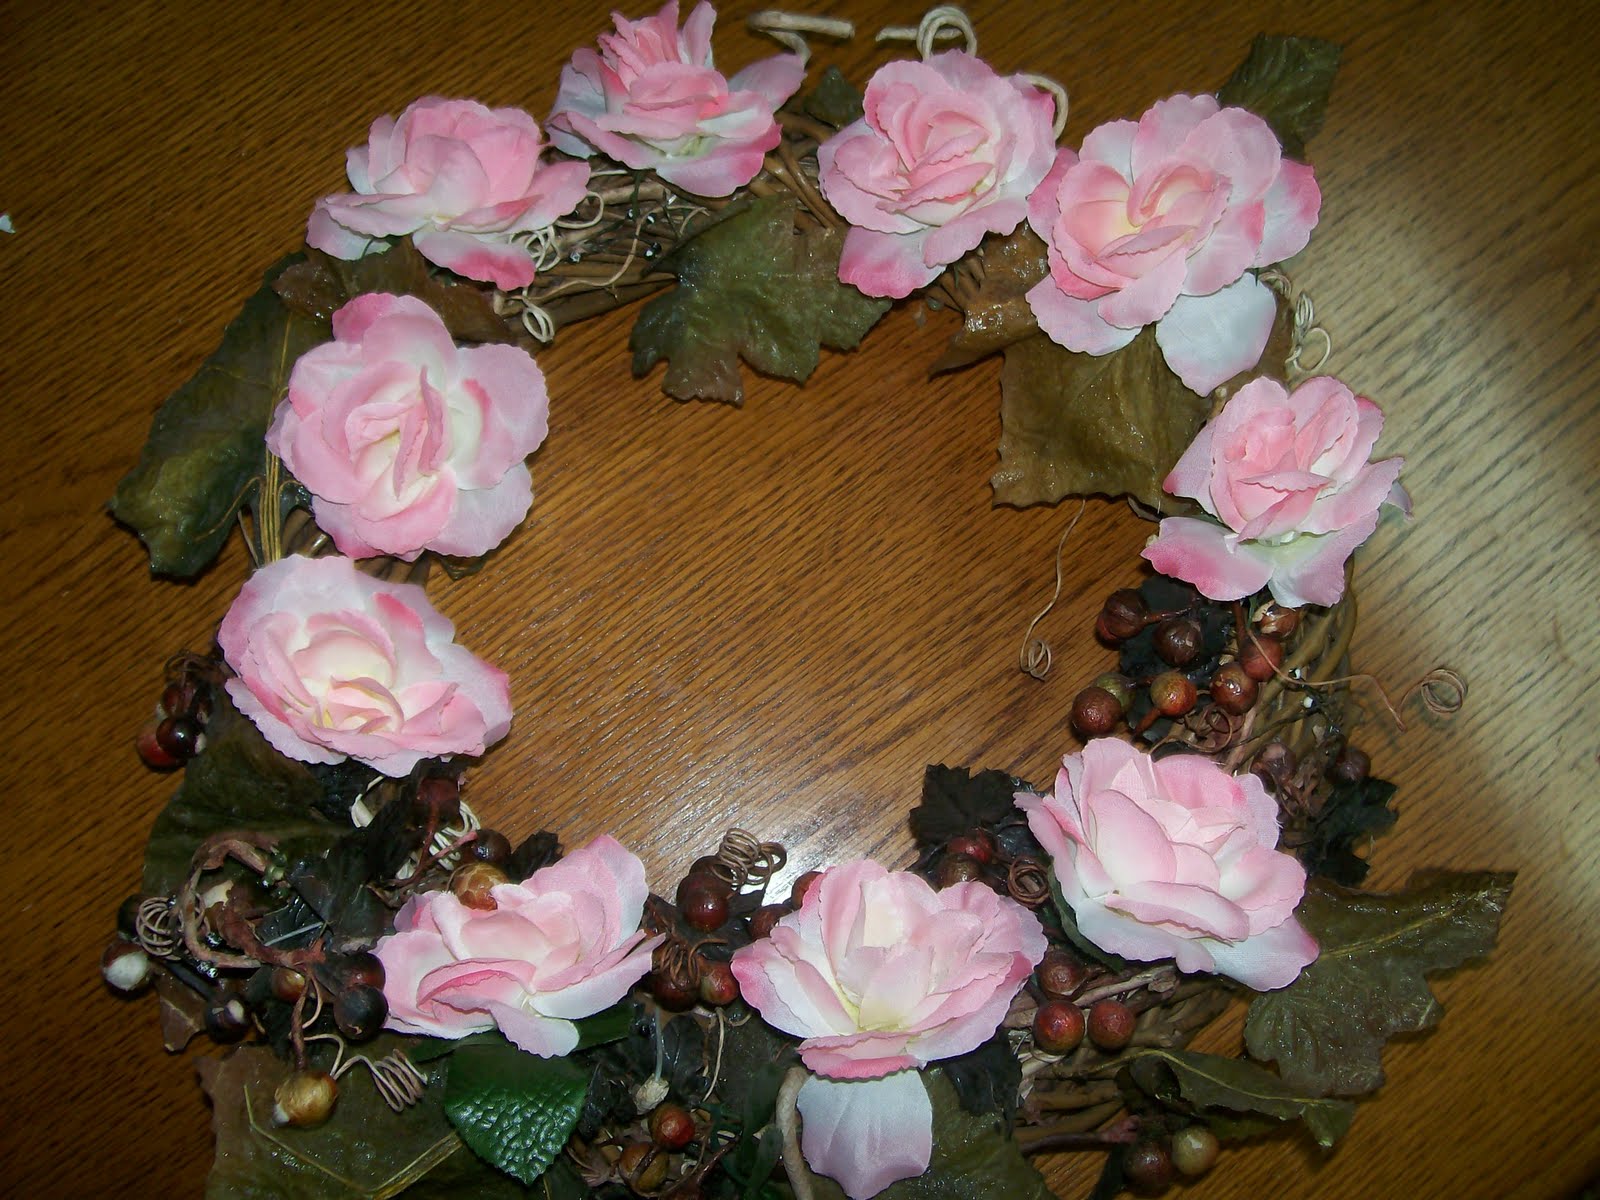
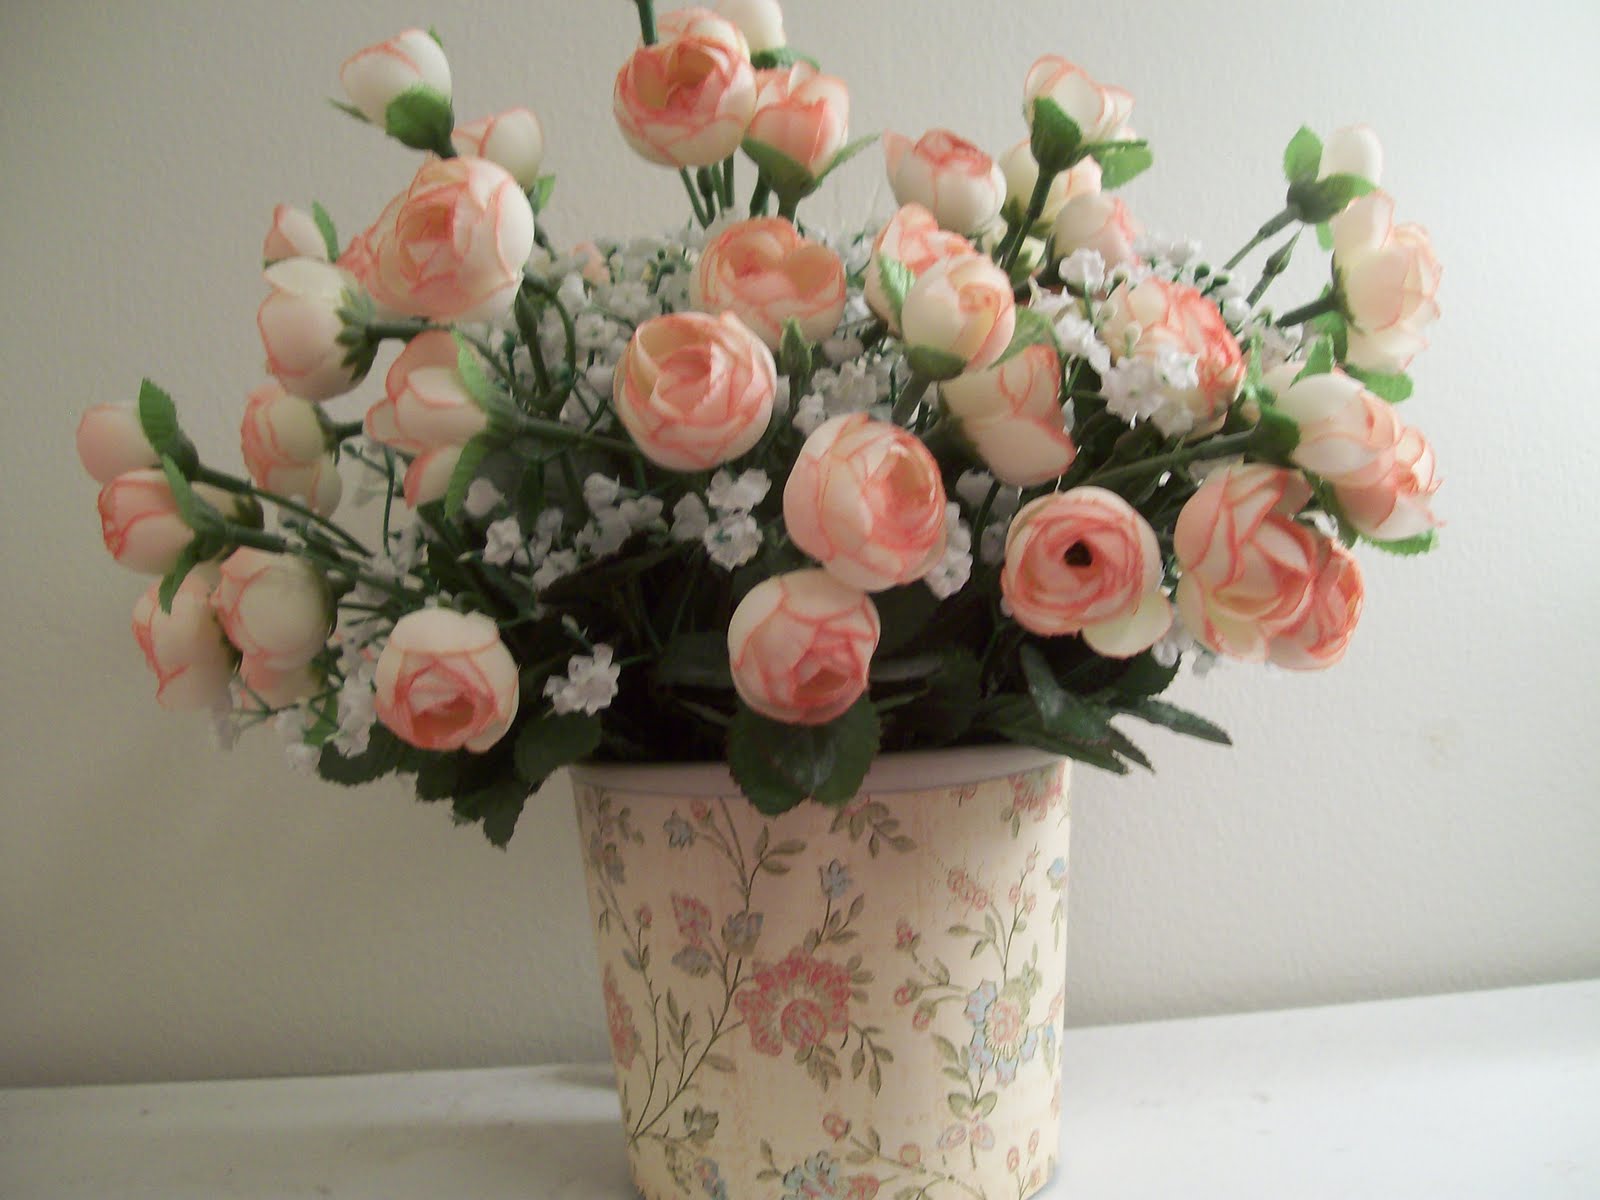
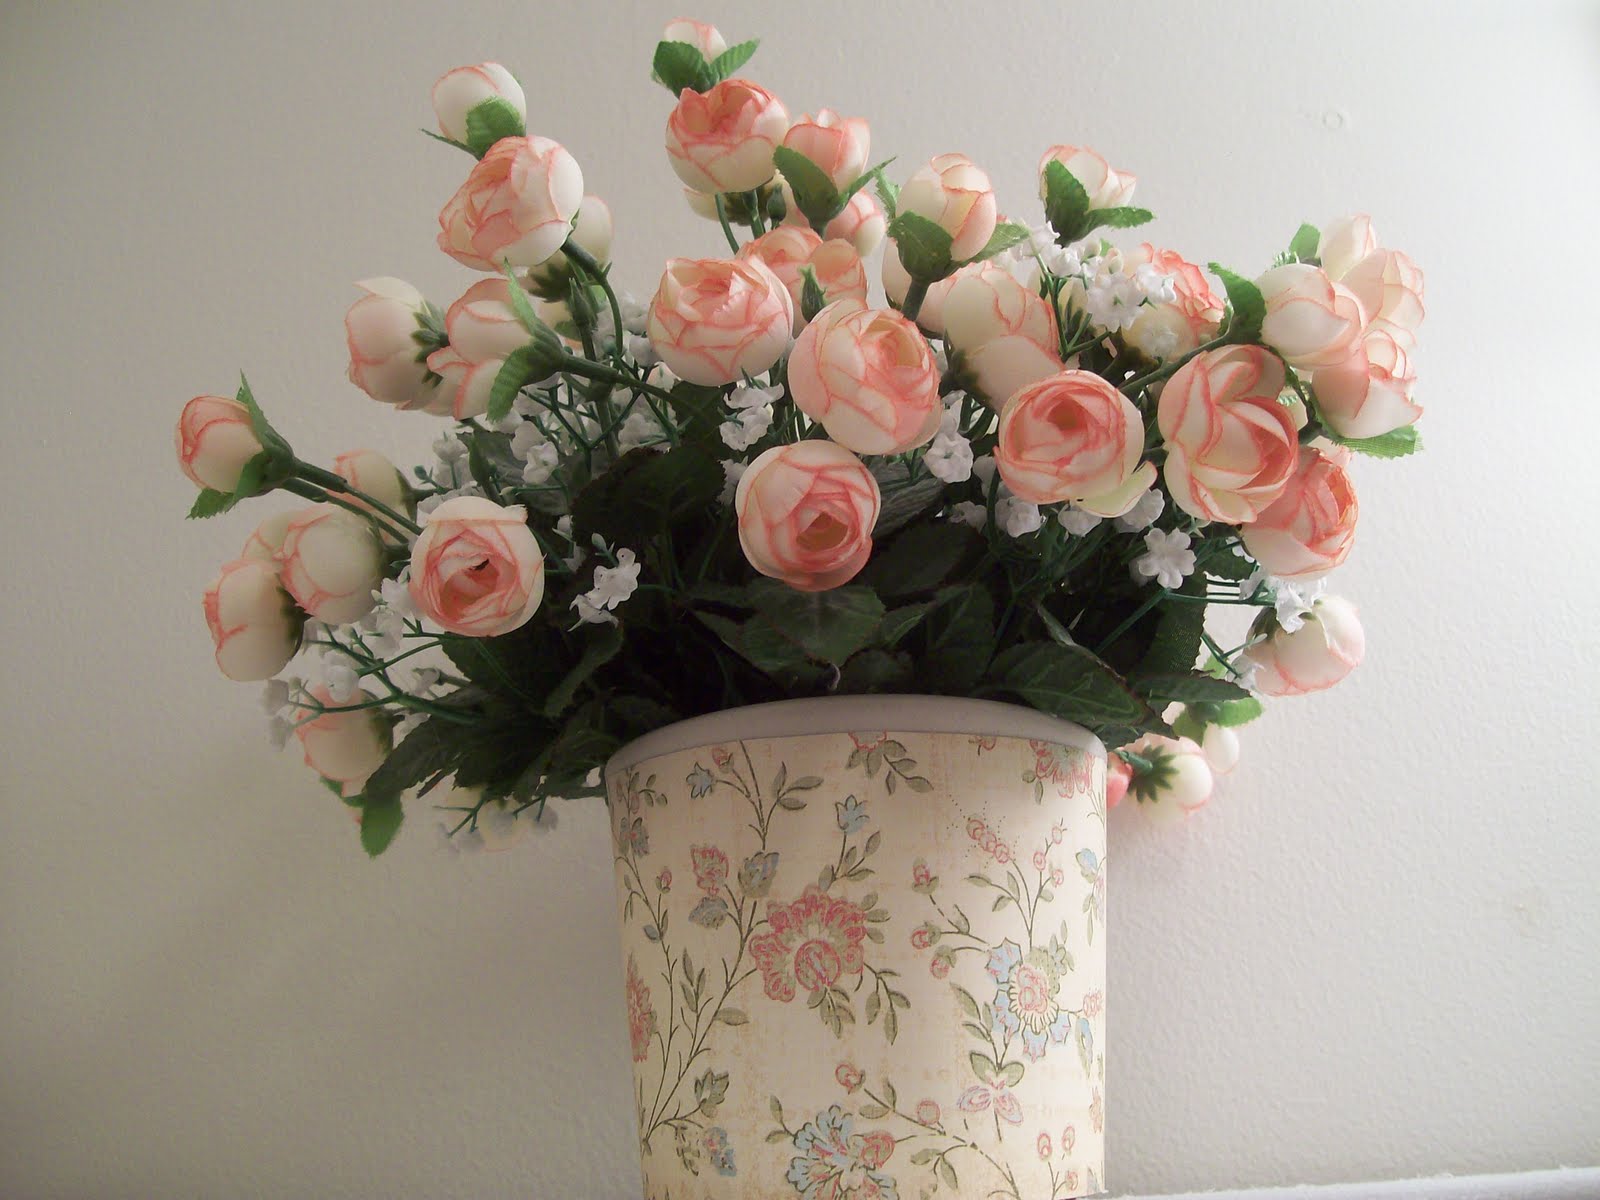
I love the brightness and color that flowers add to a room.  A few months ago my mom and stepdad were cleaning out my step dad’s mom’s house. (His mother recently passed away.)  Among the possessions to be divided between the children, there were a lot of odds and ends that weren’t really worth anything and nobody really wanted.  So they either became trash or goodwill items.  The above flower arrangement was on her kitchen table.  My mom asked me if I wanted it, or if she should put it in Goodwill.
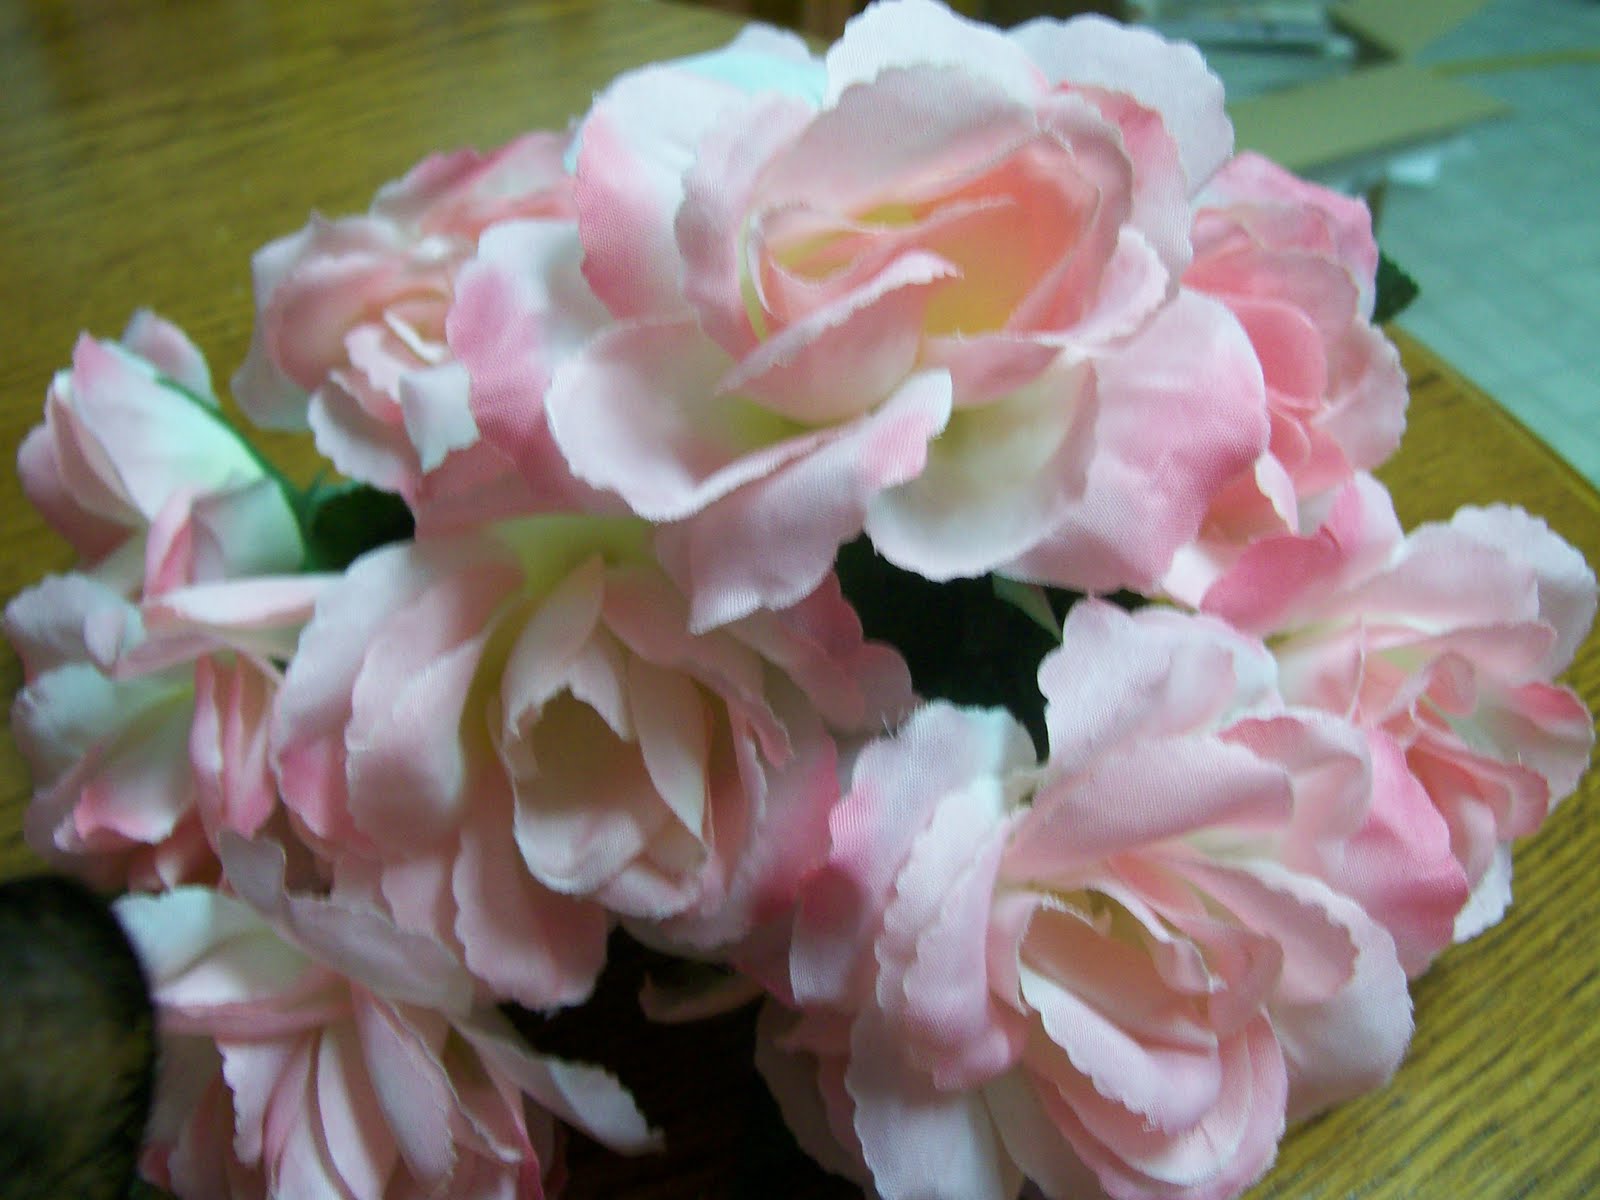
My stepdad looked up and said, “Throw that thing away.  You’ve been trying to give it away all week, and nobody wants it.”  Well, on that note, I decided I’d take it. Now here’s what it actually looked like originally:


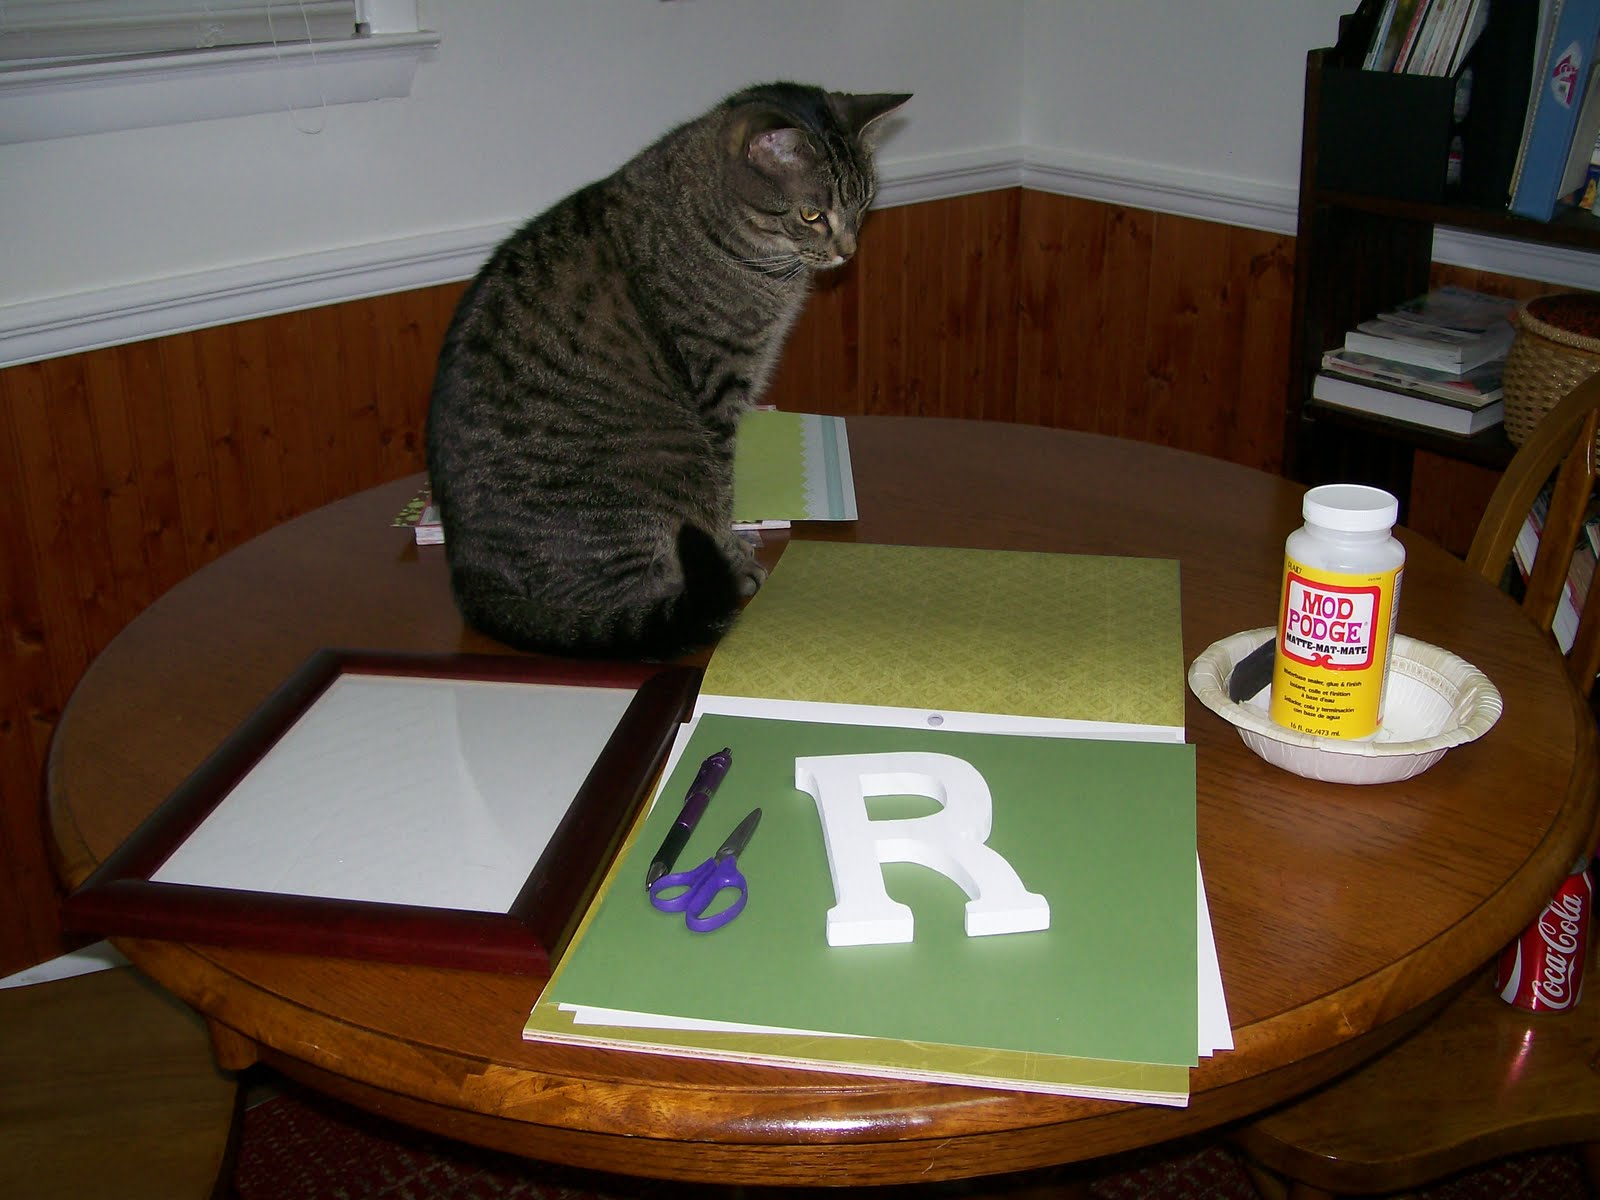
The vase was actually quite cute. It just didn’t match the flowers.  Mom suggested  I take the fake flowers out and just use it as a vase or a container for something else.  But I  actually liked the flowers.  My solution? Mod Podge of course!

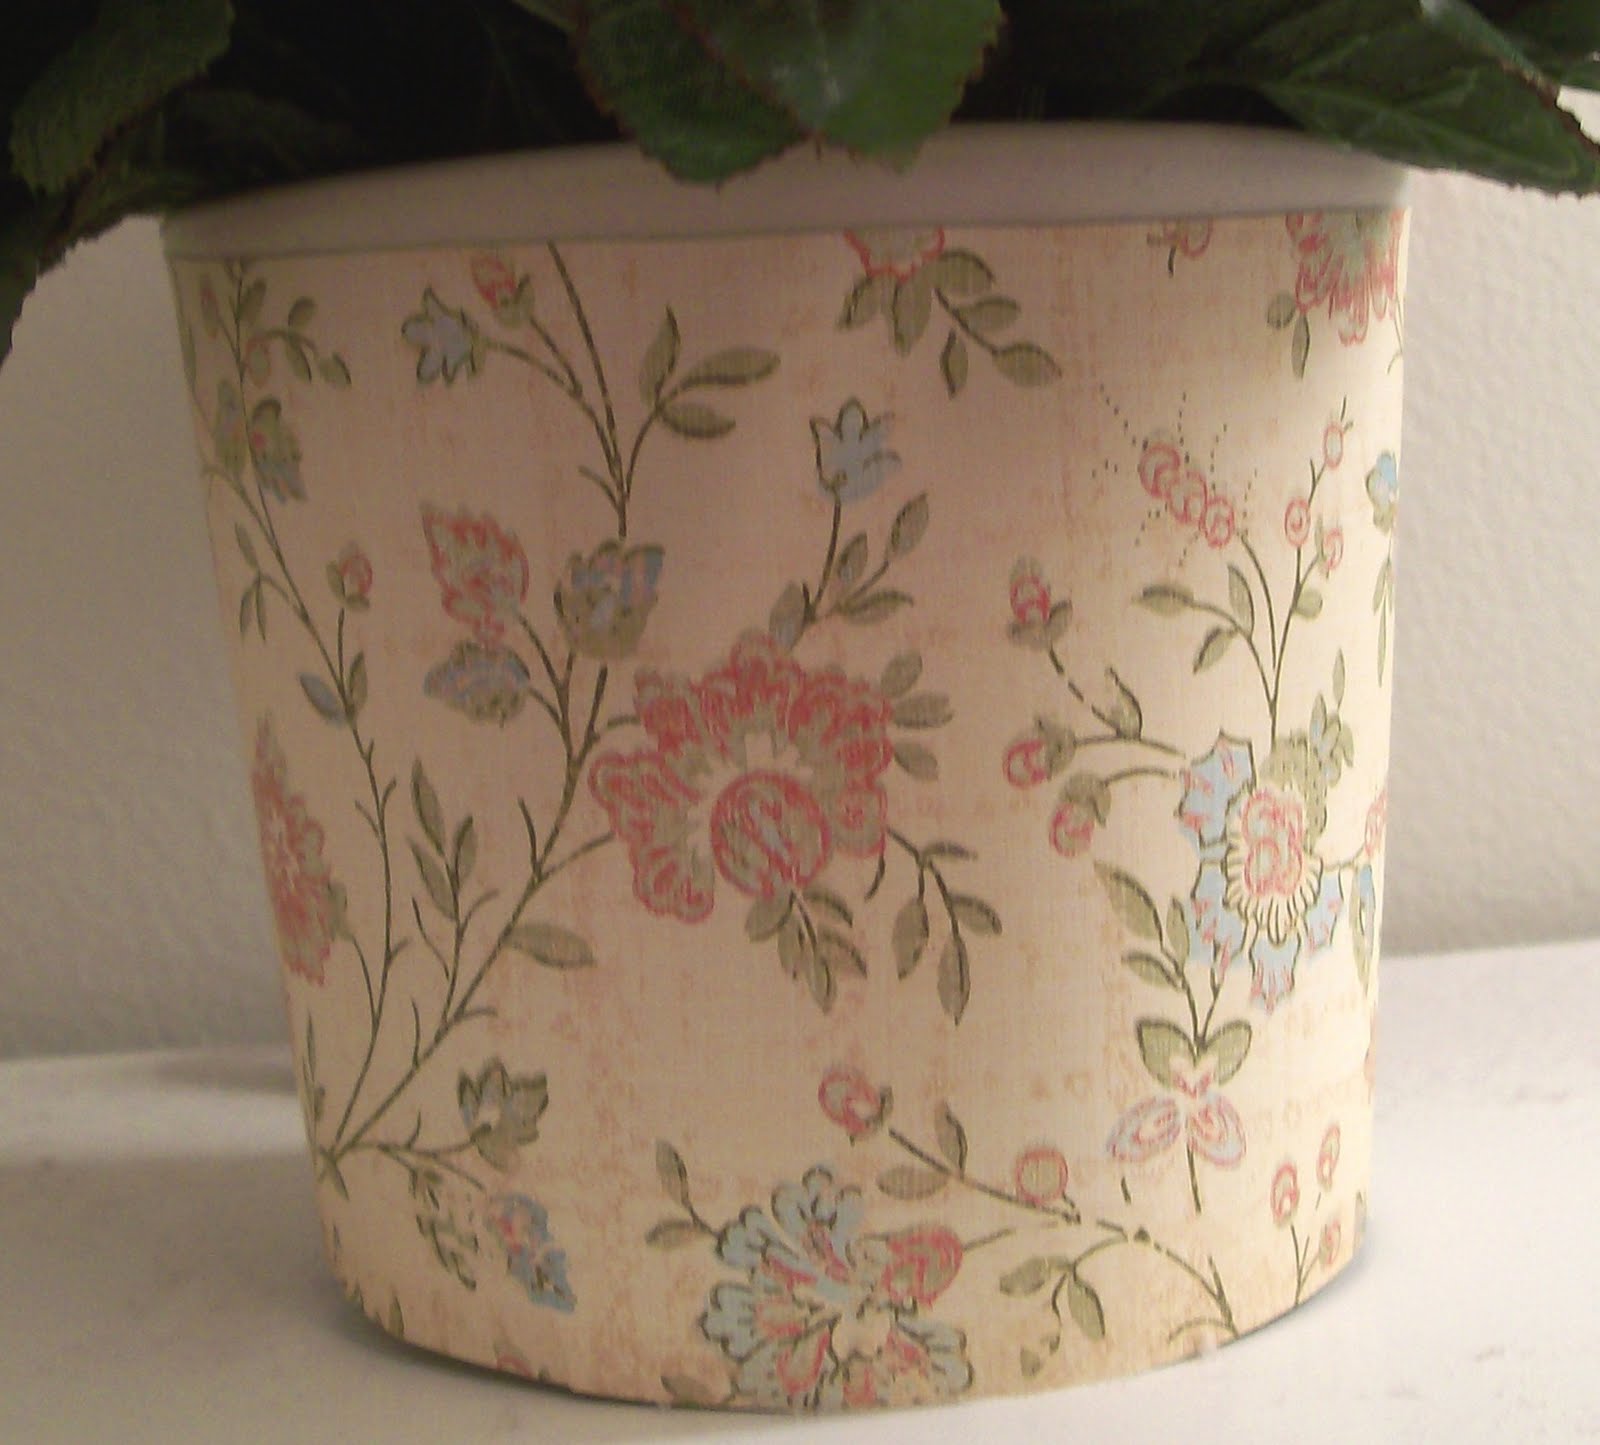
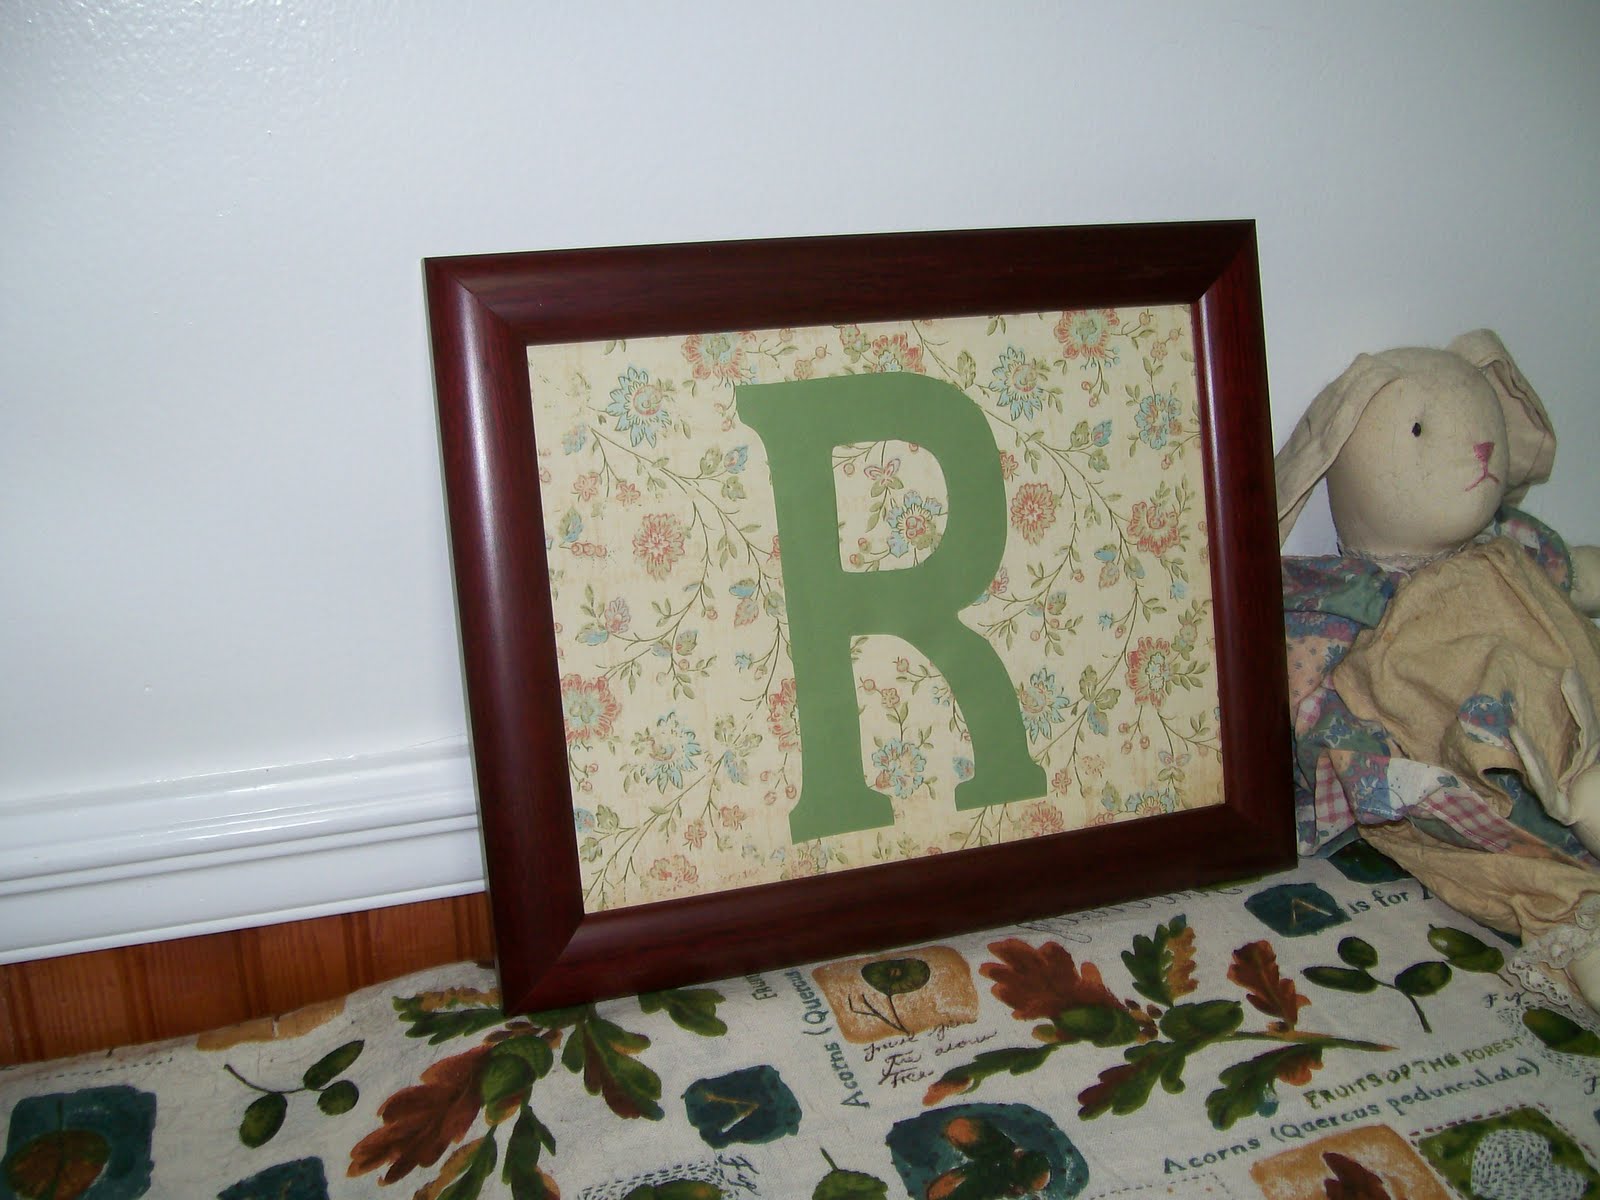
I simply took a little scrapbook paper, brushed on a little Mod Podge, wrapped it around the vase, and voila!  Flowers with a color coordinated vase!  I actually made it to match this Initial Art that I shared a few weeks ago. (But I didn’t stop there! Wait till you see the other items in my new colection!)


By the way, if you want to start on this project from scratch, simply find an old vase. (If you don’t have one around your house, you can always buy one at the thrift store or buy it new at the dollar store).  Then get some “florist foam.” (I’m using quotes because I don’t know if that’s what it’s called; that’s just what I call it!)  Alternatively you could use styrofoam. If you want to use the vase for real flowers you can order flowers online to switch up the look every once in a while.  Then just place it inside your vase, and then poke a bunch of flower stems in to it. Very easy!  Then decorate your vase as desired!

Photobucket

Easy Initial Art

I know this project has been going around the blogosphere for a while, but I made this a couple of weeks ago and just had to share, as it goes right along with some upcoming decor posts I’m doing.
And who knows? New ladies are discovering the blogosphere every day, and there may very well be someone here who hasn’t seen this.
I love this initial art idea because it’s easy and quick. (For someone who doesn’t have a lot of patience for a longterm project, this is a real plus!)  And I also love it because this is a great personalized item that you could make for anyone, to match any decor.

What You Need:
a picture frame
scrapbook paper
letter stencil
scissors
pen
Mod Podge
paint brush
(The cat is optional.)

Directions:
Use a stencil and pencil to trace your letter onto the back of a sheet of scrapbook paper. By drawing on the back side of the paper, you can avoid having lines on your letter.  (Just don’t forget to draw the letter backwards, or else when you cut it out, it will come out wrong.)
Next, if necessary, cut your scrapbook paper to size so that it fits in the frame.  Now take your paint brush and brush a little Mod Podge on the make of your letter. (I used the matte kind.) Allow to dry a few minutes.  Then take your paint brush and add a light coat of Mod Podge over the entire piece of scrapbook paper.  (Be careful not to use too much, or your paper will wrinkle.)
After your paper is completely dry, place it in your frame, and you’re done!

I’m linking up at these fabulous linky parties.

-Jerri

Szechuan Sweet & Sour BBQ Chicken (& Lawry’s Giveaway)

I don’t know anyone who doesn’t love summer grilling season!  Where I live, every weekend there’s some grilling going on in our neighborhood.  I know because we can smell it from our front porch!  Now Lawry’s is making the summer grilling season even more exciting with their new marinades.  Flavors include:
-Applewood & Plum – Juicy plums accent smoky applewood and add flair to all-American barbecue.
-Cilantro & Lime – Cutting across the diverse cuisines, this bright and zingy pair is a refreshing taste of summertime.
-Rosemary & Fig – Figs are an unexpected and regionally inspired match for aromatic rosemary.
-Chipotle & Maple – This culinary comingling deliver a fresh take on smoky, spicy and sweet.
-Brown Sugar & Bourbon – This duo brings a delicious dose of Southern charm to the patio.
-Cinnamon & Coffee – Bold and confident – with just the right edge of bitterness.
-Red Chili Sauce & Mango – The flavor of mango takes hot or sweet red chili sauce far beyond mere “condiment status.”
-Tuscan Sun Dried Tomato – Featuring extra virgin olive oil, sun dried tomatoes, sweet red bell peppers, and a blend of herbs and spices.
-Szechuan Sweet & Sour BBQ – features Chinese five spice blend with a touch of Szechuan heat.
Recently I got to try two of Lawry’s newest flavors: Szechuan Sweet & Sour BBQ and Tuscan Sun Dried Tomato. Not only are these marinades delicious, but they have a very unique taste.
I was very excited to serve the Szechuan Sweet & Sour BBQ Chicken to my husband last week. I’ve never made any chicken quite like this, and it was very well received. The marinade features a Chinese five spice blend, ginger, sesame oil, and red pepper. Just imagine the best sweet and sour chicken from your favorite local Chinese joint and then add a spicy kick and your back yard grill! The result is yummy!
As you can see from the photos, I served our chicken over a bed of Asian style rice and vegetables. This was perfect for a quick and inexpensive gourmet meal.  And I love that these are 30 minute marinades, so I don’t have to worry about doing the marinading the day before.  (Perfect if you sometimes have to throw something together at the last minute!)
I’m very excited to be trying the Tuscan Sun-Dried Tomato next and will be posting the food as soon I’ve made it. For this purpses of this post, I’ve gotten a taste of the marinade already. It’s an oil and vinegar based marinade, infused with sun-dried tomatoes, sweet red peppers, and a blend of herbs and spices, including rosemary and oregano. Yum! I’ll let you know how it turns out on food, but I can already tell you, if the taste of the marinade alone is any indication of how it will be on cooked meat, we are in for another super-delicious meal!

Win it!  One Simply Sweet Home reader will win a Lawry´s Get Grilling Kit. The kit includes: 
  •  Both of the new Lawry´s marinades: Tuscan  Sun-Dried Tomato and Szechuan Sweet & Sour BBQ
  • Lawry’s Seasoning Salt
  • A set of skewers.
  • Pyrex marinating dish.
Giveaway closed. Congrats to Rene at Three Boys and an Old Lady!

I’m happy to link up each week to some fabulous blog parties.
-Jerri
Disclosure:  The opinions in this post are my own.  For hosting this give away I received a Lawry’s prize pack like the one being given away.  I was not paid to post.  Lawry´s products, information and additional prize pack to give away are provided by Lawry´s through MyBlogSpark.

Summer Star Garland

You may remember the Easter Garland I posted on back in March.  I actually kept it up through spring, and then finally I decided I needed something new for summer.  So the other day I used the same concept behind the Easter Garland and made some star garland for the summer. 
I would have liked to have done this in red, white, and blue, but I didn’t have any  coordinating papers that I liked together, and I’ve decided I need to use some of the supplies I already have rather than going out and buying new stuff all the time, so I went with a red, green, and blue color scheme.

What You’ll Need:
Scrapbook paper
Ribbon
Scissors
Tape
Cookie Cutters
Pencil/Pen
Garland Tutorial:
-Use cookie cutters or stencils to trace shapes onto the back of scrapbook paper. You can use a single shape or multiple shapes. (I used 3 different size stars, and I used 4 different paper designs.)
-Next take your scissors and cut out the shapes. (I made 24 cut outs for a seven and a half foot string of garland last time and this time.)
-Cut off a line of ribbon. Make the ribbon as long as you like. I suggest cutting off at least a foot more than the intended length. (I made a 7 1/2 foot garland, but I actually cut about 8 1/2 foot of ribbon off. I used the extra length on each end to wrap it around the “edging” on the top of the cabinets.)
-Now attach the shapes to the ribbon. (I placed them about an inch to an inch and a half apart from each other.)
-There are a few different methods you can use for this. Liz from Hoosier Homemade  actually sewed the cutouts to the ribbon. I, however, am not a seamstress and decided to use a short cut method. I used tape to attach the shapes. I used two small pieces of tape on each shape (making a t or x with the tape on the back of each shape.) I used two pieces to make sure it was secured, and put them on there cross-ways so that the garland would be more flexible/movable. For this step you could also mod podge or a glue gun if you prefer. (I just used tape because it’s quicker, there’s no mess, and it would allow me to make adjustments if I needed to.)
-Then hang your garland and enjoy!

-Jerri
I am happy to link up my posts each week to some awesome Linky Parties.

Febreze Home Collection Review and Wal-Mart Giveaway

Summer is almost upon us! It’s time to make your décor shine as brightly as the July sun. I can’t think of a better way to do that than with the Flameless Luminary™ or New No-Spill Diffuser from Febreze Home Collection. Both are beautifully designed and come in an array of scents.

I recently had the chance to try both of these Febreze products, and I was very pleased with their appearance, functionality, and of course, their scent!
Flameless Luminary
“Turn heads with the soft flickering glow of a Flameless Luminary. Once you have a reusable base, changing scents is as easy as changing shades.”
I absolutely love the flameless luminary!  Whenever I light candles in my home, I have to keep a very close watch on them because we have 2 cats, so a flameless luminary is perfect for us.  The cherry blossom shade is very pretty, and it smells wonderful.  The scent fills the room, but it’s not too overwhelming, and it truly does look a light a real candle is flickering inside.  I also love that the light shuts off automatically after 4 hours to help you save your batteries and also save you the trouble of turning it off and on. 
I’m also happy to report that I recieved some extra shades.  I recieved an additional Cherry Blossom shade, 2 Willow Blossom Shades, and 2 Cranberry Pear shades.  I love all 3 scents that I recieved, and I love that each scent has a different design.  This is great if you want everything in your room to match, and it’s perfect if you like to change things up in your room.
I also love that this is easy to use and clean.  And it’s great to have an air freshener that not only gives your home a nice scent but can also serve as a piece of home decor. I love that!

New No-Spill Wood Diffuser
“When you live with children and pets, accidents happen. Luckily the No-Spill Diffuser with WoodWick® ambiance makes spills a thing of the past. Good looking and thoughtful, too — it’s exactly what you’ve been looking for.”
I also recieved the No-Spill Wood Diffuser.  I’ve used several forms of air freshener before, from the plug-ins, to can sprays, to candles, automatic sprays, and so forth, but I’ve never had a wood diffuser before.  And now that I’ve got my first one, I’m sure it won’t be my last.
Again, this is great if you have pets because you don’t have to worry about it getting spilled. The Wood Diffuser I received was Honeysuckle Orchid scented.  And let me tell you, it smells divine!  I’ve placed mine in the bathroom. We always keep our bathroom door shut so that the cats cannot go in unattended, so now whenever the door is opened the first thing I notice is the soft, sweet aroma of the diffuser.
Again, I love that this is easy to set up and use, and it’s not messy.  This piece would also go great in any room, and unlike some other air fresheners, it’s actually attractive and can blend in well with your decor.
More Products
The Febreze Home Collection is available in an array of premium designs and scents.  Products include the Scented Reed Diffuser, Soy Blend Candle, Room Spray, Flameless Luminary, and No-Spill Wood Diffuser.

Connect : 
~Febreze Home Collection on Facebook
~Febreze Home Collection at Walmart

Win it! To help you to try these Febreze Home Collection products, P&G has given me one $15 Walmart giftcard to award to one Simply Sweet Home reader. 


Giveaway closed. Congrats to DaMora at Mora Piggy!

-Jerri

Disclosure: I was not paid to write this post.  This product review was based on using complimentary Febreze products provided by P&G. Bloggers also received a Walmart gift card to share with their readers. P&G does not represent or warrant the accuracy of any statements or product claims made here, nor does it endorse any opinions expressed within this blogsite. The opinions are my own.

Bathroom Vanities: Classic and Contemporary

Your bathroom vanity area can make the difference between a good bathroom and a great bathroom. Today we’re going to explore a few bathroom vanities for your home.
I found the one pictured above to be one of the most unique I’ve seen.  It’s the first time I’ve seen a double vessel sink.  Looks pretty neat, I think.  And I like vanities that provide plenty of counter space and storage space, and this one definitely does that.  And it’s just a got a fun, contemporary appeal.
As far as the smaller vanities go, I really liked this this one.  I love cherry wood anyway, and this piece (as well as the one shown here ) reminds me a lot of hand built antique dressers I have in my home. Very simple and classic!
And here’s another one with antique appeal.  This one is an antique cherry vanity.  I don’t think I’ve ever seen a vanity that looked so elegance as this.  The claw feet and the detail work from top to bottom really had a lot to this piece.     
This vanity is a lot closer to what I think of when I hear the word vanity. It’s just basic and simple, but I think this one also has contemporary apeal to it. (I think it’s the color, or maybe it’s the handles.)  I really like the marble top on this one, and again, I like the counter and storage space options.
I’d really like your opinion on these vanities that feature the vessel sinks.  Maybe I’m behind the times, but I’d never seen one of these (except at a resturant) until a few weeks ago when one of my Friday Favorites participants posted about one they had installed.  I’m not sure if I’d ever get one of these, but I do think they look neat.  And I completely understand the appeal.  Perhaps I’d put one in a guest bathroom or a kid’s bathroom.  What do you guys think? 
And here’s another contemporary style (and I would say, very unique) vanity.  Here again, we have a vessel sink, although I think it would be a lot easier to get use to one like this.  In my opinion, it’s really not that different from your traditional vanities.  I think this would be a great choice for someone who wanted to go with something a little different and current, but didn’t really like the look of the other vessel sinks (or if you like the vessel sinks but you fear you’d grow tired of them after a a while). 
And finally this Avanty Oriental vanity also features the vessel sink.  I’ve browsed through several of these, and I’m intrigued.  I just think these look really cool.  Maybe it’s just because it’s new and different from everything else I’ve seen? Whatever the case, I guess I’d say if you’re looking for something new for your bathroom, and you want to go with something trendy and current, this may be the way to go.
-Jerri

—————————-
I’m posting a link to this post at:
Making the World Cuter Monday hosted by Making the World Cuter
Market Yourself Monday is hosted by Sumos Sweet Stuff
Marketing Mondays and Sharing Ideas Wednesday is hosted by The Trendy Treehouse
Show & Tell Wednesday is hosted by Blue Cricket Design
Tip Me Tuesday is hosted by Tip Junkie
Show & Tell Friday is hosted by Romantic Home
I’m Lovin’ It is hosted by Tidy Mom

Spring Wreath Revamp

I’ve seen so many cute wreaths on other blogs and in the future I want to make my own completely “from scratch” but for the sake of saving money, I created this one using stuff that I already had.
The wreath was actually given to me by dad.  It was on his front door for a while, and then it got transferred to the attic.  And rather than selling it at a yardsale for $2 or something, he asked me if I wanted it.  Of course I said yes!  And since then the wreath has adorned our front door for the past 2 springs and summers.  But I really wanted something a little different for spring…something to add a  little more color, so I simply added some pink flowers and voila! 
Here’s a picture of what the wreath looked like before.  I love the berries, but some of them are starting to fall off.  (Actually we got a glass door installed last year, and before it was installed the wreath was “exposed” to the outside, and birds frequently landed on it and tried to eat the berries, so I’m not surprised that they’re falling off.)  And again, I felt that it needed some color.
I had these two flower springs on hand. I believe these were 94 cents at Wal-Mart.  I added these to the wreath using the easiest method ever! 
I thought I might want to do something different with the wreath in the future, so I didn’t even use glue. I simply cut the flowers, leaving about 3-4 inches of the stem. (You’ll need wire cutters for this.) And then I wove the stems in through the wreath. Very easy!  And it looks so great from the outside!

-Jerri

—————————-
I’m posting a link to this post at:
It’s So Very Creative & It’s So Very Thrifty hosted by It’s So Very Cheri
Make it for Monday hosted by Cottage Instincts
Made it Mondays hosted by The Persimmon Perch
Making the World Cuter Monday hosted by Making the World Cuter
Make Your Monday hosted by Twice Remembered
Metamorphosis Monday hosted by Between Naps on the Porch
DIY Day at A Soft Place to Land
Market Yourself Monday is hosted by Sumos Sweet Stuff
Marketing Mondays and Sharing Ideas Wednesday is hosted by The Trendy Treehouse
What Your Working with Wednesday is hosted by Me and My Bucket
Show & Tell Wednesday is hosted by Blue Cricket Design
Tip Me Tuesday is hosted by Tip Junkie
Week End Review is hosted by Tator Tots & Jello
Star on Saturday is hosted by Craft-Werk
Penny Pinching Party is hosted by The Thrifty Home
Show & Tell Friday is hosted by Romantic Home

Survival Seed Review/Giveaway – Grow Your Garden!

Do you have an emergency food supply? Is your family prepared for a food shortage? In the event of a natural disaster, terrorist attack, and other catostophic events, it’s good to have the ease of mind in knowing that your family has plenty of food to eat.

Unfortunately most of us only stock enough food to sustain ourselves for a few weeks. For many of us, this is due to a lack of funds. If you live paycheck to paycheck, as many of us do, you buy what you can, which is generally a week or two weeks worth of groceries. But it’s also due to a sense or (as some would say) a false sense of security. As I stated in my previous post, we have the luxery of being able to go to the store anytime we want: today, tomorrow, next week, etc. And most us of never consider what it would be like if we did not have this opportunity. Most people have no idea what they would do in the event of a major disaster or even what they would do in the event of a personal emergency (job loss, accident, etc.)

One answer is to grow your own garden. Although maintaining a garden can be hardwork, it gives you the opportunity to be self reliant and continuously create a new food supply year after year. It also saves you a lot of money. Growing a garden is also a great project that you can work on with you family, and it can help you to teach your children about responsibility, self-reliance, and the value of hard work.


Today I’m giving away a survival seed pack from Hometown Seeds. The seed pack consists of Non-Hybrid Survival Seeds. This means that they are not genetically modified and they will produce true to variety seeds to replant for future harvests. The seeds have a 5 year shelf life (10 years, if frozen). And the package includes nearly a pound and a half of seed—enough seeds to plant 3/4 of an acre. Also, the seed pack sales for $35 and will yield about $600 worth of food a year!
The package also comes with a fabulous instruction booklet. This tells you everything you need to know to start growing your garden: when to plant, where to plant, crop spacings, germination periods, soil modification, etc.

Your Survival Seed Pack will include 16 varieties of seeds:

-Lincoln Peas (5 oz.)
-Detroit Dark Red Beets (10 grams)
-Kentucky wonder Brown Pole Bean (5 oz.)
-Champion Radish (10 grams)
-Lucullus Swiss Chard (10 grams)
-Black Beauty Zucchini (10 grams)
-Bloomsdale Longstanding Spinach (10 grams)
-Scarlet Nantes Carrots (10 grams)
-Long Green Improved Cucumber (10 grams)
-Golden Acre Cabbage (10 grams)
-Romaine Paris Island Cos Lettuce (5 grams)
-Golden Banterm Sweet Corn (5 oz.)
-Yolo Wonder Pepper (5 grams)
-Waltham Butternut Winter Squash (10 grams)
-Rutgers Tomato (5 grams)
-Yellow Sweet Spanish Onion (10 grams)

Win it! If you’d like to win your own survival seed pack (a $35 value) go to Hometown Seeds and tell us your favorite product OR tell me what crop you’d most like to have in your garden. Deadline: April 5

Extra Entries:
-One entry for following my blog publicly.
-Two entries for following me on twitter.

-One entry each time you link up at Friday Favorites during the giveaway period (3/19 edition through 4/2 edition).
-One entry for tweeting about this giveaway (limit one entry per day).
(Sample tweet: I want to win survival seeds for my garden http://bit.ly/assh9Y @SimplySweetHome.)
-One entry if you link up something for Sweet Thursday.
-Two entries if you display my button on your blog.
-One entry if you’re a fan on facebook.
-Three entries if you are subscribed to my Feedblitz mailing list.
-One entry if you follow Simply Sweet Creations.
-Five entries if you make a purchase from my etsy shop.

Rules/Restrictions: Giveaway is for US residents only. If you don’t have a blog or profile with a visible email address, please leave one with your comment so that I can contact you if you win.

-Jerri

———————————–

I’m posting a link to this post on the following sites:
Tempt My Tummy Tuesday is hosted by Blessed With Grace.
Homemaker Mondays is hosted by 11th Heaven’s Homemade Haven.
Tasty Tuesday is hosted by Balancing Beauty & Bedlam.
Works for Me Wednesday is hosted by We Are THAT Family
Tip Me Tuesday is hosted by Tip Junkie
Sharing Ideas Wednesday is hosted by The Trendy Treehouse
Friday Food is hosted by Mom Trends
Friday Foodie is hosted by Designs by Gollum
Finer Things Friday is hosted by Amy’s Finer Things
I’m Lovin It Fridays is hosted by Tidy Mom

It’s So Very Thrifty is hosted by It’s So Very Cheri
Show and Tell Friday is hosted by Romantic Home
Disclosure: I did not receive monetary compensation for this post. The opinions expressed here are my own. I received a seed pack in return for posting a text link and another package to give away to my readers.

MckLinky Blog Hop
Click here to see the entire Giveaway Blog Hop List….

The Need For Food Storage: How Much Food Do You Have on Hand?

photo credit: The Daily Telegraph

Is your family prepared for emergencies? My husband and I spoke with a network marketer who said that 95% of people just make a living. Whether they work as a store clerk or mechanic, or whether they’re a business owner, doctor, or lawyer, they have to keep trading their time into that profession in order for the income stream to continue. And for most of us, if we stopped working for a few weeks (because we lost our job, got sick or had to take care of a sick loved one, etc) it would create a big financial burden in a hurry.

And this not only applies to our finances but to our personal food supply. The majority of people only have enough food to sustain their families for a couple of weeks. For some people it may be more, but for others on a tight budget, it may be less. We’ve grown accustomed to living our lives day to day, knowing that we can go to the grocery store and get everything we need today, tomorrow, next week, and the week after that. And we give very little thought to food storage for emergency preparedness.
Think of all the things that could affect your personal food supply and/or your ability to get more food. Here are just a few things: tornado, flood, terrorist attack, civil unrest, massive power outages, inflation and even on a personal level, the loss of a job or income stream or a family emergency that prevents you from working.
Last summer we actually had a massive power outage that lasted for 3 days. I don’t know if you’ve ever been to Alabama in the summer time, but trust me, you don’t want to be without power for 3 hours, much less 3 days! Anyway–we managed to get some ice and transfer some of our refrigerated goods over to coolers, but unfortunately we had to throw some things out. And during that time we had to spend some our money on fast food.
That same week, many households were without power for 5 days. I remember reading in the paper about a lady who was in desperate straits because she’d just bought groceries before the power outage and now all her food was spoiled, and she simply couldn’t afford to take her family out to eat again. And because she only got paid every two weeks, she was in a quandary over how she could get groceries for the following week.
But what if the situation had been more dire? What if it had been a longterm problem?  For us, going 3 days without power seemed to drive us mad, not just because of the lack of internet, tv, and other luxeries, but because there was no way to cook our food or keep it cold. I can’t imagine what it would be like to be in that situation for a week, a month, or longer.  Can you?

We often read articles about emergency preparedness: having smoke detectors, a weather radio, a home evacuation plan, etc. But often food and water, the most vital things to our survival don’t get a lot of  mention.  I’ve been looking in to this topic, and as I prepared for the survival seed giveaway that I’m doing this week, I got inspired to create some other posts on this topic, starting with this one–sort of a mini series.

If you’re interested in learning more about this topic, I’ll be doing more posts on the subject in the next few weeks.  Also, later on today I’ll be launching the survival seed giveaway, which you are welcome to enter.

-Jerri

Work at Home Wednesday: Sock Sachets

This week I’m letting my resolutions and goals for the year begin, which includes coming up with a new schedule for my blogging and working to make this site a little more organized and structured.

On Wednesdays my plan is to do posts dealing with work at home topics. This could be anything from housekeeping tips and household projects to organizing or craft projects and even business ideas, tips, etc.for work-at-home-moms. And if I’m able to stay consistent with it and people like the future, I may turn it in to a linky event. What do you think?

For today’s post we have a simple and frugal project, and if you’re a packrat like me, you’ll definitely appreciate this. If you have old socks or baby booties around your house, why not turn them into sachets?
Sachets are so great to place around your home and in drawers for a fresh and pleasant scent, and by using socks or booties, you can save money and even create a personal keepsake.
Just take a really cute baby booty or sock that your child has outgrown and fill it with a little potpourri. (Find this at Wal-mart or the Dollar Store.) You could also use other scented items, including spices from your pantry. Cinnamon or nutmeg would be nice, and I read about an example where they used oregano & basil…interesting!
Or you could use anything else around your house with a pleasant scent. We had some lavender scented bath crystals, so I used some of these to make a sachet. Also, if you’re allergic or don’t like scented potpouri, you can put baking soda inside your sachets. There’s no fragrance to irritate you, and it will help deodarize your drawers and home.
After you’ve filled your sock or booty, tie it up with a cute ribbon. It makes a great keepsake for your home, or you could use them as gifts. Grandmothers would love to get one of these, and you could always add a couple of these to baby shower gift basket.
If you don’t have any kids, or you’re not too concerned with making anything cute, this is also a great project to use with just plain old socks. (You know the ones that should have been thrown away months ago!) Just take some scissors and cut off the toes off the sock (basically halfway between the toes and the heel. Then fill the sock with desired fragrance, and use a ribbon to tie it up, or tie the sock in a simple knot.

Does anyone else know some of some frugal craft or household projects made with things found around the house? I’d love some new ideas!

-Jerri


————————
I am pleased to link up this post at the following:
Works for Me Wednesday at We Are THAT Family
Hooked on Fridays at
Hooked on Houses
DIY Monday at
A Soft Place to Land

It’s So Very Creative hosted by It’s So Very Cheri
Make it for Monday hosted by Cottage Instincts
Made it Mondays hosted by The Persimmon Perch
Making the World Cuter Monday hosted by Making the World Cuter
Make Your Monday hosted by Twice Remembered
Metamorphosis Monday hosted by Between Naps on the Porch