Recipe of the Week: Lemon Easter Bread

Happy Easter everybody! I hope you’ve all had a fun holiday weekend!

Things have been a little out of whack for me this week. I didn’t do a Menu Plan Monday post for this past week, because my mom and stepdad were in town, and we did very little eating at our house. (hence, no MPM for me) And before they got here my schedule was filled with appointments (not to metion, a little housework), and after they got here, I spent the majority of my time with them, shopping, showing them all the sites, and that sort of thing. And on top of that, I’ve been feeling sick the last few days. So with all this going on, I haven’t had much time to devote to posting.

But I’m feeling a little better today, so here’s the recipe of the week. (better late than never). I was going to do another Easter dessert for this week, maybe even something you could make using leftover Easter candies, but in my search for recipes, I ran across this bread, and I decided to post it instead. This came from Taste of Home, and though it’s called Easter bread, it sounds like a good recipe for any occasion. As I’ve previously said, I love any and all breads, and I also happen to love lemon flavored desserts, so this is definitely a good combination for me. I hope you all enjoy it!

Ingredients:
1 package (1/4 ounce) active dry yeast
1/2 cup warm water (110° to 115°)
1 cup warm milk (110° to 115°)
1/4 cup butter, softened
1 package (3.4 ounces) instant lemon pudding mix
3 eggs, lightly beaten
5 to 5-1/2 cups all-purpose flour

Directions: In a large mixing bowl, dissolve yeast in warm water. Add the milk, butter, pudding mix, eggs and 3 cups flour; beat until smooth. Stir in enough remaining flour to form a soft dough. Turn onto a floured surface; knead until smooth and elastic, about 6-8 minutes. Place in a greased bowl, turning once to grease top. Cover and rise in a warm place until doubled, about 1 hour. Punch dough down. Turn onto a lightly floured surface; divide in half. Shape into loaves. Place in two greased 8-in. x 4-in. x 2-in. loaf pans. Cover and let rise until doubled, about 30 minutes. Bake at 350° for 25-30 minutes or until golden brown. Remove from pans to wire racks to cool. Yield: 2 loaves.

Recipe of the Week: Easter Bunny Cake

Hello all. This week’s Recipe of the Week is Easter Bunny Cake. This recipe is from Betty Crocker. (The link is below the pic) However, there are several other versions of the Bunny Cake all over the net. It’s a great treat for kids and adults of all ages.

I just love looking at all these great crafts & desserts for spring. Yesterday, when I wrote the Sweet Thursday post, I couldn’t help but hum to myself…..”in your Easter bonnet, with all the frills upon it.” Now suddenly I’ve got “The Bunny Song” from Vegetales in my head…and “Here Comes Peter Cotton Tale.” Is anyone else with me? No? Oh well, enjoy the recipe!

Bunny Bake

1 box cake mix. (the recipe calls for carrot, but I like yellow or white)
Water, vegetable oil and eggs called for on cake mix box
Tray or cardboard, covered with foil
1 container white frosting
1 cup shredded coconut
Construction paper
Jelly beans or small gumdrops
1 cup shredded coconut
Green food color

1. Heat oven to 350°F (325°F for dark or nonstick pans). Make and cool cake as directed on box for two 8-inch or 9-inch round pans.
2. Reserve 1 layer for another use or to make a second bunny. Cut 1 layer in half as shown in diagram. Put halves together with frosting to form body. Place cake upright on cut edge on tray.
3. Cut out a notch about one-third of the way up one end of body to form head (small end) as shown in diagram. Attach half of cutout piece from tail with toothpicks. Frost with remaining frosting, rounding body on sides. Sprinkle with 1 cup coconut. Cut ears from construction paper; press into notch on top. Use jelly beans for eyes and nose.
4. Shake 1 cup coconut and 3 drops food color in tightly covered jar until evenly tinted. Surround bunny with tinted coconut. Add additional jelly beans if desired. Store loosely covered.

High Altitude (3500-6500 ft): Follow High Altitude directions on cake mix box for two 8- or 9-inch round pans.

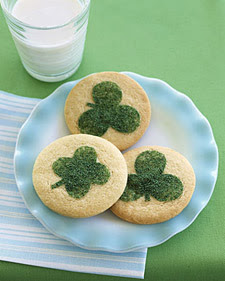
Recipe of the Week: Clover Cookies


Hello everybody. I’m proud to say that this is my 100th post! (yea!) It’s a small step for some, but a pretty big step and a great beginning for me. Thanks for visiting, and I hope you guys will continue to come back and read all my future posts.

Now it’s time for the recipe of the week. This week’s featured recipe is from Martha Stewart. On her website you will find not only the recipe but a video showing you how to make the cookies. Even if you have written instructions it’s always a plus to have a visual.

These Clover Cookies are cute, sweet, and fun! And you don’t have to be an artist to decorate them! The recipe is for St. Patrick’s Day (or spring, in general), but it is yet another recipe that can be applied to any holiday. I wish I had this recipe back around Christmas or Valentine’s Day! Enjoy and Good Luck!

Makes 50
4 cups sifted all-purpose flour, plus more for dusting
1/2 teaspoon salt
1 teaspoon baking powder
1 cup (2 sticks) unsalted butter
2 cups granulated sugar
2 large eggs
2 teaspoons pure vanilla extract
Green sanding sugar

Sift together flour, salt, and baking powder into a large bowl; set aside. Combine butter and granulated sugar in the bowl of an electric mixer fitted with paddle attachment; cream on high speed until fluffy. Beat in eggs

Reduce speed to low. Add flour mixture in two additions, mixing until well combined. Mix in vanilla. Divide dough in half, and cover with plastic wrap; refrigerate 30 minutes.
Preheat oven to 350 degrees. Roll out 1 piece of dough on a lightly floured work surface 1/8 inch thick. With a 3-inch cookie cutter, cut out 25 rounds. Working with 1 round at a time, place clover stencil on top; sprinkle surface with sanding sugar.
Arrange rounds on parchment- or nonstick baking mat-lined baking sheets. Refrigerate until firm, about 15 minutes, or until ready to bake. Repeat process with remaining dough.

Bake, one sheet at a time, until edges just start to brown, 10 to 12 minutes. Let cool completely on sheets on wire racks. Store cookies in an airtight container for up to 5 days.

Recipe of the Week: Chicken Florentine Casserole

This week’s recipe comes from All Recipes. It is for Chicken Florentine Casserole. Personally I’d leave out the mushrooms, as my husband and I aren’t too fond of the vegetable (except of course as an ingredient in cream of mushroom soup.) I’d also suggest adding angel hair pasta. Users of the All Recipes sites have made some other suggestions about the recipe that you may want to read as well.

Anyway, I don’t really eat spinach, but I love Spinach Dip, and one day when I went to each lunch with my mom at her resturant, she was having Chicken Florentine. The item was not something that was on the menu, but she told it could be made quite easily, topping a piece of grilled chicken with spinach dip; it was made even better by mixing some spinach dip with some pasta, and placing the chicken on top. I decided to try it, and I loved it. Last week I decided to search for a spinach dip recipe as well as a recipe for chicken florentine. This was seemed to be one of the easiest and most appetizing of all the ones that I found, so here it is. I hope you like it!

INGREDIENTS
4 skinless, boneless chicken breast halves
1/4 cup butter
3 teaspoons minced garlic
1 tablespoon lemon juice
1 (10.75 ounce) can condensed cream of mushroom soup
1 tablespoon Italian seasoning
1/2 cup half-and-half
1/2 cup grated Parmesan cheese
2 (13.5 ounce) cans spinach, drained
4 ounces fresh mushrooms, sliced
2/3 cup bacon bits
2 cups shredded mozzarella cheese
DIRECTIONS
Preheat oven to 350 degrees F (175 degrees C). Place the chicken breast halves on a baking sheet; bake 20 to 30 minutes, until no longer pink and juices run clear. Remove from heat, and set aside.
Increase the oven temperature to 400 degrees F (200 degrees C).
Melt the butter in a medium saucepan over medium heat. Stirring constantly, mix in the garlic, lemon juice, cream of mushroom soup, Italian seasoning, half-and-half, and Parmesan cheese.
Arrange the spinach over the bottom of a 9×9 inch baking dish. Cover the spinach with the mushrooms. Pour half the mixture from the saucepan over the mushrooms. Arrange chicken breasts in the dish, and cover with the remaining sauce mixture. Sprinkle with bacon bits, and top with mozzarella cheese.
Bake 20 to 25 minutes in the 400 degrees F (200 degrees C) oven, until bubbly and lightly browned.

Recipe of the Week: Maple Pork Chop Dinner


Okay, here’s something a little different for this week’s recipe. This idea comes from Pillsbury. This is a good meal that you can make in very little time and without dirtying up a lot of pans. It’s also a nutritious meal choice especially if you add another side item such as green beans, spinach, or turnip greens. Try it out and let me know how you like it!

5 (3/4-inch-thick) pork chops
Salt
Pepper
1(17-oz.) can sweet potatoes, drained*
1(16.3-oz.) can Pillsbury Grands Refrigerated Buttermilk Biscuits
3/4 cup maple-flavored syrup

DIRECTIONS
Heat oven to 400°F. Spray large nonstick skillet with nonstick cooking spray. Heat over medium-high heat until hot. Add pork chops; cook until browned on both sides. Place pork chops in ungreased 15x10x1-inch baking pan. Sprinkle with salt and pepper. Cover with foil. Bake at 400°F. for 10 minutes.

Remove pork chops from oven. Move pork chops to one side of pan; drain and discard drippings. Arrange sweet potatoes around pork chops. Separate dough into 8 biscuits; arrange in pan next to pork chops and potatoes. Drizzle syrup over pork chops, potatoes and biscuits.

Return to oven. Bake, uncovered, for an additional 17 to 20 minutes or until biscuits are golden brown and pork chops are no longer pink in center. If desired, brush biscuits with additional syrup before serving.

Recipe of the Week: Lovin’ Sweetcakes

This week’s recipe comes from Kraft. This is another very cute and tasty, yet very easy dessert to make. The recipe calls for strawberry flavored jello and uses pink and red sprinkles for a Valentine’s Day kind of feel. If you made Valentine cookies or some other dessert with sprinkles, then this recipe could be the perfect opportunity to use up the leftover sprinkles & stuff. And of course you can always use other flavors of jello or other colors of sprinkles to make cupcakes for all occasions. In fact this is the perfect light and fluffy recipe for spring time and great for St. Patrick’s Day or Easter. Enjoy!

1 pkg. (2-layer size) white cake mix
1 pkg. (4-serving size) JELL-O Brand Strawberry Flavor Gelatin, or any other flavor
1 tub (8 oz.) COOL WHIP Whipped Topping, thawed
1/4 cup seasonal colored sprinkles

PREPARE cake batter as directed on package. Stir in dry powered gelatin until well blended.
LINE 24 medium muffin cups with paper liners. Pour batter evenly into cups, filling each cup 1/2 full. Place a small marble or 1/2-inch ball of foil between each liner and one side of the cup, pushing the paper in to form a heart shape. Bake as directed on package for cupcakes. Cool completely; remove marble or foil.
SPREAD 2 Tbsp. whipped topping onto top of each cupcake. Decorate with sprinkles as desired. Store cupcakes in refrigerator.

Recipe of the Week: Sweet as Kisses Pie

Here we have another great Nabisco recipe. I searched and searched for a good recipe to feature this week. I found a couple several days ago, but I must have forgotten to bookmark them. Finally after searching several sites and finding nothing that I wanted to post, I ran across this delightful pie recipe. This pie is similar to other I’ve made, in that it’s base is cream cheese and cool whip (always a good combination). It’s tasty, a little on the light side (especially if you use reduced fat/sugar ingredients), and it’s with white, red, and pink color scheme, it is perfect for Valentine’s Day. And to top it off, it’s very easy!

Ingredients:
1 pkg. (8 oz.) Cream Cheese, softened
1/3 cup sugar
1 tub (8 oz.) Cool Whip Whipped Topping, thawed, divided
1 cup cherry pie filling
1 HONEY MAID Graham Pie Crust (6 oz.)
Preparation:
MIX cream cheese and sugar with electric mixer on medium speed until well blended. Gently stir in 2 cups of the whipped topping.
ADD pie filling. Cut through batter with knife several times for marble effect.
POUR into crust; spread with remaining whipped topping. Freeze at least 3 hours or overnight. Let stand 10 minutes before cutting into 8 slices.

My Tips:

-Fruit lovers can top this pie with extra pieces of fruit of fruit topping.
-Try this recipe using other kinds of pie feeling such as strawberry or blueberry.
-For kids, try topping with sprinkles and other decoration.
-For kids who aren’t fans of cherry, try substituting something they do like, such as a favorite candy bar.

Recipe of the Week: Chocolate and Cherries Fudge Torte

I’m a little later than usual on posting my recipe of the week, but I think this week’s recipe should be well worth the wait. I plan on posting some Valentine recipes over the next couple of weeks, and this is the first one. It was a hard choice this week; there is so much stuff out there! This recipe comes from Hersheys. Normally I’d have some kind of comment, but I think this one speaks for itself.

Ingredients:
1/2 cup (1 stick) butter or margarine, melted
1-1/4 cups granulated sugar
1 teaspoon vanilla extract
2 eggs
2/3 cup all-purpose flour
1/2 cup HERSHEY’S Cocoa
1/4 teaspoon baking powder
1/4 teaspoon salt
1 package (8 oz.) cream cheese, softened
1 cup powdered sugar
1/2 cup chilled whipping cream
1 can (21 oz.) cherry pie filling, chilled
1-3/4 cups (10-oz. pkg.) HERSHEY’S MINI KISSES Brand Milk Chocolates
Directions:
1. Heat oven to 350°F. Grease bottom only of 9-inch springform pan, or line 9-inch round cake pan with foil; grease bottom of foil.
2. Stir together melted butter, granulated sugar and vanilla in large bowl. Add eggs; using spoon, beat well. Stir together flour, cocoa, baking powder and salt; gradually add to egg mixture, beating with spoon until well blended. Spread batter into prepared pan.
3. Bake 25 to 30 minutes or until cake is set. (Cake is fudgey and will not test done.) Remove from oven; cool completely in pan on wire rack.
4. Beat cream cheese and powdered sugar in medium bowl until well blended. Beat cream until stiff; gradually fold into cream cheese mixture, blending well. Spread over top of torte; refrigerate several hours or until set. With knife loosen cake from side of pan; remove side of pan. (Or, lift torte out of pan, using foil; remove foil.).
5. Just before serving, put chocolates in 6-inch-wide heart outline in center of cake. Fill heart shape with cherries from pie filling; put chocolates all around outside edge. Serve cold, cut into wedges, with remaining pie filling. Cover; refrigerate leftover dessert. 10 to 12 servings.

Recipe of the Week: Fantasy Football Meatballs


Here in the United States, there will be a lot of buzz about the upcoming Super Bowl next week, and many households will be holding Super Bowl parties, big and small, next Sunday. For this reason, I decided to post an appetizer for the recipe of the week. Whether eaten as a finger food or put on a sandwich, meatballs are a tasty treat for any party or gathering, and this recipe from Smuckers is no exception. And even if you’re not a football fan, you can still enjoy this great snack.

Ingredients:
1 lb ground beef
1/2 cup fine dry bread crumbs
1/2 cup minced onion
1/4 cup milk
2 eggs, beaten
1 tsp salt
1/2 tsp Worcestershire sauce
1/4 tsp pepper
1/4 cup Vegetable Oil -or-
1 (16 ounce) pkg frozen prepared, bite-sized meatballs, thawed (about 32)
1 (12 ounce) jar Concord Grape Jelly
1 (12 ounce) bottle chili sauce

Directions:

1. COMBINE first eight ingredients, mixing well; shape into 36 one-inch meatballs.

2. COOK in oil over medium heat for 10 to 15 minutes or until browned. Drain on paper towels. 3. COMBINE grape jelly and chili sauce in a large skillet. Cook over medium heat, stirring until well combined, about 3 minutes.

4. PLACE cooked or thawed meatballs in a single layer in skillet coating each meatball evenly with sauce. Cover; simmer 10 minutes stirring occasionally, until sauce is bubbly and meatballs are heated through.

5. TRANSFER glazed meatballs to a chafing dish or slow cooker. Serve with toothpicks. Makes about 32 appetizers

Recipe of the Week: Chicken & Dumplings


In January I love eating soups, stews, and casseroles. So it seemed like the perfect time to feature something warm and hearty for the recipe of the week. This recipe for chicken and dumplings is a little different from what I think of as tradtional, Southern chicken and dumplings, but it’s still comfort food at it’s best.

Ingredients
2 cups chopped carrots
2 cups chopped potatoes
1-1/2 cups chopped parsnips
1 clove garlic, minced
2 bay leaves
1 teaspoon dried sage, crushed
1/2 teaspoon salt
1/4 teaspoon ground black pepper
2 pounds boneless, skinless chicken thighs, cut into 1-inch pieces
1 14-ounce can chicken broth
1 10-3/4-ounce can condensed cream of chicken soup
2 tablespoons water
1 tablespoon cornstarch
1/2 cup all-purpose flour
1/2 cup shredded cheddar cheese (2 ounces)
1/3 cup cornmeal
1 teaspoon baking powder
1/4 teaspoon salt
1 egg, beaten
2 tablespoons milk
2 tablespoons butter, melted
Directions
1. For stew, in a 4- or 5-quart slow cooker combine the carrots, potatoes, parsnips, garlic, bay leaves, sage, the 1/2 teaspoon salt, and pepper. Place the chicken on top of the vegetables. In a medium bowl gradually whisk broth into soup. Pour broth mixture over the chicken.
2. Cover; cook on low-heat setting for 8 to 10 hours or on high-heat setting for 4 to 5 hours.
3. If using low-heat setting, turn slow cooker to high-heat setting. With a wooden spoon, stir stew. Remove bay leaves; discard. In a small bowl combine water and cornstarch; stir into stew until combined.
4. For dumplings, in a medium mixing bowl combine flour, cheese, cornmeal, baking powder, and the 1/4 teaspoon salt. In a small bowl combine egg, milk, and melted butter. Add egg mixture to flour mixture. Stir with a fork until moistened. Use 2 spoons to drop dough directly on top of stew.
5. Cover; cook for 25 to 30 minutes more or until a toothpick inserted into a dumpling comes out clean. (Do not lift cover during cooking.) Makes 8 servings.
Prep: 25 minutes Cook: 8 to 10 hours (low), 4 to 5 hours (high); plus 25 minutes (high)