Bathroom Improvements

If you ever watch any of the home improvement and house selling shows on television, you know how much a bathroom makeover or remodel can improve the look and value of your home. When we moved in to our current home, a lot of improvements were made, particularly in the bathrooms. And I must say, it is just amazing to see the results of these types of improvements.

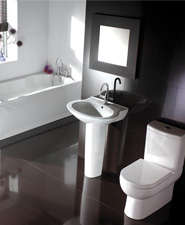
One thing that can greatly improve the look of your bathroom is a new bathroom suite.  This does so much to modernize the room and even makes the room look brighter.

Click Bathrooms specializes in quality branded bathroom goods which have excellent guarantees and the backup of UK distributors. Click Bathrooms offers affordable Bathroom suites to fit your budget, and they have many years of experience in advising in quality bathroom and showering goods.

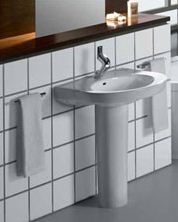
Click Bathrooms has thousands of products, ensuring that you will find exactly what you need for your baths. The products are made by high quality brands like MX trays, Just Trays, Lakes Bathrooms, Aqualisa, and Roman Shower.   And Click Bathrooms conveniently delivers their products directly to your door.

Check out their websites for ideas on how you can breathe new life into your bathroom!

Photobucket

Disclosure: This is a paid post. The opinions are my own.

Bedroom Makeover

I recently did a slight revamp in our bedroom….nothing fancy, just a new bedspread and curtains.  I love the bedspread that we had, but we’ve been using for a while, and I thought the room could use a splash of color.

Here’s a before picture:

And here’s the after:

And here’s a closeup of the bedspread: green with red/pink and white/tan flowers.

What do you think?

Photobucket

I’m linking up at Tidy Mom and these parties.

Big Spring Flower Wreath

I love the colors of spring!  This spring I’m welcoming people in to my home with the colors of this wreath on my front door! Isn’t it pretty?  
And before I go further, you’re right the door in the picture actually isn’t the front door. Actually I put it up this up in the living room last month, but I moved it to the front door a couple of weeks ago for the Easter and Mother’s Day holidays.  But I think, this time next month, I’m going to put it back up in the living room, as it goes with some other rose themed decor that I have.
There’s no tutorial today because I didn’t make this, although I wish I had!
But I do have a tip!  They have a lot of wreaths at Walmart that are similar to this.  You can find them in the craft section with the flowers  They start as low as $20 (perhaps even cheaper for something smaller), and then they go up in price from there.  That’s just about the best price you can find for something new. And for a wreath of this size and fullness, you can’t really beat it!
Even if you made your own, you’d spend about that much in materials for a wreath of this size  The only catch is that the back of it is a plastic frame as opposed to a metal frame, but you can’t see the frame anyway, so it’s pefectly good to me!

Linking up to these parties.

Photobucket

Spotlight on 1001 Sundials


Spring time is the time to get your yard and garden in order.  My husband’s never been real big on what kind of flowers we have in our yard, but  hedoes like yard decorations like stone statues and garden sundials.  And I have to admit, since being around my husband, I’ve developed a love for these sort of things as well.
1001Sundials.com was founded with a simple goal – to provide their customers the largest selection of sundials and armillaries at the best possible prices.
And they have a fabulous collection!  For this post, I thought it would be fun to share some photos of sundials that I and/or my husband would love for our yard.  We both love things that have an old, antique, or classic look, and we also love things that are whimsical or fantasy/mythologically themed, so there were a lot of things at 1001 Sundials that appealed to us, including the Armillary Sundial pictured above.  Here are some others:
Brass Butterfly Sundial


Brass Angel Sundial


Bronze Moon & Star Sundial
Cast Resin Time Passes Sundial
Visit 1001 Sundials for these and other Sundials and Armillaries.

Photobucket

Disclosure: This is a paid post written by me for 1001Sundials.com.  The opinions are my own.

Red Vignette and Valentine Garland

Today I’m sharing this cute display from my kitchen.  I’m in the process of doing a quasi-makeover in my kitchen.  For a while I’ve felt like my kitchen was having an identity crisis, and I decided that I’m going to make the predominate color in the room be red.
After Christmas I was taking down my decor, and trying to decide what to do with the top of this cabinet.  It’s very tall, and you can’t really see what’s on top of it very well, so it doesn’t need anything too showy, if you know what I mean. But it needed something.  Anyway, as I was putting my Christmas decorations away, I decided to place these red & white candles on top of this cabinet, and the vignette grew from there!

The above picture is how I had planned for it to look for most of the year. The candles are actually Christmas candles, but from the ground you can’t really tell.  Then I made the arrangement in the middle using some berry garland that I had.  And the cups were already on top of the cabinet.  I just filled them with red paper shreds so they would match.  And then I added the shiny red garland.  It’s actually Valentine garland, but again, from the ground you can’t really tell. 

And now for the finishing touch to make this vignette perfect for Valentine’s Day!  This adorable Valentine Heart garland was actually made by the super talented Liz of Hoosier Homemade.  Last year around this time, she had an assortment of giveaways. This garland was one of the prizes, and I was the lucky winner! 
Isn’t it the cutest! And you know how I said that you can’t see the top of the cabinet very well anyway, so it doesn’t really need too much stuff.  Well, now with all the red, it’s actually quite eye catching! Who knew!

So what do you think?

I’m linking up at these parties.

Photobucket

Berry Heart Wreath

With Valentine’s Day only a month away, (Wow, this month is going fast!) I thought it would great to share this really cute wreath I have on my door.  No, sadly, I didn’t make this.  I actually ordered it a few years back.  I was shopping around and I found a few things similar to it at Shop Wiki if you’d like to take a look.
Anyway, when we moved I packed it up, and I just got it out of our outbuilding this past fall.  So this is our first time to use it.  I really love using bright colors like red in the winter time, even after Christmas.  It really brightens things up and adds a lot of warmth.
What do you guys think?
Looking the wreath over, I see that it actually wouldn’t be hard to make one like this either.  You could easily purchase a round twig wreath at Hobby Lobby.  Then purchase a piece of berry garland, and then weave it through the wreath.  Then add just a little hot glue to hold the garland in place and fluff it out as desired.

I attempted to take some pictures of how the pieces of garland are woven through the wreath.  I’m not really sure how good you can see it though.

I also bought a piece of garland to match this wreath, and last week I actually used it on a few projects which I’m really excited to share with you in the coming weeks. So stay tuned!

I’m linking up to these fun craft and decor parties!

Photobucket

SSH’s Best in 2010: Projects

At the end of each year I like to revisit my posts from the year and highlight some of my favorites. I’ve never been a really crafty person, but this year I began trying my hand at Mod Podge and some other craft projects. Today we take a look at some of the things that I made throughout the year.

Next week I’ll be sharing Best in 2010: Food, so please come back and check it out!
I’m linking up this week to these linky parties.

Photobucket

Book Page Initial Wreath

Looking for a personalized Christmas gift?  Or something personalized for your own home?  How about a fun book page intial wreath!
I’ve absolutely loved looking at all the book page projects out in the blogosphere.  While my husband was out of town a few weeks ago, I finally got around to making one of my own.  For this design I was inspired specifically over the summer by someone who created a wreath using an embroidery hoop, except theirs had a fleur de lis in the center.  (If this was you, please comment or email me so that I can include a link to your project!)

Anyway, this was mostly made out of materials I had on hand at home. And it turned out so great that I’m planning a trip to craft store so I can make some more! My husband wants me to make one for his mother for Christmas, and I’m also planning to make something similar for my dad. He’s in the process of moving, and I think it would make a great Christmas and housewarming gift. And while I’m at at it, I’ll make one for my mom as well.
And I’ve also added the wreath to my shop and will take custom orders for anyone who’d like one for their home. For more information on this, including size, features, and pricing, just visit my shop.

For those of you who love to craft yourself, I’ll also be posting a tutorial for this very shortly. I’ll try to post it in the next few weeks when I have more time. It’s not a very difficult project to undertake. It was just kind of long and drawn out, and involved a lot of steps.  Till then, I hope you enjoyed this sneak peek!

I’m linking up at these fun craft and decor parties.

Photobucket

Mod Podge Bathroom Coordinates

Have you ever done a bathroom makeover? I don’t mean a makeover with a new vanity, cabinets, and floors.  I’m talking just a simple makeover: new shower curtain, rugs, towels, and coordinates.  These days even the simplest of makeovers can get a expensive.  But thanks to Mod Podge, you can now do a bathroom makeover on even the smallest of budgets!
Previously I shared my Flower Arrangement Revamp and my Easy Initial Art, and today I’m sharing some of the bathroom coordinates that I made over with just a little scrapbook paper and Mod Podge! And what’s even better about these makeovers is that I was able to use some really cheap (and I do mean cheap!) stuff that I already had on hand for the project

See what I meant by cheap?  I’ve had the jar on the left forever! This thing was in my bathroom at my dad’s house, and there’s no telling how long we’ve had it!  I used it as a cotton ball holder.  Because I can’t let go of anything it came with me when I moved out.  (It had a lid too, but that seems to have disappeared!)  And the basket on the right was something I bought at the Dollar Tree!

And next we have cocoa. Cocoa? Yes, Cocoa! I recently finished off this container of cocoa, and as I was throwing it away, something inside me screamed, “Don’t do it!” It just so happens that cocoa containers are the perfect size for storing so many things: Markers, Pens, Cosmetic Brushes, etc.

Here’s the trio together!  Quite an improvement, huh?  I should have gotten a better picture, but you’ll be able to see them a lot better when they’re actually on display in the bathroom.
As you can see, I didn’t mod podge the inside of the basket.  I thought about doing it, but it seemed kind of pointless because the basket was going to be filled with a makeup bag and supplies, so you won’t really see the inside anyway, and plus hubby and I are the only ones who will be in this bathroom.

And then I also put paper on this little set of drawers!  I actually didn’t Mod Podge this, but used tape instead.  I was very happy with the way it turned out!
In an upcoming post, I’ll show you the rest of the items, which includes a soap dish & toothbrush holder that I was actually thinking of putting in a yard sale box until I decided to do this instead! And you’ll get to see the bathroom with all the elements put together!
For a list of parties I’m linking up to, please check out the buttons in my sidebar or my Party Page
Photobucket

Flower Arrangement and Vase Revamp

I love the brightness and color that flowers add to a room.  A few months ago my mom and stepdad were cleaning out my step dad’s mom’s house. (His mother recently passed away.)  Among the possessions to be divided between the children, there were a lot of odds and ends that weren’t really worth anything and nobody really wanted.  So they either became trash or goodwill items.  The above flower arrangement was on her kitchen table.  My mom asked me if I wanted it, or if she should put it in Goodwill.
My stepdad looked up and said, “Throw that thing away.  You’ve been trying to give it away all week, and nobody wants it.”  Well, on that note, I decided I’d take it. Now here’s what it actually looked like originally:


The vase was actually quite cute. It just didn’t match the flowers.  Mom suggested  I take the fake flowers out and just use it as a vase or a container for something else.  But I  actually liked the flowers.  My solution? Mod Podge of course!

I simply took a little scrapbook paper, brushed on a little Mod Podge, wrapped it around the vase, and voila!  Flowers with a color coordinated vase!  I actually made it to match this Initial Art that I shared a few weeks ago. (But I didn’t stop there! Wait till you see the other items in my new colection!)


By the way, if you want to start on this project from scratch, simply find an old vase. (If you don’t have one around your house, you can always buy one at the thrift store or buy it new at the dollar store).  Then get some “florist foam.” (I’m using quotes because I don’t know if that’s what it’s called; that’s just what I call it!)  Alternatively you could use styrofoam. If you want to use the vase for real flowers you can order flowers online to switch up the look every once in a while.  Then just place it inside your vase, and then poke a bunch of flower stems in to it. Very easy!  Then decorate your vase as desired!

Photobucket