Archives for 2009

Kitchen Cabinet Solutions

I love organizing products. Whenever we go to Wal-Mart or Target, my husband does his best to keep me away from the organizing section! Below are some great organizing tools that you may like for your kitchen cabinets.
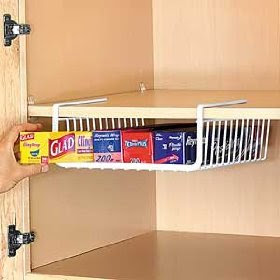

UNDER SHELF WRAP RACK – I actually keep my wraps and baggies in a drawer, but I used to keep them in a cabinet and probably still would if I had one of these. It makes it easy to grab what you need and keep all the stuff contained in an area without having to worry about stuff falling out.
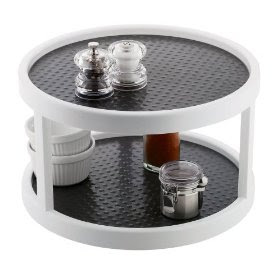

Copco 2555-9424 2-Tier 12-Inch Non-Skid Cabinet Turntable – I have one of these for my spacies. I use the bottom shelf for cooking spices and the top shelf for baking spices. It makes everything easy to find and access.


Tagco Spice Stack – White – If I didn’t have a turn table like the one above, I’d probably store my spices is a rack like this. It’s very compact and makes everything look neat and orderly.
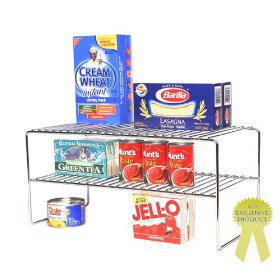

Double Chrome Helper Shelf – I’ve been thinking of purchasing one of these. I can think of a lot ways that I could possibly use this. This is a great tool that helps you to take advantage of all the vertical space in your cabinets. And you can use them for food, dishes, or even for bathroom storage.
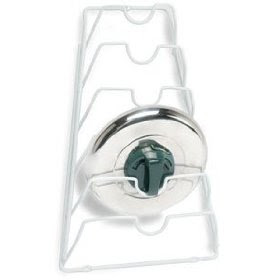

Cabinet Door Lid Rack – One cabinet that I want to work on in the future is the one where I keep pots and pans. And I love the idea of a rack to keep all the lids together. This particular one mounts one the door of your cabinet, but they make other kinds as well.

Door mount 8 Shelf Pantry Rack – I had one of these in our old apartment. The amount of cabinet space in the kitchen was terrible. So I had one of these on the door, on the inside of the laundry room. It was perfect for cereal, pasta, and other boxed items. And if you’re lacking in space, you may want to try this.

Chrome Pantry Can Goods Rack – This is another item I’d kind of like to try. We have a pretty good amount of cabinet space, but I probably don’t store as much as I could because I’m more concerned with it being organized. (All the green beans are in a row. All the corns are in a row. And I do stack everything, so even though it’s organized, it still looks crammed.) This could be a helpful tool make everything look a little more orderly.

-Jerri

Organizing Round Up: Cabinets

For the Organizing Round-Up at I’m an Organizing Junkie I worked on a few cabinets in my kitchen. Since we just moved here last fall, the cabinets weren’t terribly cluttered and they were already pretty well-organized, but I did make some slight changes.

My goal for this round-up was to take the space I have and re-arrange items within the space so that the space can be used to contain more items. So while, my tranformations aren’t very dramatic, I did at least accomplish this goal.

Also, check out my post on Cabinet Organizing Tips and Kitchen Organizing tools. Now onto my project:

Cabinet Above Stove: Before

After: I removed a few items from this cabinet and placed them in drawers or in the “spice cabinet” which you’ll see in another photo. And meanwhile, I took the baking mixes I had in my spice cabinet and placed them in this cabinet. The result: A neatly arranged cabinet of baking mixes and breakfast items.


Spice Cabinet: Before

After: I did some swapping around with some of the items from the cabinet above the stove. Result: The bottom shelf of this cabinet is a lot neater.

Bowls, Etc. Cabinet: Before

After: In this cabinet, I have my storage containers, baking dishes, bowls, and a few serving dishes. The only thing I did here was a little re-stacking, and I took some items from another cabinet and placed them in here. The Result: More items in one place, and I now have a little space to work with on the top.


Food Cabinet #1: Before. I went through a process with this one. I have a small pantry, so I store some of our food in this cabinet, as well as vitamins and prescription meds that my husband takes each day. And for the round-up project, I decided to clear some of this space so that more food could be stored here.

In this pic, as you can see, the top left hand shelf has been cleared of the bakeware that was there, and it now contains food. Also, the can goods that were on the bottom right have now been contained on the left hand side.
Later in the month, I decided to store some snacks in this cabinet, and bakeware on the middle right hand shelf got moved (to the cabinet with all the bowls and stuff). And come to think of it, this third picture looks worse than the original picture.

And finally I took the snacks out of their boxes and plaed them in the little white basket. I also managed to do a fix my husband’s medicine shelf with a little basket. The Result: A much neater cabinet with a little extra space to spare!

-Jerri

Cabinet Organizing Tips

This week I’ll be posting my Cabinet/Closet entry for the Organizing Round-Up. Here are a few general tips for organizing your cabinets:

  • Go through each cabinet and purge it of items you no longer need. If you haven’t used something in over a year, this may be a good time to rid yourself of it. (Place everything in a yard sale box, or give it away to a friend or family member.)
  • Match up all your containers with lids. Throw away anything that doesn’t have a mate.
  • Create a system for organizing your plastic containers and stick to your system. (I use gladware containers because they’re cheap to replace, and I can easily make 2 or 3 stacks of them in my cabinet.
  • Place items that you use most often on lower shelves and in the front of cabinets so that they are easily accessible.
  • Place items that you use less often on high shelves, in the back of cabinets, and in places that are harder to reach or get to.
  • Group similar items together.
  • Stack items to ensure that you take advantage of all the vertical space you have available.
  • Place items in a logical location. (Example: dishes near the dishwasher/sink, pots & pans near the stove, etc.)
  • Define the space & set parameters. (Example: This shelf will be used for mixing bowls. And this shelf will be for glasses and coffee cups. Etc.)
  • Use shelf dividers, baskets, and organizing tools to separate items, and use labels if necessary. (In an upcoming post, I’ll be featuring some great organizing tools for your cabinets.)

-Jerri

Recipe of the Week: Mexican Chicken Casserole

This week I’m sharing my Mexican Chicken Casserole. I’ve posted the recipe before in a Menu Plan Monday post, but since then I’ve taken more pictures of the casserole and wanted to post it by itself. And since we’re having it this week, it seemed like a good time to share it.

This is one of our favorite meals! It’s a pretty versatile recipe, and it makes a great make-ahead meal, and I think it would be good to freeze too. Enjoy!

Recipe for Mexican Chicken Casserole:


Ingredients:
2 cans chicken breast, drained or 3-4 boneless chicken breasts, cooked & chopped/shredded
1 reg bag tortilla chips (use as much as you like)
1 1/4 cup chicken broth or water (I use the broth drained off of the canned chicken)
2 cups grated cheddar cheese
2 cans cream of chicken soup
1 tablespoon chili powder
1 teaspoon garlic salt
1 – 1 1/2 cups of salsa (I don’t really put an exact amount)

Instructions: Spray 9X13 casserole dish with cooking spray. Mix together all ingredients except chips. Layer bottom of casserole dish with crushed chips. Then place part of the chicken mixture on top of the chips. Continue to layer chips and chicken mixture, ending with chips on top. Then sprinkle some additional cheese on top. Cover with foil and bake at 350 degrees for 45 minutes.

Tips & Suggestions
-I usually place a pile of chips on a plate and then serve the casserole on top of the chips. Additionally I get out additional salsa, shredded lettuce, extra cheese, and sour cream to go on top. You could also use peppers, onions, diced tomatoes, or any other topping with this recipe.

-Also, the original recipe included jalepeno peppers and rotel tomatoes with the chicken mixture instead of salsa.

-This is a great way to use up crumbled chips from the bottom of the bag. My husband hates eating small pieces of chips so I find that this is a great way to make sure that they don’t go go waste. Plus, you don’t have to work as hard to crush them.

Above is a photo of the casserole after it’s baked, and below is a picture of how it can be served. I like to place it on a bed of chips and top it with sour cream and extra cheese.

And if you like a little more heat, you can follow this example. In this photo, the casserole is served on a bed of chips, and topped with sour cream, cheese, salsa, and taco sauce.

-Jerri

———————————–

I’m posting a link to this post on the following sites:
Tempt My Tummy Tuesday is hosted by Blessed With Grace.
Homemaker Mondays is hosted by
11th Heaven’s Homemade Haven.
Making A Happy Home Monday is hosted by
As For Me and My House….
Kitchen Tip
Tuesdays is hosted by Tammy’s Recipes
Make Something Monday is hosted by
Go Graham Go! and Jolly Mom and Diana Rambles.
Tasty Tuesday is hosted by Balancing Beauty & Bedlam.

I Am Blissfully Domestic is hosted by Blissfully Domestic.
Ultimate Recipe is Swap is hosted by Life as Mom.

Menu Plan Monday for April 27

Before getting to this week’s menu, I want to tell everyone who may just be stopping in from Org Junkie about my Break Pal Giveaway. I’m giving away 5 memberships to the Break Pal Fitness Website. It’s designed specifically for bloggers and people who work at a desk job. So if you use a computer a lot, you should definitely enter to win!
Now for the menu: I’m planning for an easy week this week, because I have a lot of chores and things to do around the house. By the way, in case you tuned in for last week’s MPM post, I have to tell you that the Oven Chicken on last week’s menu was very good, but the next time I make it I’m going to pour about 1/2 cup of rice into the baking dish so it will cook up more like a casserole with just a little bit of sauce/juice over the actual chicken. I may also try it again without adding water, so that the sauce will be more thick. But anyway, it was good. My hubs really liked it. The pictures I took of the dish didn’t turn out so good, so I may have to make it again before I post it to see if I can get some better photos. But one way or another I will post it in the future. (Till then, just see last week’s post for a link.)
Breakfast: Cereal, Banana Muffins, Waffles, oatmeal

Lunch: salad, tuna sandwiches, chicken fingers, leftovers

Dinners:

Monday – Pork Sandwiches
Wednesday – Leftovers
Thursday – Hamburgers & Fries
Friday -Easy Alfredo, salad, garlic bread or biscuits
Saturday -Eat Out
Sunday -Smokey Mountain Chicken

Visit Org Junkie for more menus and recipes.

-Jerri

Break Pal Review and Giveaway

Can’t find the time to exercise? Finding it hard to stay fit when you’re sitting at a desk all day? Looking for a convenient alternative to the gym? Then you should try Break Pal. It’s a great site where you can access quick workouts every day.

Break Pal is devoted to “Fitness at Your Desk.” It is specially designed for people who work at a desk job and would be perfect for bloggers and people who own a computer-based home business.

Here’s how it works. You sign up for a free trial, and then download the Break Pal widget onto your computer. When you’re working at your computer, you’ll get an alert when it’s time to exercise. You can set your alerts to come at the intervals of your choice: every 15 minutes, 30 minutes, 45 minutes, or 60 minutes. You then click on a link to go to the list of exercises on the Break Pal website.

The site has a variety of exercises that can be done right from your desk such as stretches, Chi Kung, yoga, and Cardio Karaticise. (My favorite exercises are the Block Lunge exercises, which are Standing Cardio Karaticise.)

There are videos that walk you through each exercise. Each video lasts only a few minutes, which is perfect if you’re on a tight schedule, and it’s great for someone who wants to incorporate a short work out into their day. The exercises are fun and can be done by anyone, regardless of your current fitness level, and because each session only lasts a few minutes, you can avoid the fatigue, sweating, and shortness of breath that goes along with a lot of traditional workouts.

What I love about the site is the flexibility that it offers. I always find it difficult to get into a regular exercise routine, so having this widget is very helpful to me. And I love that each exercise routine only lasts a couple of minutes. This allows people of all fitness levels to participate, and it allows you to do the exercise regardless of how much time you have on your hands. It’s also great that you can set your alerts to come at different time intervals. This means that whether you’ll be at your desk for a couple of hours or all day long, you can set aside plenty of time to exercise.

The website also offers a point system for doing your exercises, and they have a network where you can make friends with fellow Break Pal users. You can also create your own profiles and post to an online blog about what your doing on Break Pal.

A membership to this website normally costs $9.95 per month. And today I’m happy to announce that BreakPal is going to give away A Free Membership to 5 lucky Simply Sweet Home Readers. Your membership will never expire, and it will give you access to the Break Pal Widget, all the great exercise routines, and other features on the site.

Giveaway Rules:
To enter, leave a comment telling me something that you think would like about Break Pal. (Don’t forget to leave your email address if you do not have a blog or profile so that I’ll be able to contact you if you win.)

Additional Entries: Please leave separate comments for each entry to ensure that all your entries are counted.

1. For one additional entry, you can tweet about the giveaway, or spread the word on another social networking site. Just leave a comment letting me know that you did that. (Please leave your username or a link.) You can make up your own tweet or use the following:
“New Giveaway – Break Pal Fitness Site Membership – 5 winners –https://simplysweethome.com/2009/break-pal-review-and-giveaway.html

2. You can also get 2 additional entries if you do a blog post on the giveaway. Please mention my blog and Break pal in the post, and be sure to link back to my blog. (Please leave two separate comments saying that you posted about the giveaway, and in one or both of your comments, leave a link to your post.)

3. You get one additional entry if you sign up today to be a Follower of my blog via blogger, a feedblitz subscriber, an RSS/Atom feed subscriber, or if you subscribe in a reader. Just leave a comment telling me how you subscribe. (1 Entry for Each Method through which you follow.)

4. To reward current subscribers, I’m also offering an additional entry if you are ALREADY a follower of my blog or a Feedblitz subscriber, prior to this giveaway. (Just leave 2 comments saying that you are already a subscriber.)

5. Become a Fan of Simply Sweet Home on Facebook, or follow jhrivers on Twitter (1 entry each).

6. And one additional entry will be given if my button is posted in your sidebar. (Just leave a comment saying that you have my button.)

This giveaway is now closed. Winners will be announced over the weekend.

-Jerri


———————————-
I’m posting this at the following carnivals:

Life as Mom and The Shabby Nest for Frugal Friday.

The Springtime Giveaway Carnival at Heavenly Homemakers.

Works For Me Wednesday at We Are That Family

New Award

DarcyLee at In This Season gave me this Kreativ Blogger Award. Thanks DarcyLee. It was nice of you to think of me.

One of the rules to this award is that I must list seven things I love….only 7? Okay!

1. My Husband.
2. My cats.
3. My family & friends.
4. My country.
5. Blogging & doing creative stuff.
6. Good music & Good Food.
7. Learning/Education (I’m a nerd!)

Now I must pass this award along to some great bloggers. It’s always so hard choosing, because there are so many great blogs out there. This time I’ve chosen a handful of blogs that are kind of new to me, some of which I found during the Ultimate Blog Party.

Brea’s Mommy
Peanut Butter and Smelly’s Dad
GEORGIKIDS
Kara’s Kitchen Creations
Katiecakes
Teresa’s Treasures
Sweet Southern Journey

Congrats and keep up the good work!

-Jerri

Recipe of the Week: Crispy Ranch Chicken

This week I’m sharing one of favorite chicken recipes. It’s one of the first dishes I made for my husband while we were dating, and it is super yummy!

Recipe for Crispy Ranch Chicken


Ingredients:

1 can cream of chicken soup

1/2 cup milk

1 envelope (1 ounce) ranch salad dressing mix

4 boneless, skinless chicken breasts

1 1/2 cups of crushed tortilla chips

2 tablespoons butter or margarine

Directions: In shallow dish, mix soup, milk, and salad dressing mix. Reserve about a cup for sauce. Dip chicken into soup mixture. Coat with tortilla chips. Place chicken on greased baking sheet. Drizzle with margarine. Bake at 400 degrees for 20 minutes or until done. In small sauce pan, heat reserved soup mixture to boiling. Serve with chicken.


Normally I put in some different suggestions and variations on the recipes, but I think this one is perfect as is. I suppose you could leave the chips out or use something else such as bread crumbs for the crispy part. Or you could use this recipe/technique with various types of sauce. Let me know if you have any good ideas!

-Jerri

———————————–

I’m posting a link to this post on the following sites:
Tempt My Tummy Tuesday is hosted by Blessed With Grace.
Homemaker Mondays is hosted by
11th Heaven’s Homemade Haven.
Making A Happy Home Monday is hosted by
As For Me and My House….
Kitchen Tip
Tuesdays is hosted by Tammy’s Recipes
Make Something Monday is hosted by
Go Graham Go! and Jolly Mom and Diana Rambles.
Tasty Tuesday is hosted by Balancing Beauty & Bedlam.

I Am Blissfully Domestic is hosted by Blissfully Domestic.
Ultimate Recipe is Swap is hosted by Life as Mom.

Menu Plan Monday for April 20

I’m a little late with the menu. It was sort of a busy weekend because my husband started his 7 days off (yay!). And yesterday evening when I tried to get on the computer, the internet was down due to storms in the area.
But I did manage to plan a good menu for this week. I’ve got a new recipe to try plus an old favorite that we haven’t had in a while, and one of our favoirtes Mexican Chicken Casserole.
Hope you’re all having a good Monday!
Breakfasts: cereal, chocolate chip muffins, cinnamon toast or monkey bread
Lunches: chicken fingers,tuna sandwich, turkey sandwich, salad, leftovers
Dinners:
Monday – Sloppy Joes
Tuesday – Oven Chicken (new recipe), rice, and Great Northern Beans (from the freezer)
Wednesday – Leftovers from Tuesday
Thursday – Broccoli Cheddar Chicken & Mashed potatoes
Friday – Eat Out
Sunday – Not sure…possibly leftovers
Visit Org Junkie for more menus and recipes.

-Jerri

Town Hall For Hope

I just found out about this free event that’s coming up next Thursday, April 23. The Town Hall for Hope is being hosted by Dave Ramsey, financial couselor and author of The Total Money Makeover. (If you’re interested in getting out of debt or managing your money better, you should check him out.)

The Town Hall for Hope is a nationwide event. It’s an opportunity for people to come together and listen to Dave Ramsey talk about the economy, the recession, foreclosures, and other topics. After the presention, Dave will be taking questions through email & Twitter and answering them live.

This event is FREE to the public and there are many host locations. Just go the website and type in your zipcode to find a location near you. (There are over a dozen locations within 15 miles of my house, and I live in a small town, so it looks like there’s a location for everyone.)

And if you can’t attend an event, then you can view the town hall from your living room via YouTube. For more information on this event, go to The Town Hall for Hope.


-Jerri


———————————-
I’m going to share this post for Frugal Friday over at Life as Mom.