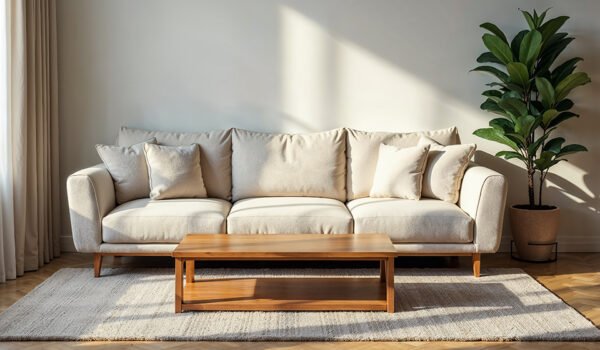
Why is Your Pool Water Cloudy?

Cloudy pool water is a common issue that can make your pool look uninviting and indicate underlying problems with water quality. Understanding the reasons behind cloudy pool water and knowing how to address them is essential for maintaining a clean and safe swimming environment. While some issues can be tackled with DIY methods, hiring a professional like Pinnacle Pool Service ensures that the problem is resolved efficiently and thoroughly. Here’s why your pool water might be cloudy and why professional help is often the best solution.

Common Causes of Cloudy Pool Water

1. Imbalanced Chemicals
One of the primary reasons for cloudy pool water is an imbalance in the pool’s chemical levels. Proper chemical balance is crucial for clear water, and imbalances can lead to a variety of issues.
High pH Levels: High pH levels can cause calcium to precipitate out of the water, creating a cloudy appearance.
Low Chlorine Levels: Insufficient chlorine allows bacteria and algae to grow, leading to murky water.
High Alkalinity: High alkalinity can result in scaling and cloudiness.

2. Poor Filtration
Your pool’s filtration system plays a vital role in keeping the water clear by removing debris and contaminants. When the filter is dirty, clogged, or not running long enough, it can’t effectively clean the water, leading to cloudiness.

3. Environmental Factors
External factors such as heavy rain, pollen, and debris can introduce contaminants into your pool, overwhelming the filtration system and causing cloudy water. Regular maintenance is essential to manage these environmental impacts.

4. Algae Growth
Algae can turn pool water cloudy and give it a greenish tint. Algae growth is often a result of poor chemical maintenance, inadequate circulation, and insufficient cleaning. Even if the water doesn’t appear green, microscopic algae can still cause cloudiness.

5. Organic Contaminants
Sunscreen, body oils, sweat, and other organic contaminants introduced by swimmers can cloud the water. These contaminants can combine with chlorine to form chloramines, which not only cloud the water but also produce a strong chlorine odor.

6. High Calcium Hardness
Excessive calcium levels in the pool water can lead to calcium scaling, which makes the water appear cloudy. High calcium hardness can be caused by using hard water to fill the pool or by adding calcium-based pool products.

Steps to Clear Cloudy Pool Water

1. Test and Balance Chemicals
The first step in addressing cloudy water is to test the pool’s chemical levels using a reliable test kit. Check the pH, chlorine, alkalinity, and calcium hardness levels. Adjust the chemicals as needed to bring them within the recommended ranges:
pH: 7.2-7.8
Chlorine: 1-3 ppm
Alkalinity: 80-120 ppm
Calcium Hardness: 200-400 ppm

2. Shock the Pool
Shocking the pool involves adding a large dose of chlorine to break down organic contaminants and clear the water. Follow the manufacturer’s instructions for the appropriate amount of shock treatment based on your pool size. This process helps eliminate bacteria, algae, and other impurities.

3. Clean the Filter
Ensure your pool filter is clean and functioning correctly. Backwash sand and DE filters, or clean cartridge filters to remove trapped debris. A clean filter is essential for maintaining clear water.

4. Brush and Vacuum
Brush the pool walls and floor to remove algae and debris that might be contributing to the cloudiness. Use a pool vacuum to clean the bottom of the pool thoroughly. Regular brushing and vacuuming help prevent the buildup of contaminants.

5. Improve Circulation
Run the pool pump and filter for at least 8-12 hours a day to ensure proper circulation and filtration. Check that the pump and filter are in good working order and not obstructed by debris.

6. Use a Clarifier
Pool clarifiers can help clear cloudy water by causing small particles to clump together, making it easier for the filter to remove them. Follow the manufacturer’s instructions for the correct dosage and application.

Why You Should Hire a Professional
While DIY methods can be effective for addressing some causes of cloudy water, hiring a professional pool service offers several advantages:

Expertise and Precision – Professional pool technicians have the knowledge and experience to diagnose and treat the root causes of cloudy water accurately. They can identify chemical imbalances, filtration issues, and other underlying problems that might not be obvious to a pool owner.

Comprehensive Cleaning – Professionals use advanced tools and techniques to provide a thorough cleaning. They can reach and clean areas that are difficult to address with standard equipment, ensuring that all contaminants are removed.

Regular Maintenance – Hiring a professional service ensures consistent and regular maintenance. Professionals can perform routine tasks such as testing water chemistry, cleaning filters, and inspecting equipment, preventing problems before they start.

Time and Convenience – Maintaining a pool requires time and effort. By hiring professionals, you can save time and avoid the hassle of managing pool maintenance yourself. This allows you to enjoy your pool without worrying about its upkeep.

Long-Term Savings – Improper maintenance can lead to costly repairs and replacements. Professionals ensure that all aspects of your pool are properly cared for, extending the life of your pool and its equipment, and saving you money in the long run.

Conclusion: Keep Your Pool Crystal Clear
Cloudy pool water is not only unattractive but also indicates potential issues with your pool’s maintenance. While DIY methods can provide temporary solutions, hiring a professional pool service ensures that the problem is addressed thoroughly and efficiently. Professionals bring expertise, precision, and convenience, ensuring that your pool remains clean, safe, and enjoyable year-round. Trust the experts to maintain your pool and enjoy the peace of mind that comes with crystal clear water..3

What Should You Check First When Moving Into A New Home?

When you’re moving home, it’s easy to focus on what you can do to make it easier and to make the process of getting in there smoother, but you should start thinking about what you’re going to do once you’re in there, too. Your first thoughts might be to unpack and decorate, but it’s important to make a few checks in the home, as well. A few of these are likely to have been completed during a home inspection if you ordered one, but if you haven’t, you need to do them yourself (with the help of a professional, in some cases). Otherwise, it’s a good idea to give them a quick once over even if you did get an inspection.

Source – CC0 License


The HVAC

When moving into a new home, one of the first essential checks should be the HVAC system. Ensure that the heating, ventilation, and air conditioning system is in good working order. Inspect the system for signs of wear and tear, and verify that it has been regularly serviced. Efficient HVAC systems are crucial for maintaining a comfortable indoor climate and good air quality, preventing issues such as mold growth and respiratory problems.


The Roof

The roof is a critical component of any home, protecting against weather elements and maintaining structural integrity. Inspect the roof for any signs of damage, such as missing shingles, leaks, or sagging areas. A damaged roof can lead to water infiltration, mold growth, and significant structural damage. Ensuring that the roof is in good condition will help avoid costly repairs and maintain the home’s safety and comfort. Even a single or a couple of missing tiles can cause leaks in the home, so don’t let any lingering roof damage remain too long.


The Utilities

Check the plumbing and electrical systems thoroughly before moving into a new home. Look for any signs of leaks, corrosion, or outdated plumbing fixtures. Work with a plumbing expert to give your systems a once over to make sure that everything is running well, you’re getting good water pressure, and there are no signs of issues that might lead to damage down the line. Ensure that the electrical system is up to code and that there are no exposed wires or malfunctioning outlets. Functional utilities are essential for everyday convenience and safety, preventing potential hazards such as water damage or electrical fires.


The Security

Assess the security features of your new home to ensure it provides a safe environment for you and your family. Check that all doors and windows have secure locks and consider installing additional security measures such as alarm systems, motion-sensor lights, and surveillance cameras. If you have any valuable belongings that you don’t want to make easily available, then investing in a strong safe for the home might be worth spending a little time and money on, as well. A secure home can provide peace of mind and protect against potential break-ins and theft.


The Foundation

The foundation of a home is fundamental to its structural integrity. Inspect the foundation for any cracks, settling, or signs of water infiltration. Foundation issues can lead to significant structural problems, affecting the entire home. Addressing any concerns with the foundation early on can prevent costly repairs and ensure the long-term stability of your new home. Keep a look out for the signs of foundational damage in the home, such as wall cracks, as well as what you can do about it, depending on the source of any potential damage.


The Garden

The garden or outdoor area of your new home should also be inspected for potential issues such as pests and weeds. Check for signs of pest infestations, which could affect not only your garden but also the interior of your home. You can get to know the pests that are common to your area, as well, and invest in some pest prevention methods to stop them from finding a home in your garden, even if you don’t already have one. Ensure that the landscaping is well-maintained and free of invasive weeds that can damage plants and structures. Get a good idea of what routine care your garden will need to put together a schedule, too. A healthy garden contributes to the overall aesthetic and environmental quality of your home.


It’s not uncommon for a newly bought home to come with a little work for you to do to get it into the shape that you want. However, you want to avoid being surprised by any major lingering issues, so be sure to be thorough both during and after the buying process.

5 Essential Steps To Build Your Dream Home

Everyone has a dream home in their mind, but few people actually get to turn it into reality. When you get the chance, you’ll naturally want to jump on it.

Trying to build your dream home, however, can be a long and complicated process. There’ll be a lot to do, and you’ll need to juggle seemingly countless tasks. As much as you’ll have to do, it doesn’t mean it has to be impossible. Quite the opposite. It’s just a matter of following the right steps.

While some of these will be obvious, others mightn’t be. It’s worth diving into five steps that could be relatively easily overlooked.

Build Your Dream Home: 5 Essential Steps

1. Actually Understand Your Budget

Before you start planning the construction of your dream home, make sure you actually know what your budget is. This goes beyond knowing how much you have to spend.

Start by knowing how much you can spend on the project, and then break this down into different categories. These can include the contractors, materials, and even the furniture after the house has been built. Once you know all of this, you’re in a better position to actually plan everything out.

Don’t forget to include some funds in case anything comes up during construction.

2. Double-Check Local Building Codes

Before you start construction, it’s worth being aware of any local building codes that could affect your dream home. Make sure you’re as familiar with them as possible.

These could have much more of an impact on your dream home than you could’ve thought. You’ll have a specific image of your home in your head, but that doesn’t mean everything about the house will be permitted. Quite the opposite. A few things mightn’t be allowed at all, so you’ll have issues if you construct it that way.

To avoid needing to remove these and rebuild in a different way, know the local codes.

3. Pick The Right Builders

You’ll naturally need contractors and professionals to build your dream home. Make sure you take the time and effort to actually find the right ones for your needs.

You’ll want to make sure everything’s perfect, after all. By spending time researching different options, like an Altoona home construction specialist, you can make sure the project’s in the right hands. With how much of an impact the builders have, there’s no reason not to spend some time and effort on this.

While that could mean spending a little more on your contractors, it’ll be worth it once the home is built.

4. Invest In Quality Materials

Speaking of spending some money on the project, make sure you invest in the materials you use, too. These play a significant impact in your home long-term.

Cheap options mightn’t last too long, and you’ll find yourself needing to make more and more repairs as time goes on. They’ll turn your dream home into a nightmare before you know it. By actually investing in your materials, however, you’ll avoid that. You’ll make sure the materials – and your home – actually lasts a while.

You’ll still need to make repairs at some point or another, but not nearly as much as you otherwise would.

5. Stay Involved In Construction

Once you’ve got everything lined up, construction should begin relatively quickly. You’ll know to trust the contractors you hired for the job.

That doesn’t mean you should stay completely hands-off with the project. Instead, it’s worth staying involved, at least to a small degree. Visiting the site regularly and checking in on what’s being done to make sure it’s all going the way it should. It’ll help give you peace of mind as the construction happens.

Even having regular meetings with the professionals in charge of the project helps. That way, you know how construction’s going and everything else you need to know.

Build Your Dream Home: Wrapping Up

Everyone has a dream home in their mind, but that doesn’t mean all of them get to turn it into reality. If you have the chance, then it’s worth taking the plunge on.

Actually building your dream home can be daunting, and even complicated, when you start on it, though. Thankfully, it doesn’t have to be nearly as overwhelming as you might think. It’s just a matter of making sure you take all of the right steps, even the ones that can be relatively easily overlooked.

Once you do, you’ll see your dream home take shape, and you’ll be living in it before you know it.

First Time Maintaining a Lawn? Here’s What You Should Know

So, you’ve got your first lawn and you’re excited to turn it into a lush, green paradise? Before you get started, it’s important to know that maintaining a lawn isn’t just about mowing the grass. It takes a bit of effort, some know-how, and a few good habits to make your lawn lush and healthy. Don’t worry though, it’s not rocket science and anyone can learn it!.

So let’s walk through the basics together so you can keep your lawn looking fantastic.

Source: Unsplash (CC0)

Learning more about your lawn

First things first, you need to understand what kind of grass you have. Different types of grass have different needs. For example, Kentucky Bluegrass loves cooler weather and a bit of shade, while Bermuda Grass thrives in warm, sunny climates. Knowing what you’re working with helps you give your lawn the care it needs. As such, do a bit of research or ask a local gardening expert about your grass type.

Once you know your grass type, it’s time to think about soil. Healthy grass starts with healthy soil. You might want to get your soil tested to check its pH levels and nutrient content. This might sound complicated, but it’s as simple as sending a sample to a local extension office or using a home test kit. Balanced soil pH and nutrients ensure your grass has the right environment to thrive.

Watering at the right time

Watering is a key part of lawn maintenance, but more isn’t always better. It’s all about consistency and timing. Watering deeply and less frequently is usually best. This encourages the grass roots to grow deep into the soil, making your lawn more drought-resistant. Aim for about one inch of water per week, including rainfall.

The best time to water your lawn is early in the morning. This way, the water soaks into the soil before the heat of the day causes it to evaporate. Avoid watering in the evening because it can lead to mildew and disease. Using a sprinkler system with a timer can help you stick to a good schedule without too much effort.

Feeding your lawn

Just like people, lawns need a supply of food to stay healthy. Fertilizing your lawn gives it the nutrients it needs to grow thick and green. There are lots of options out there too, but liquid fertilizer is a great choice for beginners because it’s easy to apply and quickly absorbed by the grass, giving your lawn a quick boost.

When using liquid fertilizer, make sure you follow the instructions on the label. Too much fertilizer can burn your grass, while too little won’t be effective. Typically, you’ll want to fertilize in early spring and again in late summer or early fall. This ensures that your grass gets the nutrients it needs during its most active growing periods.

Taking care of a lawn is an important part of home maintenance. But with the right knowledge and a few good habits, your lawn will be the envy of the neighborhood in no time.

Expert London Removals: What You Need to Know

Moving house is always difficult, let alone when you’re moving to a place in London. It’s the busiest city in the UK with terrible roads and millions of people. Attempting the move alone is borderline crazy – you need expert London removals to guide you through the process. What does this entail? Plenty of things become part of the moving process when you work with an experienced moving company. The points in this post explain what happens so you know what to expect from the process!

Start by finding the best removal company

Begin with an extensive Google search to find the best removal companies in the London area. You’ll find loads of businesses offering removals in South London, Central London and many other areas of the city – including all the London boroughs. Your first port of call is ensuring the company covers the area you’re in/moving to, so you know they’re experienced with the road layouts and can get around with no issues.


From here, you’ll have a shortlist to narrow down – consider the following when selecting your expert London removals company:


● What services do they provide?

● How expensive are they?

● Do they have the right level of insurance?

● Are they certified?

● How much experience have they got?

● What do previous customers say about them?

● Have they been recommended by friends/family?


Following your research, you should be able to pick one removal company to handle your move. You’ve filtered all the results and found a business that adheres to your unique needs and is experienced in London removals.

Pick the main services you require

The next stage of the removal process is picking the services you need for your move. This can include any of the following:


● Expert packing services

● Self-storage services

● Car transportation services

● Valuable items removal services

● Large items removal services


The list goes on, and some people may only need one or two services in addition to the general moving service. You could need a company to help you move your belongings to a London home, and you may also want them to help pack everything. It’s up to you; think about how you’ll benefit from the services and if they’re worth paying for. If you’re severely strapped for time, paying extra for a company to pack your belongings and unpack them at your new London home makes a lot of sense. Likewise, you may need them to move large items of furniture or musical instruments – like pianos – as you can’t physically do this.

Arrange a suitable moving date

What constitutes a suitable moving date? It depends on your situation; if you can be flexible, a good moving date is during the week, outside of rush hour times. Pick a date that gives you enough time to prepare for the move so you’re not overly stressed about it.


In many instances, you’re unable to be flexible due to the nature of your move. Perhaps you’re forced to move because you’ve sold your home, and the new owners are moving in on a certain date. This means your moving date has to come before this, so you can be out of your old house before the new owners start setting up shop and to avoid any awkwardness.


Regardless, try your best to move during the week, as London removals on weekends can prove difficult. There’ll be a lot of foot and vehicle traffic in the city, which is why you should pick a time outside of the normal busy hours.

Acquire all the packing supplies

Any good moving company in London will provide packing supplies for you to use. Some throw these in as part of their removal package, while others sell them individually. Grab all of the following:


● Sturdy removal boxes

● Packing tape

● Bubble wrap for protection

● Wardrobe boxes


Armed with all the right packing supplies, you can start packing your life up, ready for the move. If you choose to pay for the removal company to do this, then you need to arrange for them to come over and start packing before the moving date.

Get ready to move

After packing everything, you’re ready for the move! All that’s left is to wait for the moving date and let the expert moving company take over. Working with an experienced company helps immeasurably and takes all the stress out of moving to or from London. You’ve seen the main

steps involved and what to expect; now, head out there and kickstart the moving process for real.

How to Identity and Treat Cut Edge Corrosion on Industrial Structures

Cut edge corrosion is a common issue in industrial structures, especially those made from metal. It occurs when the protective coating on the edges of metal sheets deteriorates, leading to rust and structural damage. Addressing cut edge corrosion promptly is crucial to maintaining the integrity and longevity of industrial buildings. In this article, we’ll explore how to identify and treat cut edge corrosion on industrial structures effectively.

Understanding Cut Edge Corrosion

What is Cut Edge Corrosion? Cut edge corrosion occurs at the unprotected edges of metal sheets where the protective coating has been compromised. This often happens during the cutting and shaping process, exposing the bare metal to the elements. Over time, exposure to moisture, oxygen, and other environmental factors leads to rust and corrosion.

Why is it a Problem?

Cut edge corrosion can weaken the structural integrity of industrial buildings, leading to potential safety hazards and costly repairs. It also affects the aesthetic appearance of the structure, which can be detrimental to businesses relying on their facilities’ appearance.

Identifying Cut Edge Corrosion

Visual Inspection

The first step in identifying cut edge corrosion is a thorough visual inspection. Look for signs of rust, discolouration, and flaking paint along the edges of metal sheets. Pay special attention to joints, seams, and areas exposed to harsh environmental conditions.

Professional Assessment

For a more detailed analysis, consider hiring a professional inspector. They can use specialised tools and techniques, such as ultrasonic testing and magnetic particle inspection, to detect hidden corrosion that may not be visible to the naked eye.

Regular Maintenance Checks

Implementing a routine maintenance schedule can help identify cut edge corrosion early. Regular checks allow for timely intervention before the corrosion causes significant damage.

Treating Cut Edge Corrosion

Surface Preparation

Before treating cut edge corrosion, it’s essential to prepare the surface properly. This involves cleaning the affected area to remove rust, dirt, and debris. Methods such as wire brushing, sandblasting, or using chemical rust removers can be effective.

Applying a Rust Converter

A rust converter can be applied to the cleaned surface. This chemical treatment converts rust into a stable, non-reactive compound, preventing further corrosion. It also provides a suitable base for subsequent coatings.

Reapplying Protective Coatings

Once the rust converter has dried, reapply the protective coatings. This typically involves priming the surface with a rust-inhibiting primer, followed by a topcoat of paint or sealant. Ensure that the coatings are compatible with the metal type and environmental conditions of the structure.

Sealing Edges

To prevent future cut edge corrosion, seal the edges of metal sheets with a high-quality sealant. This creates a barrier that protects the exposed metal from moisture and contaminants. Regularly inspect and maintain the sealant to ensure its effectiveness.

Preventing Cut Edge Corrosion

Using Pre-Coated Materials

One of the best ways to prevent cut edge corrosion is to use pre-coated materials during construction. These materials come with a protective coating that extends to the edges, reducing the risk of corrosion.

Proper Installation Techniques

Ensure that metal sheets are installed correctly, with minimal cutting and exposure of bare edges. Use appropriate tools and techniques to minimise damage to the protective coating during installation.

Regular Maintenance

Implement a regular maintenance schedule to inspect and address any signs of corrosion early. This includes cleaning, touch-up painting, and reapplying sealants as needed.

Environmental Considerations

Consider the environmental conditions of the industrial structure. In areas with high humidity, salt exposure, or industrial pollutants, additional protective measures may be necessary. This could include using corrosion-resistant materials and coatings designed for harsh environments.

The Role of Professional Services

Specialised Contractors

Hiring specialised contractors with experience in treating cut edge corrosion can ensure effective and long-lasting results. These professionals have access to advanced tools and materials, providing a higher level of protection for your structures.

Regular Inspections

Professional services can offer regular inspections and maintenance programs tailored to your specific needs. This proactive approach helps to identify and address potential issues before they escalate.

Expert Advice

Professionals can provide expert advice on the best materials, coatings, and techniques to prevent cut edge corrosion. They can also recommend products and methods suited to your industrial structure’s unique requirements.

Conclusion

Cut edge corrosion is a significant concern for industrial structures, but with proper identification, treatment, and prevention strategies, its impact can be mitigated. Regular inspections, using pre-coated materials, and employing professional services are key to maintaining the integrity and appearance of your industrial buildings. By addressing cut edge corrosion promptly and effectively, you can ensure the longevity and safety of your structures, ultimately saving on costly repairs and downtime.

FAQs

What causes cut edge corrosion?

Cut edge corrosion is caused by the exposure of unprotected metal edges to moisture, oxygen, and environmental contaminants, leading to rust and deterioration.

How can I identify cut edge corrosion early?

Regular visual inspections and professional assessments can help identify cut edge corrosion early, allowing for timely intervention.

What treatments are available for cut edge corrosion?

Treatments include surface preparation, applying a rust converter, reapplying protective coatings, and sealing edges with high-quality sealants.

Can cut edge corrosion be prevented?

Yes, using pre-coated materials, proper installation techniques, regular maintenance, and considering environmental conditions can prevent cut edge corrosion.

Why should I hire professional services for cut edge corrosion?

Professionals offer specialised expertise, advanced tools, and tailored maintenance programs, ensuring effective treatment and prevention of cut edge corrosion.

Essential Home Maintenance Tasks To Get Done Now That The Soultice Has Passed

Can you believe the days are getting shorter already? Yep, it’s that bittersweet time when we say goodbye to those blissful summer evenings. But, hey, it’s also the perfect moment to get your house all set for the chillier times ahead. Let’s go through some super important jobs you should definitely not skip in the coming months.

1. Inspect And Upgrade Insulation

First up, let’s talk about staying warm. And not just with a nice cup of coffee—though that sounds pretty good, right? I’m talking about making sure your house keeps the warmth inside. You might want to think about getting one of those insulation companies to take a look at your setup. They can check out your current insulation situation and fix up any spots where heat might be sneaking out. This can really help in keeping those heating bills from skyrocketing.

2. Clean And Repair Gutters

Moving on to gutters—yeah, not the most glamorous task, but oh-so necessary. After all the summer storms and autumn winds, these guys can get pretty gunky. Clear out all that mess so rainwater can do its thing without making a mess of your home’s foundation or, heaven forbid, inside your house. It’s all about being proactive.

3. Service Your Heating System

Now, about keeping your toes toasty when the frost hits: it’s time to give your heating system some TLC. Have a professional come out to do a thorough check—think changing the filters, making sure the thermostat is not playing tricks on you, and generally ensuring everything’s running smoothly. Trust me, you don’t want your furnace bailing on you in the dead of winter.

4. Check For Drafts And Seal Leaks

There’s a sneaky chill in the air, and it might be slipping through the cracks around your windows and doors. Do a little detective work and hunt down those drafts. A bit of weather-stripping or some caulking can work wonders and keep your home warm inside without any unwanted cool air blowing in.

5. Prepare Your Fireplace

If you’ve got a fireplace, let’s get it ready for those cozy fire-lit nights. Call in a chimney sweep to clear out all the buildup from last year. It’s a must to avoid any scary surprises like chimney fires. Plus, make sure your damper is doing its job to keep out drafts when you’re not basking by the fire.

6. Test Home Safety Devices

This one’s a no-brainer but easily forgotten. Test all your smoke detectors and carbon monoxide detectors. Swap out old batteries for new ones, and don’t forget to check the dates—some of these gadgets need replacing after a decade.

7. Care For Your Lawn And Garden

Last but not least, give your green space some love. Aerate your lawn to keep it breathing easy, seed the sparse patches, and maybe throw on some fall fertilizer to keep it fed and happy. Also, trim back those perennials, tidy up dead annuals, and mulch your beds to keep your plants cushy until spring comes round.

There you have it—tackle these tasks now, and you’ll be all set for whatever the weather throws your way. Plus, you’ll have peace of mind, which, let’s be honest, is pretty priceless. So, grab your to-do list, and let’s get cracking!


Top Benefits of Sealing Your Driveway in 2024

Driveways play a significant role in the overall aesthetics and functionality of a property. As we move into 2024, the importance of maintaining and preserving your driveway cannot be overstated. One of the most effective ways to achieve this is through driveway cleaning and sealing. This article will explore the top benefits of sealing your driveway and explain how these services are used in construction and property maintenance.

1. Enhanced Aesthetic Appeal

Improved Appearance

Sealing your driveway significantly enhances its appearance by restoring the colour and giving it a clean, polished look. A well-maintained driveway can dramatically improve the curb appeal of your property, making it more attractive to visitors and potential buyers.

Protection Against Stains

Over time, driveways can accumulate stains from oil, grease, dirt, and other substances. Sealing creates a protective barrier that prevents these stains from penetrating the surface, keeping your driveway looking clean and new for longer.

2. Increased Durability and Longevity

Protection from the Elements

Driveways are exposed to various weather conditions, including rain, snow, and UV rays, which can cause significant wear and tear. Sealing provides a protective layer that shields the surface from these elements, preventing cracks, erosion, and other forms of damage.

Resistance to Wear and Tear

The protective layer created by sealing makes the driveway more resistant to daily wear and tear. This includes the impact of heavy vehicles, foot traffic, and other physical stresses that can cause damage over time.

3. Cost-Effective Maintenance

Reduced Repair Costs

By sealing your driveway, you can prevent many common issues that lead to costly repairs, such as cracks, potholes, and surface deterioration. Regular sealing extends the life of your driveway, reducing the frequency and cost of repairs.

Easier Cleaning

A sealed driveway is much easier to clean and maintain. The smooth, sealed surface prevents dirt and debris from getting embedded, making it simpler to sweep or wash away any accumulated grime.

4. Environmental Benefits

Prevention of Weed Growth

Weeds can find their way into the smallest cracks and crevices in an unsealed driveway, causing further damage and creating an unsightly appearance. Sealing your driveway prevents weeds from taking root and growing, reducing the need for chemical weed killers.

Reduced Water Runoff

A properly sealed driveway can help manage water runoff more effectively. The sealant prevents water from penetrating the surface, reducing erosion and runoff that can contribute to environmental degradation.

5. Safety Improvements

Slip-Resistant Surface

Driveway sealing can improve the texture of the surface, making it less slippery when wet. This is especially important in areas that experience heavy rainfall or snow, where slippery surfaces can pose a safety hazard.

Enhanced Visibility

A clean, well-maintained driveway improves visibility, reducing the risk of accidents. Sealing can enhance the contrast and colour of the driveway, making it easier to see at night or during inclement weather.

How Driveway Cleaning and Sealing Services Are Used in Constructions

New Builds

In new construction projects, driveway cleaning and sealing services are often part of the final touches to ensure the property is presented in the best possible condition. Sealing a new driveway protects the fresh surface from the start, ensuring its longevity and appearance.

Renovations

During property renovations, upgrading the driveway through cleaning and sealing can significantly enhance the overall aesthetic appeal of the home. It is an effective way to add value and improve the functionality of the driveway without the need for complete replacement.

Regular Maintenance

For existing properties, regular driveway cleaning and sealing are essential for ongoing maintenance. These services ensure the driveway remains in good condition, preventing costly repairs and maintaining the property’s curb appeal.

Conclusion

Sealing your driveway in 2024 offers numerous benefits, from enhancing aesthetic appeal to increasing durability and longevity. It is a cost-effective way to maintain your driveway, reducing the need for frequent repairs and making cleaning easier. Additionally, driveway sealing has environmental benefits, such as preventing weed growth and reducing water runoff, and can significantly improve safety by creating a slip-resistant surface and enhancing visibility.

Driveway cleaning and sealing services are integral to both new constructions and renovations, providing a polished, professional finish that enhances the overall appearance and functionality of the property. Whether you are a homeowner looking to maintain your driveway or a builder seeking to complete a new project, these services offer a practical and effective solution.

Investing in driveway sealing is a wise decision that pays off in the long run, ensuring your driveway remains in excellent condition and continues to enhance your property’s value and appeal for years to come. As we move into 2024, consider the benefits of sealing your driveway and take the necessary steps to protect and preserve this important feature of your home.

Common Home Health Hazards & What To Do About Them

Clearly, we all want to live full and healthy lives. But it’s amazing how many of us say that while engaging in behaviors that seem to confirm the opposite. A good example can be found in the way that you treat your home. The home is the most important place in the world when it comes to looking after your health, so you should try to make sure that you are aware of this and do all you can to look after it.

Image Source – CCO License

In particular, it’s wise to think about some of the common health hazards that the home can have, so that you can figure out what to do about them and therefore keep your home much healthier. So let’s take a look at some of these right now that you may want to bear in mind.

Poor Air Quality

This is perhaps the most common health hazard in homes across the world, and it’s something that can lead to some serious ongoing health conditions. Even at the very least, having poor quality air in the home will mean that you struggle to breathe as easily as you could, and that your lungs are going to be in a worse condition. And if you tend to suffer from allergies, then you are more likely to have those crop up in the home too.

Fortunately, keeping air quality as good as possible is not too tricky. Firstly, get a few houseplants. All you need to do is have one or two plants around the home, and already you are going to have better quality air. Next, ensure you have good ventilation throughout the home – keep a window cracked, check your vents are clear and so on.

As long as you have done that, you’ll be avoiding this particular health hazard at least.

Image Source – CCO License

Mold

A lot of homes have mold, and you might not even know it until you start developing health problems related to it. The kinds of problems you can get as a result of mold can be quite diverse, and can range from very mild to quite severe, in the case of black mold for instance which can be lethal eventually. So if you have any mold at all, you’ll want to make sure that you are getting rid of it as soon as you can, and thoroughly.

For that, you will generally need to clean the affected area and then apply a fungicidal wash before repainting it. That’s the best approach, but it may also be that you need to call in an expert to deal with it properly. Also, remember that, as ever, the best approach is preventative, and anything you can do to avoid mold happening in the first place is going to be well worth your while.

How can you do that? Mostly, it’s about avoiding moisture in the home. So make sure you get someone to carry out a leak detection process on your water system, and consider getting a dehumidifier to keep the moisture out of the air too. In that way you should be able to avoid mold developing at all.

Image Source – CCO License

Trip Hazards

You should also be aware how common it is to trip and fall at home. In fact, this is the number one cause of injuries in the home, as it is in the workplace. So you should be very careful to avoid tripping at home if at all possible. Largely this is obviously about avoiding having anything large on the floor that you might trip over, and making sure that you declutter and generally keep the place tidy. But you should also bear in mind how important it is to generally pay attention as you walk through your home.
If you can do that, you are going to be much less likely to trip over at all, so this is something to think about here.

Fires

If a fire breaks out, it’s obviously a hugely damaging event, so you want to do all you can to avoid this happening at all. It’s damaging to the home and to your health, so make sure that you are avoiding this as best as you can. Be careful with electrics, make sure you have the proper fire safety equipment, and generally ensure that you are taking great care in the kitchen too.

If you do that, hopefully you will be able to avoid a fire in the home happening at all. But if one does occur, at least know what you are going to do.

Essential Consideration for Pool Deck Construction: A Homeowner’s Guide

Picture this: a gorgeous pool sparkling in your backyard, just begging for a party. But what about the area around it? That’s where your pool deck comes in. A great deck isn’t just about looks—it’s the foundation for fun, safety, and even boosting your home’s value.

So, before you start laying down pavers or pouring concrete, let’s dive into the key things you need to think about. We’ll cover everything from materials and design to practical stuff like drainage and maintenance. By the end, you’ll be armed with the knowledge you need to create a pool deck that’s perfect for YOU.

Let’s get started!

Materials Matter: Choosing What’s Right for You

Concrete is a popular choice, thanks to its affordability and long-lasting nature. For a touch of luxury, natural stone is gorgeous but comes with a higher price tag. Wood gives off that warm and cozy vibe, but it does need a bit more TLC.

But if you want the best of all worlds—style, durability, and easy setup— then Built-Smart paver pool decks might be your thing. These pre-cast concrete pavers come in all sorts of colors, textures, and patterns, so you can create a deck that’s totally you. They’re tough enough to handle lots of foot traffic, resist stains, and are super easy to keep looking good – perfect if you’re busy but still want a stylish space.

But hey, no matter what material catches your eye, the most important thing is that it fits your budget, matches your style, and works with how much upkeep you’re up for. It’s your pool deck, after all!

Design with Purpose: Blending Beauty and Function

Your pool deck isn’t just a place to walk around. It’s an extension of your home and how you live. Think about what you’ll be doing out there. Love soaking up the sun? You’ll want a wide-open space to spread out your lounge chairs. Big on barbecues? A built-in grill could be the perfect addition. Maybe a cozy corner for morning coffee is more of your style. Whatever you dream of, design your deck around it.

If you are confused, then hiring a professional landscape designer can help you bring your vision to life while taking care of all the technical details. This is where form meets function, and with a little help, it’s totally doable!

Drainage: Don’t Let Water Ruin Your Fun

Proper drainage is crucial for a safe and enjoyable pool deck. Nobody wants a slippery deck, puddles everywhere, or—worse—damage to their deck or house. And let’s not forget those pesky mosquitoes that love stagnant water!

So, think of your deck as a gentle slope, guiding water away from the pool. This keeps things dry and safe. If rain is frequent where you live, go the extra mile with a drainage system or use special pavers that let the water soak through.

This might sound boring compared to picking out cool tiles or furniture, but trust professionals. Good drainage will save you a ton of headaches down the road. And that means more time for fun in the sun!

Lighting and Ambiance

Now that you’ve got the basics down, let’s talk about setting the mood! The right lighting can turn your pool deck into a magical oasis, whether you’re enjoying a relaxing evening swim or hosting a lively party.

Soft, ambient lighting creates a romantic atmosphere, while brighter lights are perfect for entertaining. You can use a combination of overhead lights, path lights, and even underwater pool lights to create a multi-layered look. Don’t forget about accent lighting to highlight features like trees, sculptures, or water features. String lights or lanterns can add a festive touch, while spotlights can showcase your beautiful landscaping.

Future Expansion

Even if your pool deck is perfect right now, it doesn’t hurt to think about the future. Maybe you’ll want to add a hot tub someday or expand the deck to fit a bigger dining area. It’s smart to plan for these possibilities early on.

Consider how your deck could grow and change over time. Leave space for future additions, and choose a material that’s easy to expand upon later. Talk to your designer about your vision for the future so they can incorporate it into the initial design.

This kind of forward-thinking can save you a lot of hassle and expense down the road. So dream big, plan ahead, and build a pool deck that can grow and evolve with your lifestyle.

The Last Words

Remember, your pool deck is an investment in your enjoyment and well-being. So take your time, do your research, and choose wisely. With a little planning and effort, you can create a pool deck that’s perfect for making memories with family and friends for years to come.