Bathroom Vanities: Classic and Contemporary

Your bathroom vanity area can make the difference between a good bathroom and a great bathroom. Today we’re going to explore a few bathroom vanities for your home.
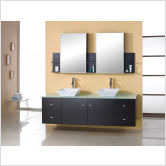
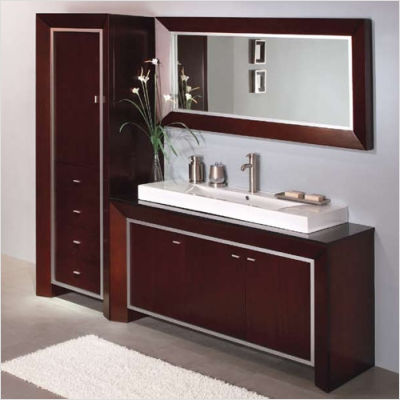
I found the one pictured above to be one of the most unique I’ve seen.  It’s the first time I’ve seen a double vessel sink.  Looks pretty neat, I think.  And I like vanities that provide plenty of counter space and storage space, and this one definitely does that.  And it’s just a got a fun, contemporary appeal.
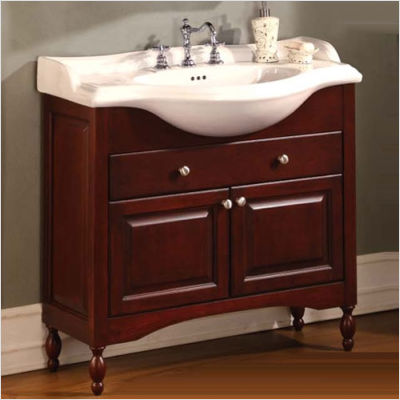
As far as the smaller vanities go, I really liked this this one.  I love cherry wood anyway, and this piece (as well as the one shown here ) reminds me a lot of hand built antique dressers I have in my home. Very simple and classic!
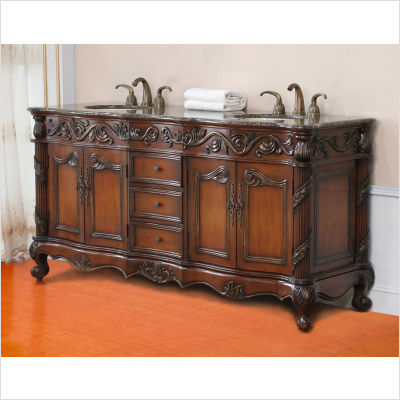
And here’s another one with antique appeal.  This one is an antique cherry vanity.  I don’t think I’ve ever seen a vanity that looked so elegance as this.  The claw feet and the detail work from top to bottom really had a lot to this piece.     
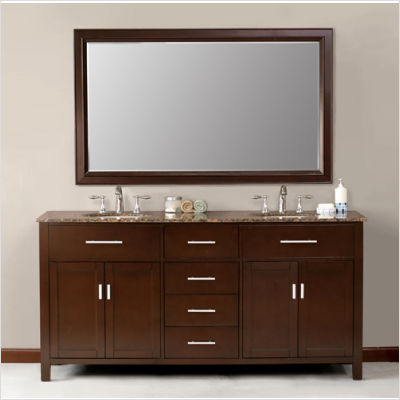
This vanity is a lot closer to what I think of when I hear the word vanity. It’s just basic and simple, but I think this one also has contemporary apeal to it. (I think it’s the color, or maybe it’s the handles.)  I really like the marble top on this one, and again, I like the counter and storage space options.
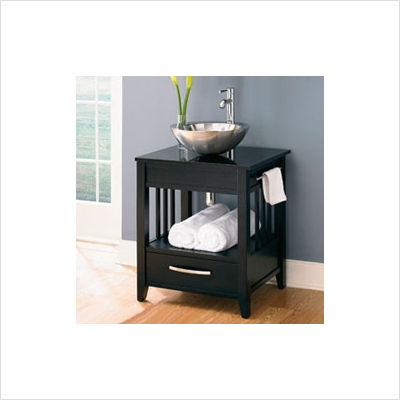
I’d really like your opinion on these vanities that feature the vessel sinks.  Maybe I’m behind the times, but I’d never seen one of these (except at a resturant) until a few weeks ago when one of my Friday Favorites participants posted about one they had installed.  I’m not sure if I’d ever get one of these, but I do think they look neat.  And I completely understand the appeal.  Perhaps I’d put one in a guest bathroom or a kid’s bathroom.  What do you guys think? 
And here’s another contemporary style (and I would say, very unique) vanity.  Here again, we have a vessel sink, although I think it would be a lot easier to get use to one like this.  In my opinion, it’s really not that different from your traditional vanities.  I think this would be a great choice for someone who wanted to go with something a little different and current, but didn’t really like the look of the other vessel sinks (or if you like the vessel sinks but you fear you’d grow tired of them after a a while). 
And finally this Avanty Oriental vanity also features the vessel sink.  I’ve browsed through several of these, and I’m intrigued.  I just think these look really cool.  Maybe it’s just because it’s new and different from everything else I’ve seen? Whatever the case, I guess I’d say if you’re looking for something new for your bathroom, and you want to go with something trendy and current, this may be the way to go.
-Jerri

—————————-
I’m posting a link to this post at:
Making the World Cuter Monday hosted by Making the World Cuter
Market Yourself Monday is hosted by Sumos Sweet Stuff
Marketing Mondays and Sharing Ideas Wednesday is hosted by The Trendy Treehouse
Show & Tell Wednesday is hosted by Blue Cricket Design
Tip Me Tuesday is hosted by Tip Junkie
Show & Tell Friday is hosted by Romantic Home
I’m Lovin’ It is hosted by Tidy Mom

Spring Wreath Revamp

I’ve seen so many cute wreaths on other blogs and in the future I want to make my own completely “from scratch” but for the sake of saving money, I created this one using stuff that I already had.
The wreath was actually given to me by dad.  It was on his front door for a while, and then it got transferred to the attic.  And rather than selling it at a yardsale for $2 or something, he asked me if I wanted it.  Of course I said yes!  And since then the wreath has adorned our front door for the past 2 springs and summers.  But I really wanted something a little different for spring…something to add a  little more color, so I simply added some pink flowers and voila! 
Here’s a picture of what the wreath looked like before.  I love the berries, but some of them are starting to fall off.  (Actually we got a glass door installed last year, and before it was installed the wreath was “exposed” to the outside, and birds frequently landed on it and tried to eat the berries, so I’m not surprised that they’re falling off.)  And again, I felt that it needed some color.
I had these two flower springs on hand. I believe these were 94 cents at Wal-Mart.  I added these to the wreath using the easiest method ever! 
I thought I might want to do something different with the wreath in the future, so I didn’t even use glue. I simply cut the flowers, leaving about 3-4 inches of the stem. (You’ll need wire cutters for this.) And then I wove the stems in through the wreath. Very easy!  And it looks so great from the outside!

-Jerri

—————————-
I’m posting a link to this post at:
It’s So Very Creative & It’s So Very Thrifty hosted by It’s So Very Cheri
Make it for Monday hosted by Cottage Instincts
Made it Mondays hosted by The Persimmon Perch
Making the World Cuter Monday hosted by Making the World Cuter
Make Your Monday hosted by Twice Remembered
Metamorphosis Monday hosted by Between Naps on the Porch
DIY Day at A Soft Place to Land
Market Yourself Monday is hosted by Sumos Sweet Stuff
Marketing Mondays and Sharing Ideas Wednesday is hosted by The Trendy Treehouse
What Your Working with Wednesday is hosted by Me and My Bucket
Show & Tell Wednesday is hosted by Blue Cricket Design
Tip Me Tuesday is hosted by Tip Junkie
Week End Review is hosted by Tator Tots & Jello
Star on Saturday is hosted by Craft-Werk
Penny Pinching Party is hosted by The Thrifty Home
Show & Tell Friday is hosted by Romantic Home

Thrifty Basket Decor

Here’s something cute and simple.  I got these baskets at the thrift store.  They were a whopping 50 cents each!  Oddly enough I found these on two separate occasions, and both are in good condition and both appear to be hand painted. 
And I just happened to have some plastic eggs here at home to put inside them.  I’m currently displaying these in the kitchen for Easter.
In the future, I may decoupage these eggs for fun, but till then, they are fine for me as is. 
So if you’d like to decorate for Easter, but you don’t want to spend a lot of money and/or you’re not that crafy, just get you some plastic eggs at the dollar store and stuff them in a basket.  It works!

-Jerri

———————————–
I’m posting a link to this post at:
It’s So Very Creative & It’s So Very Thrifty hosted by It’s So Very Cheri
Make it for Monday hosted by Cottage Instincts
Made it Mondays hosted by The Persimmon Perch
Making the World Cuter Monday hosted by Making the World Cuter
Make Your Monday hosted by Twice Remembered
Metamorphosis Monday hosted by Between Naps on the Porch
DIY Day at A Soft Place to Land
Market Yourself Monday is hosted by Sumos Sweet Stuff
Marketing Mondays and Sharing Ideas Wednesday is hosted by The Trendy Treehouse
What Your Working with Wednesday is hosted by Me and My Bucket
Show & Tell Wednesday is hosted by Blue Cricket Design
Tip Me Tuesday is hosted by Tip Junkie
Week End Review is hosted by Tator Tots & Jello
Star on Saturday is hosted by Craft-Werk
Penny Pinching Party is hosted by The Thrifty Home
Show & Tell Friday is hosted by Romantic Home

Homemade Easter Garland

After Christmas the kitchen cabinets looked so bare! So I added a little garland from the craft store for Valentines. Then I was fortunate to win some homemade Valentine Garland from Liz at Hoosier Homemade. It was such a cute prize that it inspired me to make my own garland for Easter. I don’t sew or anything. In fact, I’m not very crafty at all. (Although I am getting better!) So I took Liz’s design and did my own variation on it. (Sorry the pics aren’t any better. Our house doesn’t have the best light. Plus, I’ve decided that I’m in need of a new camera. I always thought I had a pretty good one until my niece got one for Christmas, and the megapixels were about 2x better than mine. I had no idea how much cameras had impoved….then again, I should have known, since I’ve had the camera now for 3 yrs…but I digress! Sorry!) Let’s just get to the tutorial…

Here’s What You’ll Need:
Scrapbook paper. (I used 4 different colors, but I only used half the sheet of paper on each.)
Ribbon
Stencils or cookie cutters
scissors
glue or tape
pen or pencil

Garland Tutorial:
-Use cookie cutters or stencils to trace shapes onto the back of scrapbook paper. You can use a single shape or multiple shapes. (I used an egg shape and two different flower shapes. And again, I used 4 different color patterns and about a half a sheet of paper of each pattern.)
-Next take your scissors and cut out the shapes. (I made 24 cut outs for a seven and a half foot string of garland)
Cut off a line of ribbon. Make the ribbon as long as you like. I suggest cutting off at least a foot more than the intended length. (I made a 7 1/2 foot garland, but I actually cut about 8 1/2 foot of ribbon off. I used the extra length on each end to wrap it around the “edging” on the top of the cabinets.)
-Now attach the shapes to the ribbon. (I placed them about an inch apart from each other.)
-There are a few different methods you can use for this. Liz actually sewed the cutouts to the ribbon. I, however, am not a seamstress and decided to use a short cut method. I used tape to attach the shapes. I used two small pieces of tape on each shape (making a t or x with the tape on the back of each shape.) I used two pieces to make sure it was secured, and put them on there cross-ways so that the garland would be more flexible/movable. For this step you could also mod podge or a glue gun if you prefer. (I just used tape because it’s quicker, there’s no mess, and it would allow me to make adjustments if I needed to.)
-Then hang your garland and enjoy!

-Jerri

—————————-
I’m posting a link to this post at:
It’s So Very Creative & It’s So Very Thrifty hosted by It’s So Very Cheri
Make it for Monday hosted by Cottage Instincts
Made it Mondays hosted by The Persimmon Perch
Making the World Cuter Monday hosted by Making the World Cuter
Make Your Monday hosted by Twice Remembered
Metamorphosis Monday hosted by Between Naps on the Porch
DIY Day at A Soft Place to Land
Market Yourself Monday is hosted by Sumos Sweet Stuff
Marketing Mondays and Sharing Ideas Wednesday is hosted by The Trendy Treehouse
What Your Working with Wednesday is hosted by Me and My Bucket
Show & Tell Wednesday is hosted by Blue Cricket Design
Tip Me Tuesday is hosted by Tip Junkie
Week End Review is hosted by Tator Tots & Jello
Star on Saturday is hosted by Craft-Werk
Penny Pinching Party is hosted by The Thrifty Home
Show & Tell Friday is hosted by Romantic Home
Tackle it Tuesday is hosted by 5 Minutes for Mom
Strut Yourself Thursday is hosted by Somewhat Simple
Easter Link Party is hosted by
Bird Crafts

Quilted Cabinet Cover

Hey Guys! Thanks to everyone who’s linked up at my first Friday Favorites!  I will be visiting all of you this week, and as promised a few of you will be featured in the next Friday Favorites post.  And if you didn’t link up yet, you have until Wednesday to do so.  And of course, this Friday we’ll be having a new event for you to link up your favorite post from this week.
Today I’m sharing a little decor idea.  Above is a picture of a little baby-sized quilt.  Actually it’s not a quilt….it’s the front of a quilt, but it was never finished; that is, it has no “backing.” (Sorry I’m not familiar with sewing terms…if you are a sewing person, feel free to correct me.)  Anyway this little quilt was always folded and placed at the end of my bed for decorative purposes when I was little.  I’m not sure who made it, but I always liked it because of all the colors.  Recently I found it as I was going through boxes, and I decided to bring it inside.
Here’s what I decided to do with it:

I’m using the quilt as a cover for my curio cabinet.  The top of the cabinet was looking a little dull, and the quilt really added a lot of color and made the pictures and stuff up top look better.  And as an added bonus, this keeps dust from settling on the cabinet.

Other Ways to Use Quilts in Your Decor:
-Place it on your bed.
-Hang it on the wall.
-Purchase a quilt stand and hang two or three quilts at a time.
-Fold the quilt and place it on top of a chest (cedar, antique, etc).

-Jerri
—————————–
I’m posting a link to this post at:
It’s So Very Creative & It’s So Very Thrifty hosted by It’s So Very Cheri
Make it for Monday hosted by Cottage Instincts
Made it Mondays hosted by The Persimmon Perch
Making the World Cuter Monday hosted by Making the World Cuter
Make Your Monday hosted by Twice Remembered
Metamorphosis Monday hosted by Between Naps on the Porch
DIY Day at A Soft Place to Land
Market Yourself Monday is hosted by Sumos Sweet Stuff
Marketing Mondays is hosted by The Trendy Treehouse
Week End Review is hosted by Tator Tots & Jello
Penny Pinching Party is hosted by The Thrifty Home

WAHW: Quick Valentine Decor

Today I’m sharing a few Valentine decor items. This is nothing too elaborate…just some things I had on hand that I could put out. I find that after the Christmas decor is put away, everything looks so bare. In the future when we’re not on such I tight budget I’d love to buy some things to really make it festive. Till then, these items add a lot color and festiveness to the room. Perhaps you have similar items in your that you could use in this way too.

By the way, in the next couple of weeks, I plan on sharing some Valentine Gift Baskets that I’ve put together, so be sure to come back for that. I’m also planning to feature some Valentine craft ideas in a few weeks, so if anyone has a craft they’d like to have featured here, just send me your link in an email. Thanks!

Last year I helped my mom with the annual chocolate festival, and we had this cute heart garland that we didn’t use. So I weaved it over the tops of the cabinets. (There was such a void to fill after the Christmas garland and balls went down.)

Next I took some of the pink & purple Christmas balls and placed them inside of some glassware:


And can anyone think of any better (or simple) Valentine decor than a candy dish or jar? (Disclaimer: Candy tends to disappear after a few days…it may be necessary to buy extra “decor.”)

My hubby bought me these cute little lovebird salt shakers last year. Most of the time, they are in China cabinet, but I put them out just for Valentine’s Day.

Hubby also bought this cute cupcake plate last year at Hobby Lobby. (Isn’t he the sweetest?)


And here’s my snowman of the month for February. I guess if I thought about it, I have all kinds of figurines like this in my cabinet that are Valentine or Heart themed items. Maybe you do too. (And if not, you can get all kinds of things similar to this at the dollar store.) I find that little things like this can add a lot.

I love seasonal dish towels. I have a few of these heart towels in and around the kitchen.

And finally, here’s another great example of using what you have. I got these four Valentine glasses. Most people would probably just pour a little coffee or hot chocolate in them. But I prefer to just sit them out and look at them.

-Jerri

Holly Bloggy Christmas Crafts

I don’t do very much crafting…probably because in school my art was never very good. I always excelled more at music and writing. I just started making jewelry this year, and in the past I’ve occasionally done a craft project or two. But I do want to try more stuff. I see so many tutorials out there, and I think to myself, “I can do that! It may not be as easy for me as they make it look, but still I think I could possibly do this!”

So one of my goals next year is to try some of these projects, or at least start small: try one or two and get really good at them. Then that should make it easier for me to learn more things in the future. Heidi from Blue Eyed Blessings hosted a fabulous craft party for us last week. Today I’m featuring just a few of the projects that were submitted to the event. I know you guys will love these! And after you check these out, be sure to go over to Heidi’s blog and check out all the other wonderful ideas! It may be too late to make some of these. Although if you’re needing a last minute gift, several of these are actually projects that you can do fairly quickly. And if all else fails, you’ll get some fabulous ideas to bookmark for next year.

Jingle Bell Shadow Box from Blue Eyed Blessings

Elegant Pine Cone Ornament from A Scrap Mom’s Musings

Monogram Ornament from: Sweet Pea

Decoupage Ornaments from: Sweetly Southern

Light Bulb Ornament from: Crafts by Amanda

Blue & Silver Wreath from: Eug

-Jerri


Holly Bloggy Christmas Trees

I just love Christmas Trees! It’s always been one of my favorite things about the season. If you haven’t been by A Baby Changes Everything to see all the great trees from the Holly Bloggy, you should definitely stop by. (Not to mention, Teresa has a Tree Decorating business, and the trees she shares on her blog every day are amazing!)

Again today, it was very difficult just picking a few trees to feature! In fact, several of the ladies featured here today have more than one tree in their home, so in some cases it was even difficult picking just one tree from a single post! So be sure to visit these ladies and take a look at their beautiful work. (And go by the party too b/c everyone did a great job—it’s just impossible for me to feature everyone!)

Pez Tree from Hoosier Homemade

From Perfect Harmony

From: The Adventures of Miss V

From: Adventures in Decorating

From: A Mommy’s Blessings

Embellished Bayou

From: A Baby Changes Everything

-Jerri

Christmas Tour

It’s that time of year again! As Lucy would say, time to “deck them halls and all that stuff!” This year I’m happy to be participating in Christmas Tours over at Southern Hospitality, Hooked on Houses, and The Nester.

As you look through the post you’ll notice there’s no tree…..I got so carried away with the pictures that I decided not to put any tree pictures here. But for the record, I do have a tree and will be featuring it in a separate post later on. By the way, if you’re one the ladies sharing your trees and decor, don’t forget to stop by A Baby Changes Everything on Tuesday and link up your Christmas Tree post for the Holly Bloggy Christmas Bash. (And link up at our other events too. Go here for more details.)

To begin our 2nd annual holiday tour, we have a very special treat! This is photo of our house decked out with real “Alabama Snow!” Isn’t it glorious?

For some reason, I find it nearly impossible to get a good pictures of Christmas lights, regardless of the outside lighting or camera settings, but I did my best!


We begin our tour in the living room where I have a couple of displays and items to share, starting with our 3 snowmen here. When you go through this entire post, you’ll probably think that I’m obsessed with snowmen….but actually most of them were gifts. Over the years I seem to have acquired quite a collection! (And I must admit, they are quite cute!)


The snow village…..


Last year I decorated the entertainment center in blue and silver, but this year I went with red and gold. I just love these cone shaped trees! I wish I had a whole forest of them!


This village is an easy one piece set up. I have an entire box of villages out in our storage building…but it takes so much time to set up. Maybe one day I’ll put them out, but for now I’m loving this one…

The stockings were hung on the China cabinet with care…..

A couple of cute pieces.


Last year’s dining room centerpiece is now at the top of the China Cabinet.


Kitty Cat Stockings…..

Last year this wreath was adorned in mice ornaments, but this year to keep with the red & gold theme, I decided to just add some gold accents and ornaments that came off a predecorated Christmas tree.


A couple of Hallmark special animals…..


And some Hallmark Sock Monkeys…..

Moving On To The Kitchen……..


After Christmas last year I bought some new garland and balls to put over the cabinets. It really adds a lot of color….and fun to the room. (Note all the snowmen items hanging from the drawers above and the snow men towels hanging on the stove below…not to mention a couple of snowmen on the counter.)


I saw so many glass containers filled with Christmas balls last year on the tours that I decided to do a few of my own.


The “Kitchen Tree”

If any of you are in to antiques or “country kitchen stuff,” I got these out of the Lakeside Catalog. (Note once again, the snowmen.)


My stepmom painted this plate for us two Christmas’s ago.

Some close up pictures of the garland and balls over our other two cabinets….


….And the following two pieces actually don’t go together. One is a card hold and the other is just an ornament. I couldn’t find a good place to put the ornaments, so I hung them here….so that’s the story behind that. (But at least they both feature snowmen, and they’re both from Hallmark…okay, maybe this looks a little weird…)

More Christmas Balls in glass containers. (I told you I liked the idea!)

And the kitchen table decked out in what else….snow men!
This Christmas Tree plate is one of my favorite pieces. My husband bought it for me 2 years ago.

….And more snowmen.

….And even S’more Snowmen!

Thanks for stopping by for my Home Tour. Don’t forget to come by next week for the Holly Bloggy Christmas Bash! We’ll have some great events and great prizes to give away!

Have a Merry Christmas!

-Jerri

Falling into Fall Decor

Need a few ideas to brighten up your home this fall? Here’s a few to get you started.
Welcome Sign from BHG. Here’s a great project that adds a simple charm to your decor.

Pumpkin Vase from Martha Stewart. A centerpiece really brightens up your table, and this pumpkin vase with wild flowers is just perfect!

Naturally Beautiful Wreath from Southern Living. If you’re looking for something a little different from the orange and yellow harvest wreaths, here’s something for you in green.

Modern Fall Cornucopia from BHG. I love this idea! The greens and purples are just lovely for fall or any time of year! And you can always use other colors of your choice for you own custom look.

Mantle Decor at About.com. And a little color and fall cheer to your mantle with a few pumpkings and some leaf garland.

Harvest Centerpiece from From You Flowers. There are so many different centerpieces out there for the fall. And the colors in the piece add so much warmth to your table or buffet.

-Jerri