Pumpkin Wall Hanging

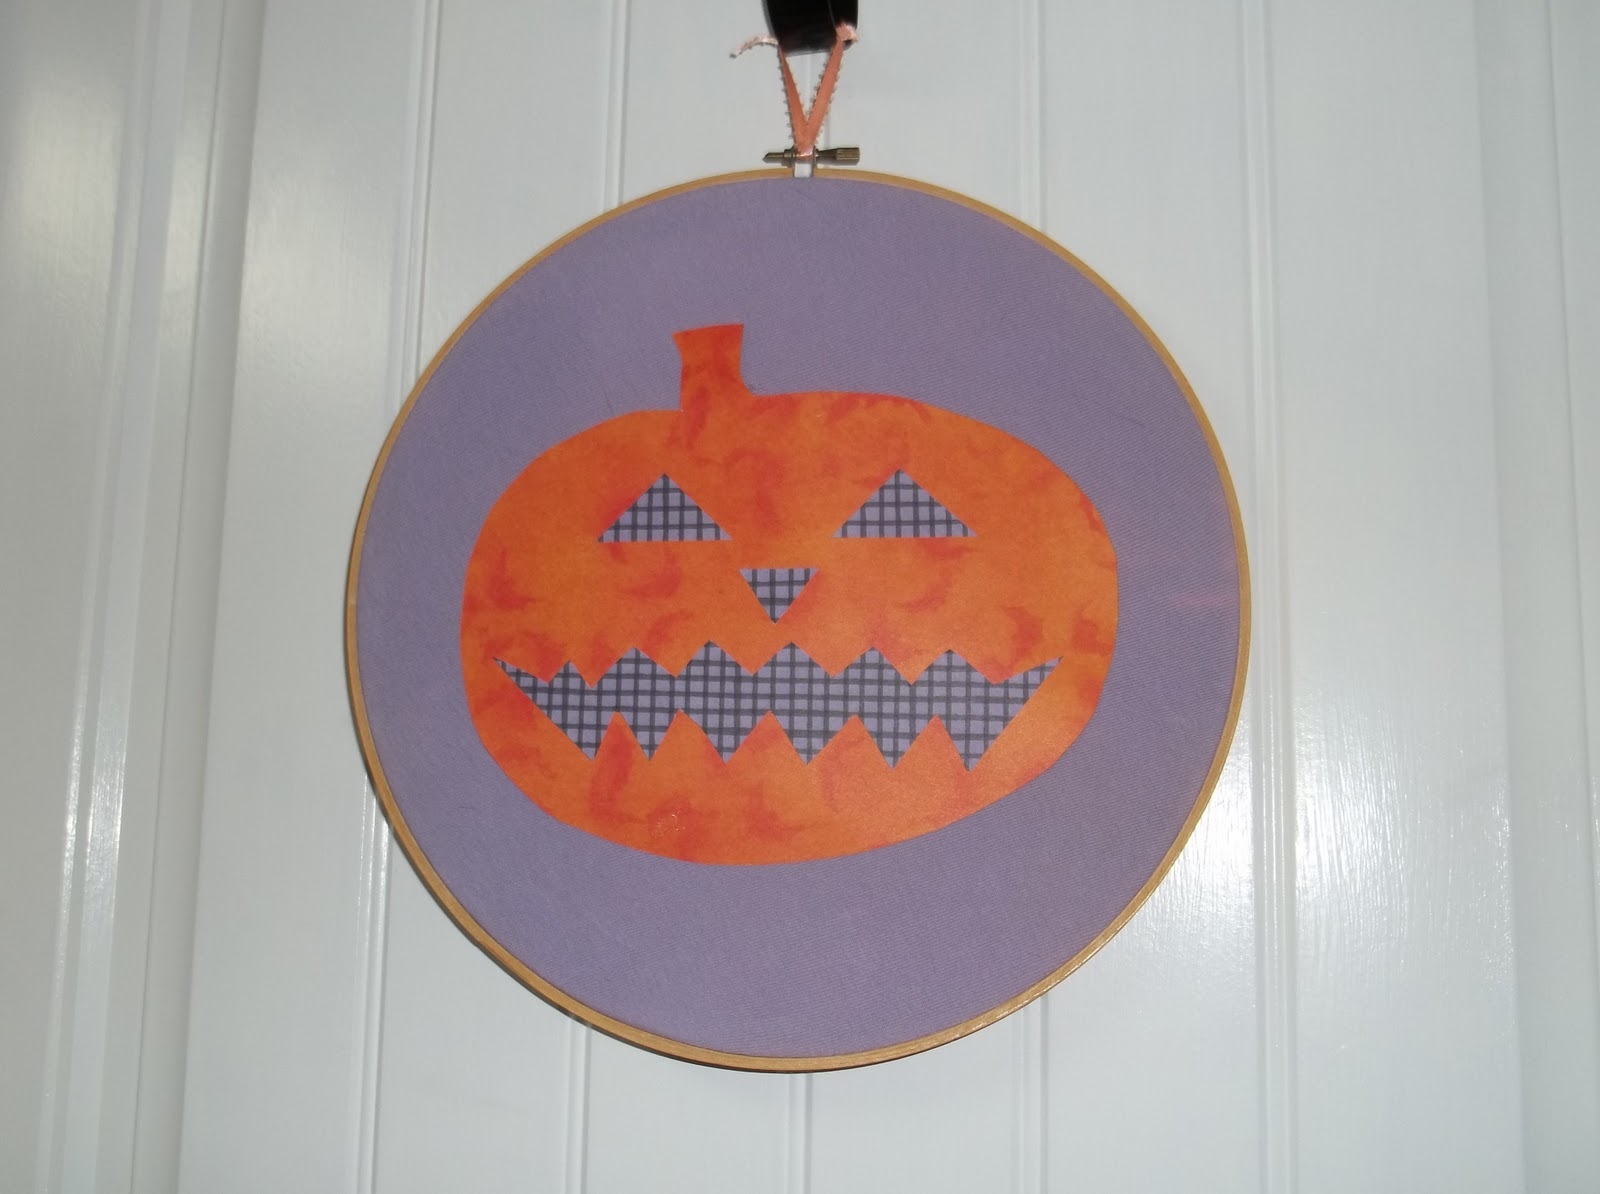
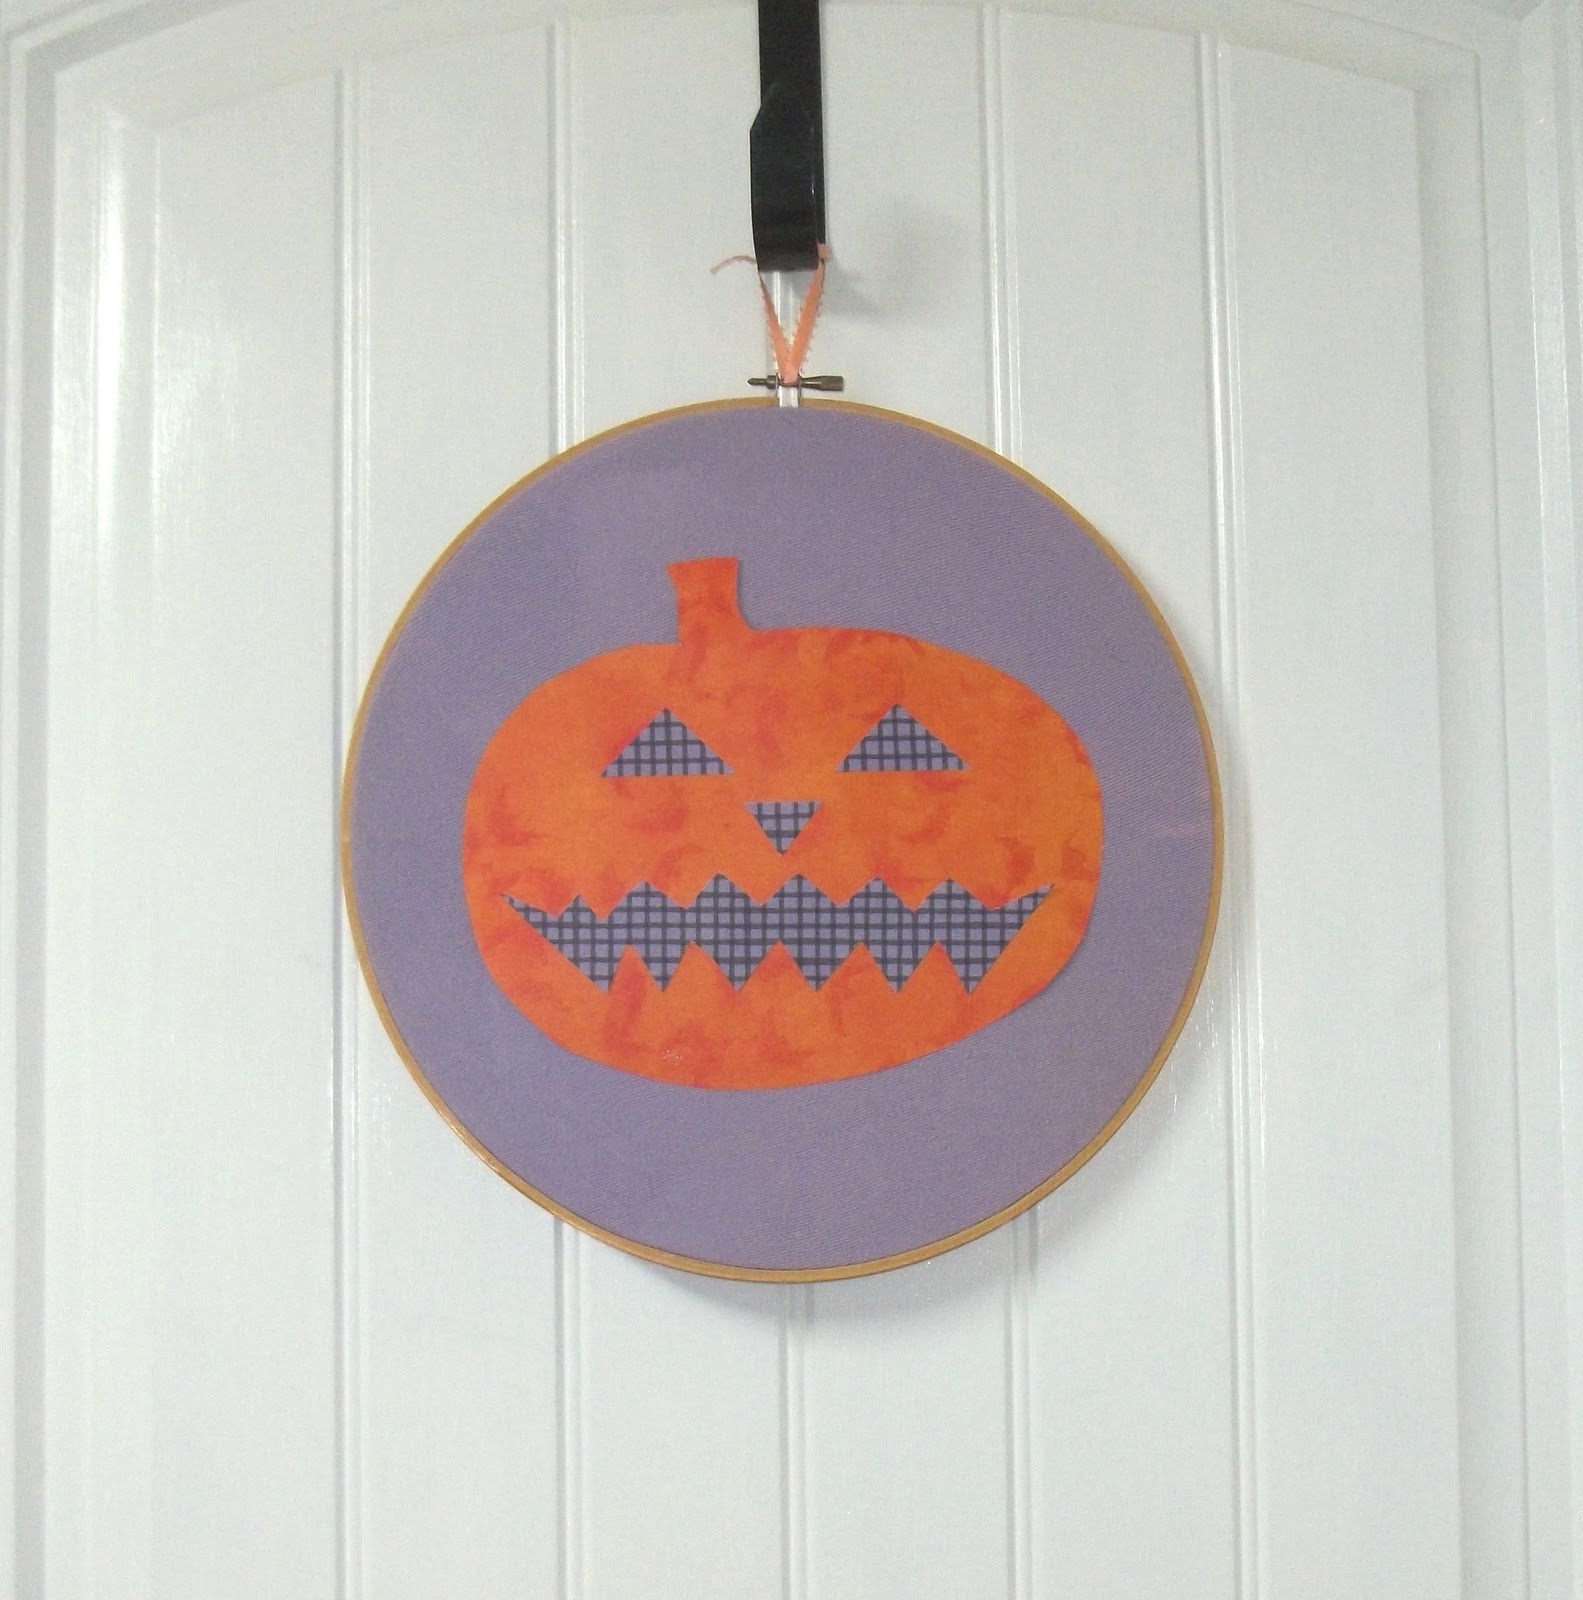
During the summer I shared a couple of projects made with embroidery hoops.  And here’s another! This Pumpkin Wall Hanging is very easy and very budget friendly!
I made with it with a couple of sheets from scrapbook kit that I got at the Dollar Tree and (believe it or not) the fabric from an old shirt.

What You Need:
One embroidery hoop (mine was 12 inches)
Fabric (14 x 14 inch square)
2 pieces scrapbook paper or fabric scraps if you prefer
Glue Stick or Mod Podge
Hot Glue Gun
Scissors
Ribbon
Directions: Cut fabric square into a circle (to fit hoop). Wrap fabric around the outside of the inner hoop. Put the outer hoop in place. Make sure the fabric is pulled and stretched tight. Then tighten the hoops to secure the fabric in place. 
Apply hot glue to the inner frame of the embroidery hoop and wrap and press down the excess fabric.
Using a piece of scrapbook paper or fabric, cut out a pumpkin shape and a pumpkin face. Use glue stick or mod podge to add a face to your pumpkin.  Then use hot glue or mod podge to place the decorated pumpkin on your fabric.
Cut out a 6 inch piece of ribbon, loop it through the top of the hoop and tie for hanging.

Photobucket

I’m linking up at Tidy Mom and these parties.

Free Halloween Printables

Halloween Party Printables from Party Planning Center

My Free Fall Printables post was my most viewed post last month, so for this month I’ve got some Halloween printables for you. As always you’ll find links to the sources where you can download these beneath the photos. Happy Downloading!

Halloween Versions of “Keep Calm and Carry On” Wall Art from A Southern Accent

Halloween Drink Labels from It’s Written on the Walls

Halloween Subway Art From That’s What Che Said

TREATS Sign from Dittle Dattle

Witch Sign from RainyButterfly05 on Photobucket

Photobucket
I’m linking up at Tidy Mom and these parties.

Blogiversary Giveaway #1 – Little Miss Missy Boutique

I’m really excited to bring you some great giveaways this month in honor of 4 years of blogging! 
Our first giveaway is from Little Miss Missy Boutique. This shop is owned by Missy, a wife and mom from Utah, and it offers Fine Art for Baby, Children, Teen, Adults, Parties, Weddings, Holidays, Custom design and DIY Printables.

Little Miss Missy Boutique specializes in welcome signs and wall art that is custom printed and shipped to your door, as well as printable invitations, cards, and party supplies.
One of my favorite signs from Missy’s shop is this Princess Words Print.

I also love her selection of religious and quote art and her decor for nurseries and kids’ rooms.

Isn’t this Noah’s Ark Print adorable?


She also has some adorable printable items, including shower invitations, baby announcements, Christmas cards, and party supplies!

One of my favorite party sets is the Go Bananas Monkey theme.

Connect!  Follow Little Miss Missy Boutique through their blog or follow on Facebook.

Win it! Little Miss Missy Boutique is offering a $35 Gift Certificate for her shop to one Simply Sweet Home reader.

(Terms:Must use in one visit. If purchase amount goes over $35, you will need to pay the remaining balance. NO Cash Back. May be used for any listing(s) on Little Miss Missy Boutique Etsy Shop.  Etsy Shop only allows credit card or paypal payments)

How to Enter: Please use the Rafflecopter form to enter. Giveaway will run through October 18.


Photobucket
I’m linking up at Tidy Mom and these parties.

Disclsosure: I received no products or compensation for this post. Prize is provided by Little Miss Missy Boutique.

Harvest Halloween Sponsor #2 Paramore Art Works

It’s time to spotlight another Harvest Halloween sponsor.

Paramore Art Works is a unique Etsy shop, which offers handmade gift tags, word banners, potion bottles, and witches’ wands!

This is a fanstastic shop! The items have a sort of vintage, shabby-chic appeal, which I love! A couple of my favorite fall items are these cute tags, although I also love her Halloween garlands!

The thing that really makes Paramore Art Works stand out is their line of witches’ wands and potion bottles!  

What a great decor idea! Each bottle is adorned with cute tags and embellishments, making them perfect for a Halloween themed mantle or buffet. So fun!

The shop also has a lot of non-Halloween items which I wanted to highlight.  I really like their word banners like this one:

And they some very cute vintage and primitive tags featuring everything from from Wizard of Oz to Fleur de lis.  This set is one of my favorites:

Please go by Paramore Art Works and take a look around!

Giveaway! Beth at Paramore Art Works is offering a potion bottle of “Moon Dust” decorated with crusty gauze, twine, moss, and a spider. Perfect for a witches collection of potions!
How to Enter: The Harvest Halloween Giveaway will be posted and open for entries on Oct 14.

Photobucket

Fall Letter Craft Tutorial

I love fall crafts and decor!  I made this shabby style fall craft the other day.  I guess you’d call it a wall hanging (even though I’ve hung it on the fridge).  But the concept behind my little fall letters could also be applied to banners, cards, place mats and more.


What You Need:
Black Felt 
Brown Paper or a paper sack
Faux Leaves
Sand paper (or scrapbook paper)
Black Marker or Alphabet Stickers for lettering
Hot Glue
Twine
Magnets (optional)
Directions:
1. Cut 4 squares of black felt.  Mine are 5 inches by 5 inches. 
2. Then cut 4 squares of brown paper. (I used a paper sack).  The size of the brown pieces will depend on how big your black pieces are and how big you want your black border to be.  For example, my brown squares are about a 1/4 of an inch (or so) smaller than the black squares.  But if I was using 10 inch black squares, I probably would make the brown squares about 9 inches.
3. Next crumple the brown squares to create the textured/wrinkled effect.  
4.  Use hot glue to affix the brown squares to the black felt squares.
5. Next position your leaves on top of the brown paper, and affix using hot glue.
6. Next cut out pieces of sand paper (or scrapbook paper) for your FALL letters.
7.  With a Sharpie draw a letter on each piece of paper and place them on top of the leaves using hot glue.  Or you can add stickers or chipboard letters if your prefer.

Directions and Methods for Display/Hanging
The next step depends on how you wish to use the letters.  Here are some options:
1. You could place your letters inside a frame.
2. Another option is to place the letters in a vertical or horizontal row and attach a piece of twine to the back of the letters using hot glue. (Or poke holes in the felt and weave the twine through to connect the letters). And then tie a piece of twine at the end(s) for hanging. (as in the very first picture)
3. As a third option you can attach magnets to the back of the letters for refrigerator hanging. (or you could even use tape).
4. Or you can do a combination of #2 and #3, which will allow you to hang this of the fridge (or somewhere else) in  a variety of ways.  (See examples below)

Photobucket

I’m linking up at Tidy Mom and these parties.

Z-Access 3D Display Frame Review and Giveaway

Today I’ve got a great new display frame to share with you. The Z-Access 3D Rotating Display Frame is the perfect way to showcase your favorites items.  You can creatively display family photos and keepsakes, sports memorabilia, awards, collectibles, and more!

“With the Z-Access Display Frame  showcased treasures can be seen and felt from a variety of angles, while staying safely protected from moisture, dust and fingerprints – an interactive display experience display cases made with rigid glass or acrylic can’t offer! What sets the Z-Access™ Display Frame apart from traditional frames, display cases and shadow boxes, is its clear flexible frame inserts which gently conform around objects placed between them. The puncture-resistant, dual inserts fit securely within the hinged frame enabling treasured objects of virtually any shape, to be suspended in full view. Don’t let those treasured life memories stay tucked away another day, proudly share them with your family and friends by prominently displaying them in the Z-Access Display Frame today!”

The frames come in 3 different types: The 6″x4″ 3D Stand Alone Frame, the 6″x4″ Slim Line 3D Rotating Frame, and the 6″x4″ Executive Rotating Frame in Frame.
Within the 6” x 4” frame size you can display items with volumes up to thirty-seven cubic inches (approximately items 5” x 3” x 2.5”), and the frame can hold items weighing up to three pounds.

Here’s a demonstration to show you how easy it is to place your favorite items inside your frame:

My Thoughts: As someone with a lot of collectibles and keepsake items, I love this frame! I normally put my keepsakes in my China cabinet, but with this frame I can now take select items and display them on my desk, a shelf, or any other area of the house for better viewing, and I don’t have to worry about them collecting dust.

I also love how quick and easy it is to place your items in the display frame.  It’s much easier than mounting your items in traditional shadow frames, which often requires using adhesives that can damage your collectibles. And the Z-Access frame you can remove your items from the frame at any time.  And it’s also more convenient and way less expensive than sending your items off to be professionally framed.

If you’re looking for a better way to display your memories and collectibles, you should definitely consider this frame!

Buy it! You can purchase all Z-Access Display Frames online at Displayit3D.com.

Connect:  Also, check out DispalyIt3D on Facebook and Twitter.

Win it! One Simply Sweet Home reader will win a Z-Access Display frame.

Mandatory Entry:  To enter, please use the Rafflecopter form below.


Photobucket

Fall Leaf Jar

At Christmas I just love jars filled with Christmas balls, so last year I took the idea and applied it to fall. 
It turned out really cute, and the best part of all is that I didn’t have to spend a dime. I already had the gold Christmas balls that I used.  And the leaves actually fell off of some fall garland that I had. Rather than throw them away, I figured why not use them for craft materials!

What You Need:
A Glass or Plastic Jar(s)
Christmas Balls in Gold or Fall Colors
Faux Fall Leaves
Or other fall-ish items (gourds, etc.)
Directions:  Just layer your balls and leaves inside your jar as desired.  I suggest starting with a few balls and then place your leaves in and around them as a filler.

Photobucket

I’m linking up at Tidy Mom and these parties.

Free Fall Printables

A cold front of wind and rain came our way yesterday, and today it’s actually 71 degrees in our house without any air conditioning!  I’m know the fall season doesn’t officially begin for another couple of weeks, and we’ll probably have a few more hot days ahead, but today I’m officially in the mood for fall!

To ring in, what is in so many ways, my favorite season, I’ve got some free fall printables for you! Hope you enjoy!

Fall Subway Art from Betty Crocker Wannabe

Fall Favor Tags from it is what it is
Fall Worksheets from All Kids Network 
(about 20 different fall worksheets are available)
Give Thanks Printables from TomKat Studio

Fall/Thanksgiving Subway Art from Blooming Homestead

Photobucket

I’m linking up at Tidy Mom and these parties.

Inspired Bedrooms

Following the theme from the past couple of weeks, today I’ve got some inspired bedroom decor to share with you. I found all these on the absolutely fabulous site Pinterest, which is now my go-to site for blogging and other creative inspiration!  
The first picture (above) is actually from anEtsy shop called Atilla Design. I actually found it several weeks ago on Pinterest and was just looking for an excuse to share it, so here it is! lol. Hope you enjoy all my selections!

Love the bright and bold colors of this Modern Bedroom from Craftaholics Anonymous

I found a lot of classical and vintage inspired rooms at Simplified Bee.
A chic, modern bedroom with rich colors from HGTV
Modern bedroom with a touch of classic elegance at Decor Pad
I thought this one had an interesting mix of modern, vintage, and shabby chic stylings.  It’s from House of Turquoise.
And finally here’s a shabby chic beach bedroom from NewPhotosGalleries.

This post is sponsored by The Trendy Boutique.  The place for trendy, fun, and affordable shopping!  Check out everything they have to offer from watches to photo jewelry and hand stamped jewelry.  And even design your very own flip flops and hand bags!  Find all the accessories you need  for summer and back to school!

Photobucket

I’m linking up at Tidy Mom and these parties.

Bedroom Makeover

I recently did a slight revamp in our bedroom….nothing fancy, just a new bedspread and curtains.  I love the bedspread that we had, but we’ve been using for a while, and I thought the room could use a splash of color.

Here’s a before picture:

And here’s the after:

And here’s a closeup of the bedspread: green with red/pink and white/tan flowers.

What do you think?

Photobucket

I’m linking up at Tidy Mom and these parties.