Chocolate Covered Caramel Popcorn – 2 Ways


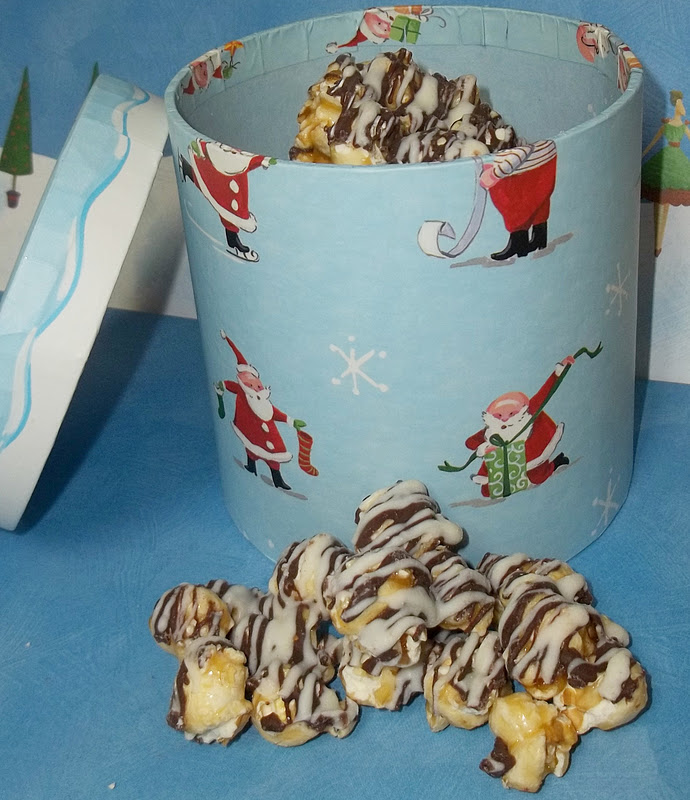
When I was kid we used to get those giant popcorn tins every Christmas! Those are still around today, but now we also have a whole host of gourmet popcorns to choose from for holiday parties and gift giving.
Today I’m going to show you  how easy it is to make your own gourmet popcorn at home using 2 different methods!  Not only will it make a fabulous homemade gift, but it’s also a lot cheaper than a lot of the gourmet gifts on the market!

Recipe for Chocolate Covered Caramel Popcorn – Method 1

Ingredients:
3 quarts lightly salted popped popcorn
1 cup light brown sugar, firmly packed
1/2 cup sweet unsalted butter (USE REAL BUTTER)
1/4 cup light corn syrup
1/2 cup peanuts (optional)
1/2 teaspoon baking soda
1 lb dipping chocolate or 1 bag of chocolate chips

(If using two kinds of chocolate like I did here, use half a pound of each, or 2 – 1/2 bags of chocolate chips.  Be sure to have extra chocolate on hand in case you need more.)

Directions: Preheat oven to 200 degrees.  Place the popped corn in two 9×13 baking pans. (Must be deep enough to stir popcorn)
To make caramel, melt butter in a very large saucepan.  Add brown sugar and corn syrup. Stir CONSTANTLY to prevent sticking and scorching. Bring to a boil and boil for 5 minutes.  Add peanuts (if desired).  Add soda (will foam up, so be sure to keep stirring).
Pour caramel over popcorn and mix well.
Bake popcorn one hour, stirring every 10-15 minutes.Remove from oven and cool completely.
You’ll have to stir it every once in a while so it doesn’t stick together.Next line some cookie sheets with parchment paper. Pour popcorn out onto the cookie sheets.
Meltchocolate per package directions.  I always use the microwave, stirring every 15-20 seconds to prevent scorching.  (Again, you may want to melt more chocolate than the recipe calls for to make sure you have enough.)
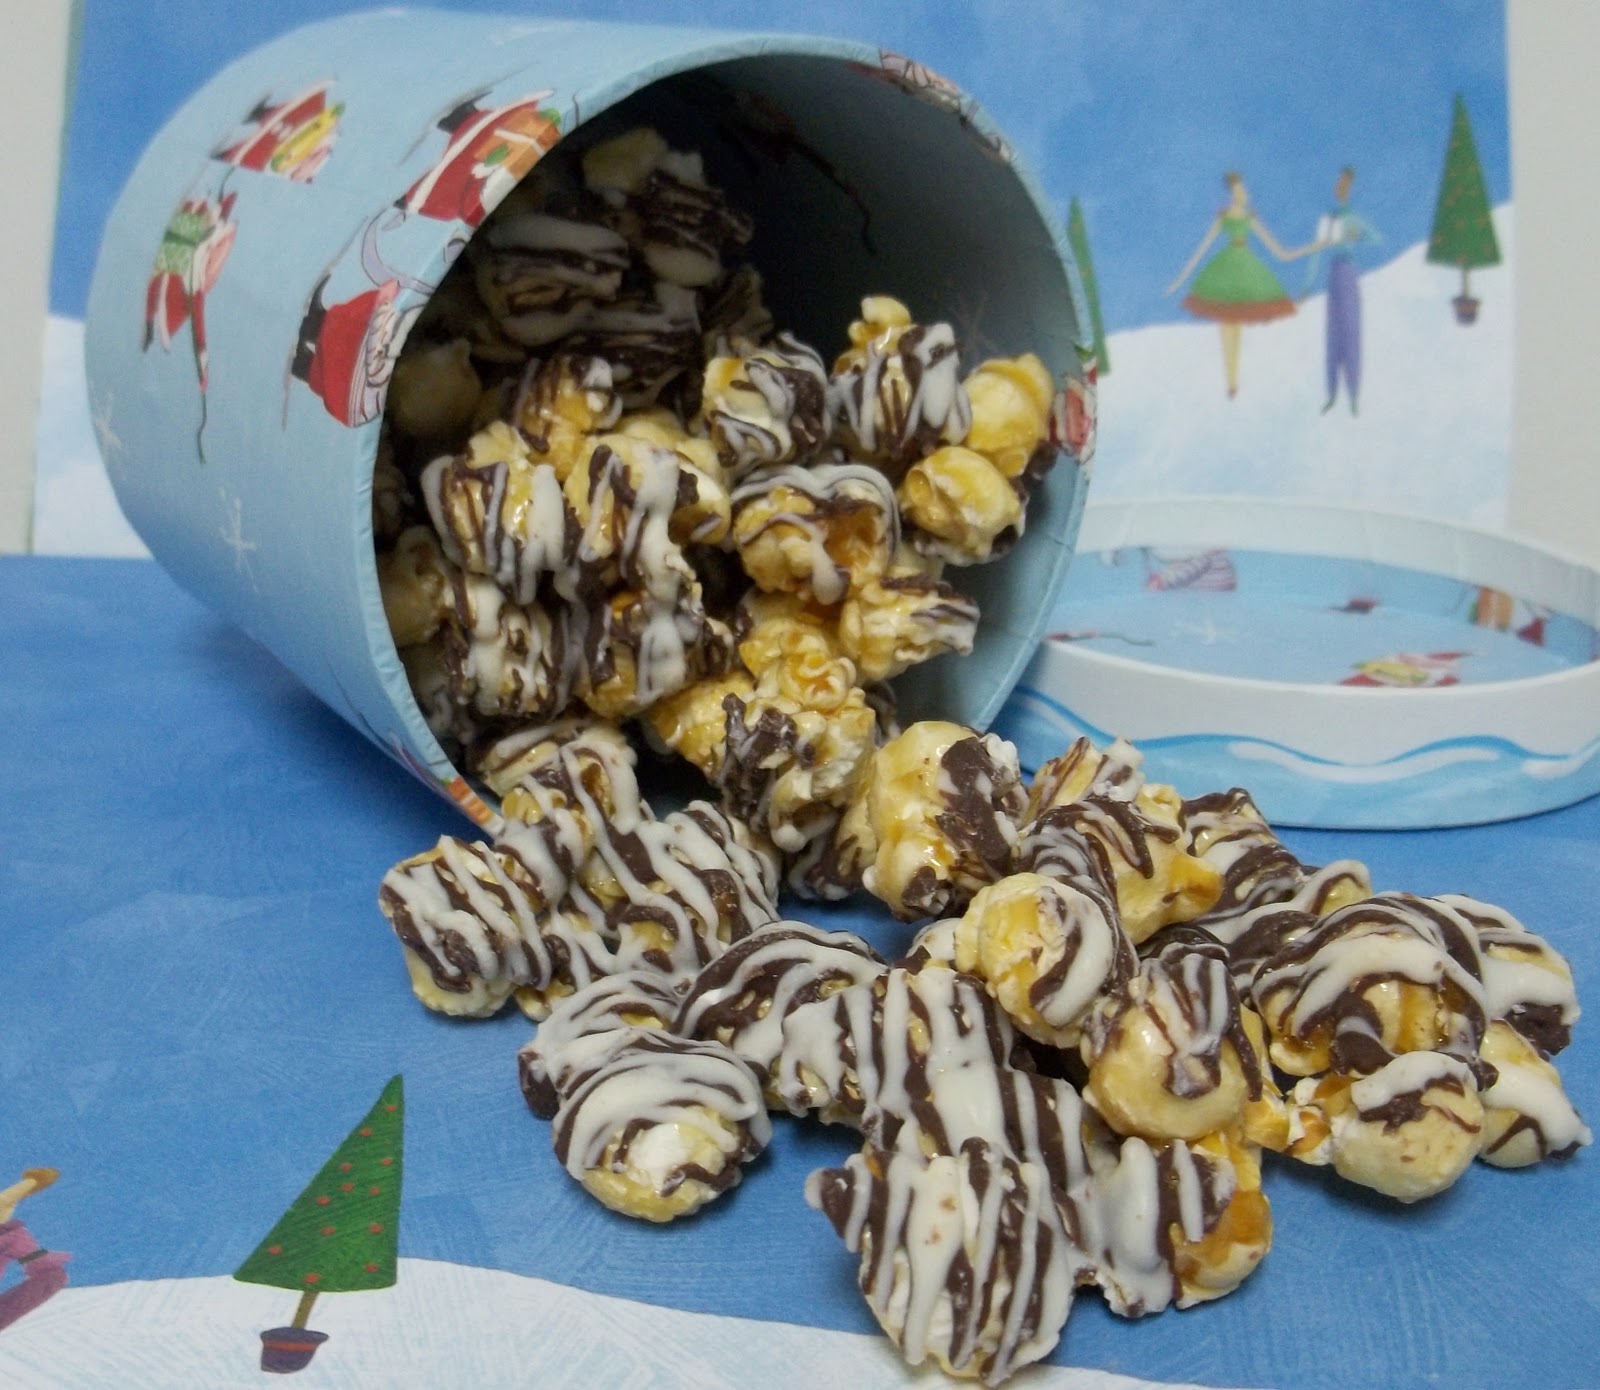
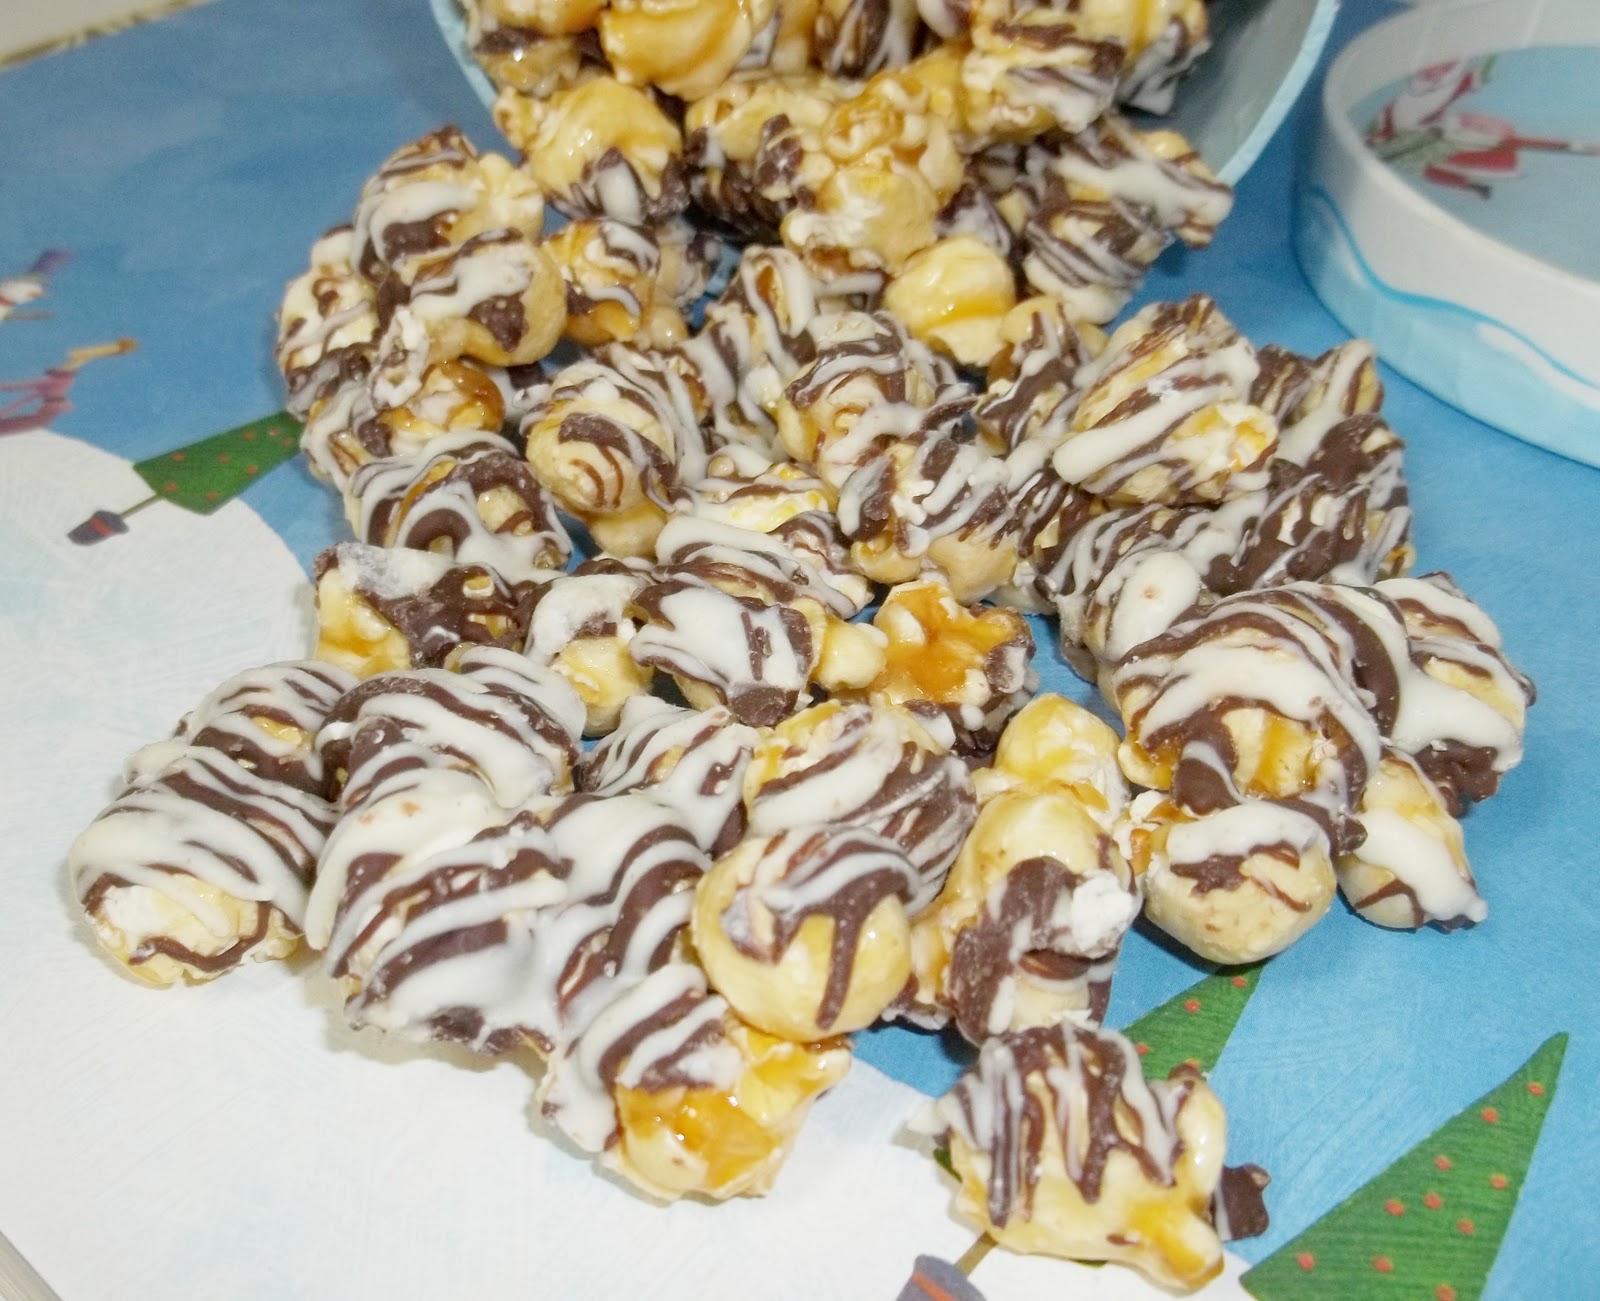
Once the chocolate is melted, drizzle over the popcorn.  Store at room temperature or refrigerate.
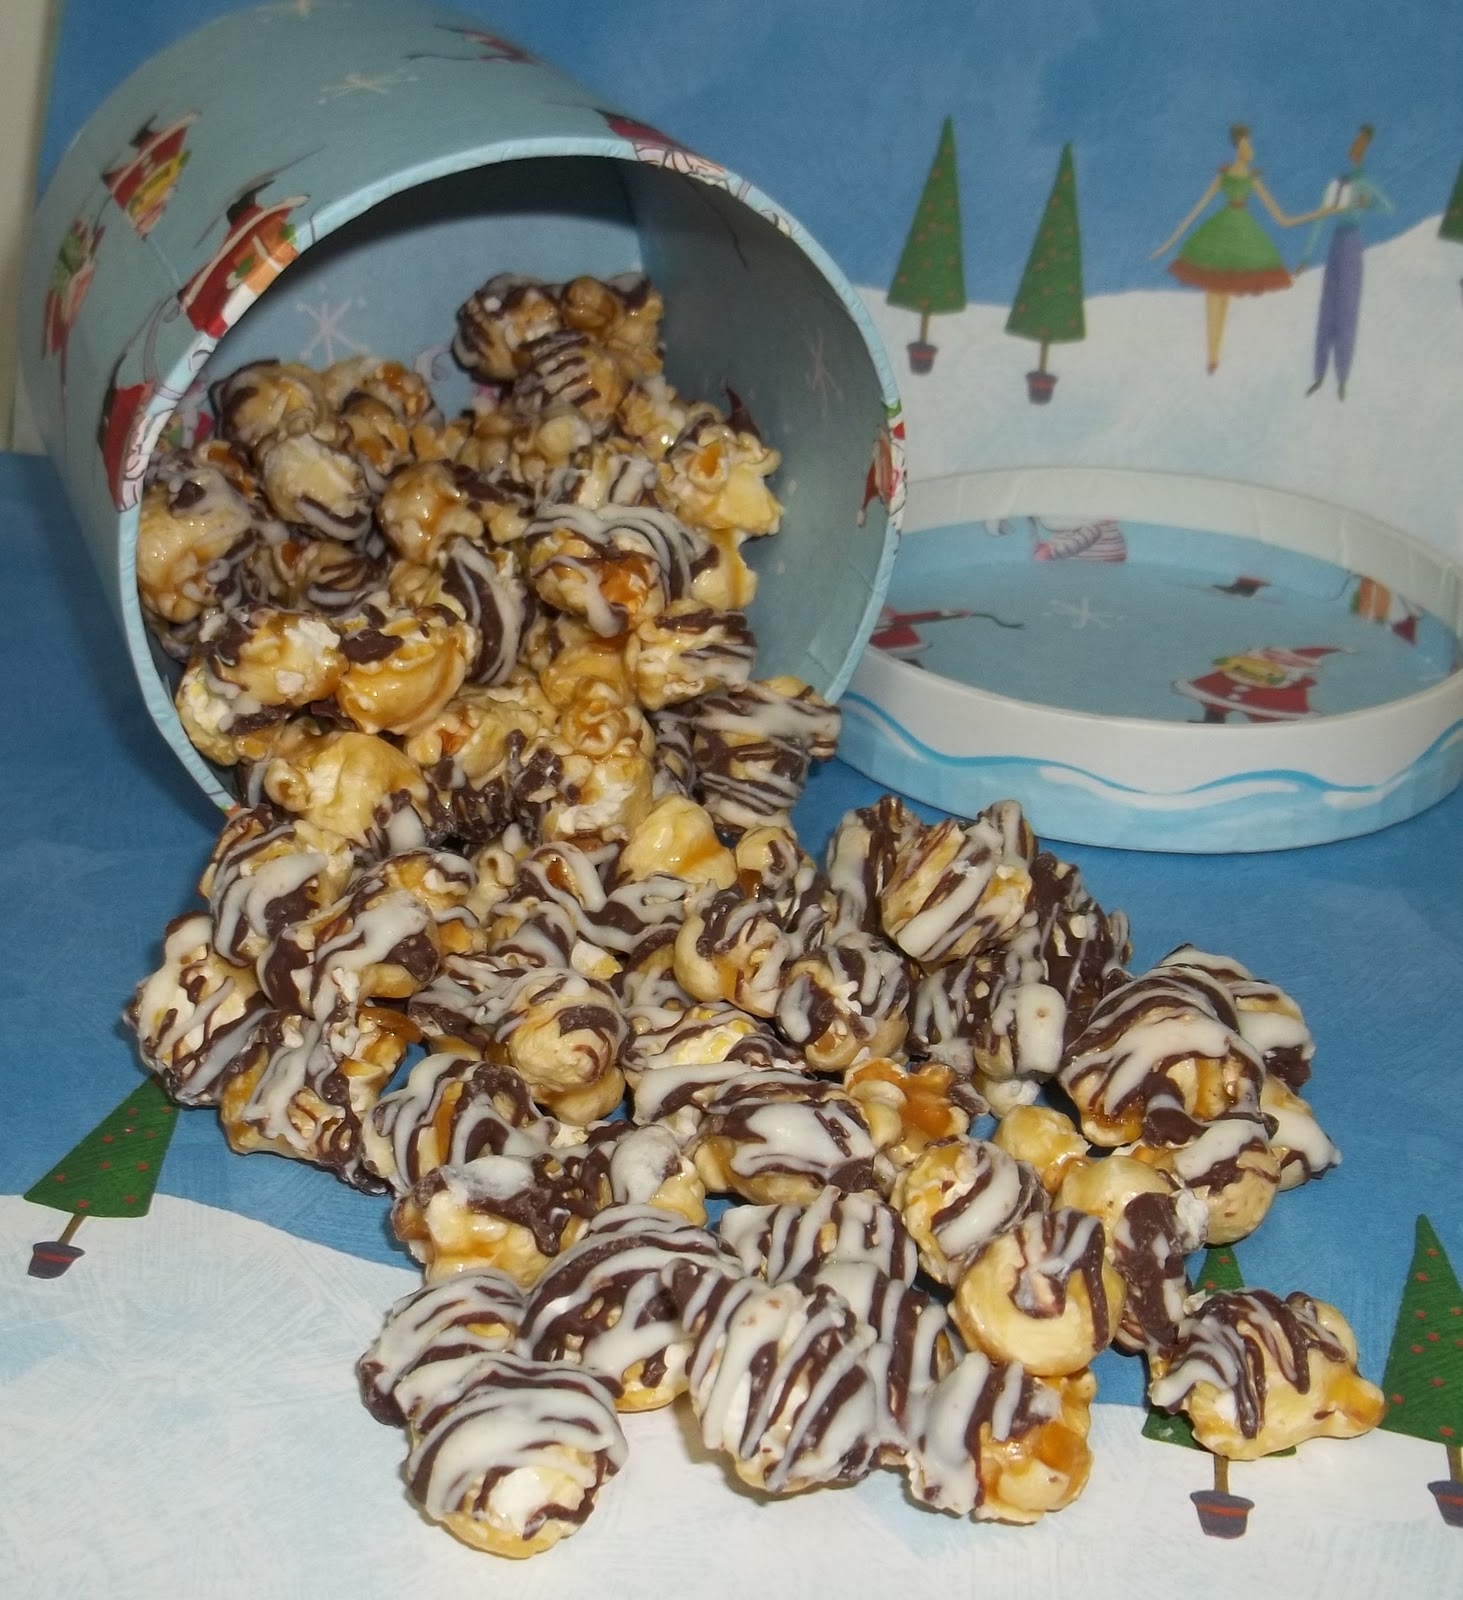
Recipe for Chocolate Covered Caramel Popcorn – Method 2

Ingredients:
3-4 boxes of Crunch N’ Munch
1 lb dipping chocolate or 1 bag of chocolate chips

(Again, if using two kinds of chocolate like I did here, use half a pound of each, or 2 – 1/2 bags of chocolate chips.  Be sure to have extra chocolate on hand in case you need more.)

Directions: Pour the Crunch N’ Munch out on to cookie sheets lined with parchment paper. 

Melt chocolate according to package instructions.  (I use the microwave, stirring every 15-20 seconds to prevent scorching.)
Drizzle chocolate on to popcorn.


Photobucket

I’m linking up at Tidy Mom and these parties.

Oreo Balls

One of my favorite things about the holiday season is the food, especially the sweets!  Today I’ve got a really yummy treat that’s perfect for parties and gift giving.  I first made these Oreo Balls last Christmas, and I can’t wait to make them again!  I know your family will love them too.  And guess what? They are SUPER easy to make!

Recipe for Oreo Balls:

Ingredients:
1 (16 oz) package Oreos
1 (8 oz) cream cheese
1 package almond bark
sprinkles (optional)
wax paper
Directions:  Crush the oreos. You can do this using a food processor or blender.  Or you can place them  in a plastic bag and crush them with a rolling pin.  Place in a bowl and add softened cream cheese.  Stir until well combined.  Chill in the refrigerator for half an or until the mixture is of a good consistency for rolling into balls.  Next scoop out the balls; you can use a cookie scoop, a spoon, or even your hands.  Roll into balls. (1 inch wide is a good size.)  Next chill in the freezer.
Now take your almond bark and melt it in the microwave.  I’d start with just half the package.  Stop the microwave and stir every 15 to 20 seconds to prevent scorching. It usually takes about a minute for the almond bark to melt in my microwave.
After the almond bark is melted, dip your balls.  I place the balls on a candy dipper for this, but you could also use a spoon, or you can stick each ball with a toothpick before freezing for easy dipping.  If the almond bark starts to harden in the bowl, microwave for an additional 15 seconds. Place your balls on wax paper.
The balls are great plain but if you wish to decorate them,  garnish with candy sprinkles or extra Oreo crumbs immediately after dipping  (before almond bark hardens).  Another way to decorate these is to drizzle them with another color almond bark. (If dipping in the brown, come back and drizzle them with the white and vice versa.)

Photobucket

I’m linking up at Tidy Mom and these parties.

Bauble Pops Recipe and Crazy for Cake Pops Review and Giveaway

Photo: Present Pops

If you’re in to the cake pop craze, you are going to love today’s review and giveaway!  It’s for the brand new book Crazy for Cake Pops!  And I’ve also got a super fun Christmas recipe for Bauble Pops! 

Cake pops are the hottest trend in baking and it’s easy to see why. With creative shapes and delightful flavors, they’re as fun to make as they are to eat. Crazy for Cake Pops teaches you the secrets for creating these mouthwatering mini treats like a professional baker. Packed with over 75 color photos, Crazy for Cake Pops leaves nothing to chance as it guides you step by step through each part of the process including baking, crumbling, shaping, frosting, and decorating.
My Thoughts: This is an awesome book!  There are so many fun ideas! It features cake pops for any and all occasions for the entire year: Christmas, Thanksgiving, Valentine’s Day, Easter, and Halloween!
There’s also a bunch of ideas for birthdays, baby showers, and other parties.
It’s also the perfect book regardless of your skill level. The book explains all the different equipment and ingredients you’ll need to create these fabulous creations.  Then it includes recipes for the different cake and frosting flavors featured in the book,  followed by step by step tutorials or each design.
And you’ll be so inspired by all the fun colored photos, you’ll want to get started right away creating your own cake pop creations!

Recipe for Bauble Pops: 

Baubles are beautiful party decorations for any time of year. Make them sparkle with a little edible luster spray.

 Makes 20 pops

Ingredients 
20 medium cake balls, chilled
¼ (14-ounce) bag each green, blue, pink and yellow candy melts
40 grams (2½ tablespoons) white fondant, kneaded
1 can edible silver luster spray

Equipment 
4 disposable piping bags

Directions: 

Make tops of baubles in advance: Split the fondant into 20 pieces and roll into balls with your hands. Flatten the balls slightly and make a hole through the middle of each one using the end of a lollipop stick. Leave to harden for a few hours. 
Once hardened, spray with the silver luster spray. Leave to set overnight. 
Melt each color of candy separately. Working with 5 cake balls per color, dip the end of each lollipop stick ¾ inch deep into the candy and insert a stick into each cake ball. Leave to set. 
Dip each cake ball fully into the candy, shake off any excess and, while the candy is still wet, slide a bauble top down over the stick. Make sure the bauble top sticks firmly to the candy on the ball. Place on a sheet of parchment paper with the stick facing up. 
Working with 1 color of candy at a time, pour each color into a separate piping bag. Cut a small piece off the tip of each bag and pipe designs onto the cake pops. 
 Once the candy has set, spray the cake pops lightly with the silver luster spray.

Photo: Snowman Pops
Buy it! Check out Ulysses Press to find out how to order the book online.
Win it! One Simply Sweet Home reader will win a copy of Crazy for Cake Pops.

To enter, just use the Rafflecopter form below. Giveaway will be open through Dec 5.

Photobucket

Photobucket

I’m linking up at Tidy Mom and these parties.

Coconut Pecan Cookies

Several weeks ago I shared these pudding cookies, which I first saw over at Chef in Training.  You know I love to make different versions and variations of the same recipe, so today I’ve got Coconut Pecan version to share with you!

Recipe for Coconut Pecan Cookies:

Ingredients: 

1 1/2 sticks butter (3/4 cup) 
3/4 cup brown sugar 
1/4 cup sugar1 
(3.4 oz) package instant coconut cream pudding
1 tsp coconut flavoring (or use vanilla if you don’t have coconut)
 2 eggs 
1 tsp baking soda 
2 1/4 cups flour
1/2 cup pecans
1 cup shredded coconut
Directions: Preheat oven to 350 F. Mix flour and baking soda together. Set aside.In a large bowl, cream butter and sugars together. Add in pudding package and beat until well blended. Add eggs and coconut flavoring. Add flour mixture slowly until well incorporated. Add chocolate chips or other add-in.Roll into 1 inch balls and place on greased baking sheet. Bake at 350 F for 8-12 minutes.

Photobucket

I’m linking up at Tidy Mom and these parties.

Fun Halloween Sweets

Photo Credit: Taste of Home
Can you believe that Halloween is just a couple of weeks away? Whew…how time flies! Today I’ve got an array of fun sweets and treats to help inspire your creativity this Halloween!

Candy Corn Meringues from The Kitchn

Gingerbread Skeletons from Family Fun

Skeleton Cupcakes from Women’s Day
Sugar Ghost Cupcakes from Taste of Home

Trick or Treat Sweets from Good Housekeeping

Photobucket

I’m linking up at Tidy Mom and these parties.

Satisfy Your Sweet Tooth: Nicole’s Homemade Treats

I’m excited to welcome back Nicole’s Homemade Treats as a sponsor to my blog!  As you all know, I have a huge sweet tooth, so this shop is right up my alley!

Nicole is a stay at home mom of two boys and a military spouse. And she has spent many hours trying to get her treats “just right!”

Nicole’s Homemade Treats is an LLC operating out of New York State. All the products are prepared in a fully licensed kitchen. NYS Dept. of Agriculture #31AAAA

Nicole’s shop features everything from organic chocolate bars and Rocky Road Candy to my favorite peanut butter cups, and just about every chocolate truffle or cluster that you can imagine!

And right now Nicole has some amazing fall treats in stock like these Chocolate Pumpkin Lollipops. Aren’t they adorable?

And Nicole also has these amazing gourmet candy apples and pears, one the quintessential fall treats!

Don’t these look positively divine and scrumptious? I think so!

And besides the gourmet apples and pears, there’s a lot of other fruit and chocolate treats.

And another treat that I found positively scrumptious and festive for fall was this White Belgian Chocolate Hazelnuts and Dried Apricot Mediants candy:

And as if all all the candies and sweets aren’t enough, Nicole’s Homemade Treats also offers homemade sauces.

And if you’re looking for something a little less sweet but just as delicious, check out her baked granola and fruit & nut mixes!

The treats are prepared in small batches, to preserve the taste and quality of the product, and to ensure that there is no waste. It takes about 5-7 days to produce your order. But Nicole PROMISES – they will be worth the wait! Go by Nicole’s Homemade Treats and place your order today!

Photobucket

I’m linking up at Tidy Mom and these parties.

Pudding Cookies

One of the great things about hosting my linky party is that it gives me a chance to get recipes and ideas that I might not have otherwise found through regular blog surfing or hopping through links at other parties.  One blog that always shows up to the party with some standout eats and treats is Chef in Training. Back in July, they linked up these Pudding Cookies, which I made almost immediately.  And they were just scrumptious!

Recipe for Pudding Cookies:


Ingredients:
1 1/2 sticks butter (3/4 cup)
3/4 cup brown sugar
1/4 cup sugar
1 (3.4 oz) package instant vanilla pudding
1 tsp vanilla
2 eggs
1 tsp baking soda
2 1/4 cups flour
1-2 cups chocolate chips

Directions: Preheat oven to 350 F. Mix flour and baking soda together. Set aside.

In a large bowl, cream butter and sugars together. Add in pudding package and beat until well blended. Add eggs and vanilla. Add flour mixture slowly until well incorporated. Add chocolate chips or other add-in.

Roll into 1 inch balls and place on greased baking sheet. Bake at 350 F for 8-12 minutes.

Photobucket

I’m linking up at Tidy Mom and these parties.

Newtons Fruit Thins Review

For more than a century, Newtons has been one unique cookie – wholesome goodness made with real fruit and a taste all its own. Now, with the creation of Newtons Fruit Thins, Nabisco is breaking the mold again with a cookie unlike any other with real fruit in unexpected combinations packed into a thin and crispy cookie.
They come in 4 great flavors:
  • Cranberry Citrus Oat
  • Blueberry Brown Sugar
  • Chocolate Raspberry
  • Fig and Honey
And because Newtons Fruit Thins are made with real fruit and 8 grams of whole grain per serving you can feel great knowing you’re having a deliciously wholesome snack.
Growing up, I loved eating Strawberry Newtons, so I was very excited to hear about these new cookies.  I had a chance to try the Cranberry Citrus Oat, and I was VERY impressed!
Ordinarily I’m not a big fan of cranberry, but the cranberry bits in these cookies were actually quite tasty, and I also loved the thin, crispy consistency.
But what I loved most was the citrus taste.  As a kid I can remember eating something that I would describe as a “lemon shortbread cookie,”  and when I bit into the Newtons I immediately thought of those cookies I used to eat.  The last few years I haven’t been able to find cookies like the ones I ate as a kid, so I’m now excited that I’ll have the chance to experience that taste with the Newtons Fruit Thins.
I think this is a great snack for moms and kids alike, and I look forward to trying the other varieties in the future!

Photobucket


Disclaimer: I received a free sample of Newtons Fruit Thins for review through the One2One Network. The opinions are my own.

Indulge at Nicole’s Homemade Treats

There’s nothing like homemade candies and treats to satisfy your sweet tooth!  But if you’re like me, you may not always have the time and patience to spend making your own candies.  But now thanks to Nicole’s Homemade Treats you don’t have to have time or  patience. 
Nicole’s Homemade Treats is a fabulous etsy shop offering yummy, delectable, sweet treats.  They have everything from chocolate caramel truffles and peanut butter cups to chocolate covered cherries and much more!
Nicole is a stay at home mom of two boys and a military spouse. She uses candy-making as a stress reliever and creative outlet. For Nicole, selling her products locally and online is a fun and rewarding endeavor. And she has spent many hours trying to get her treats “just right!”
Nicole’s Homemade Treats is an LLC operating out of New York State. All the products are prepared in a fully licensed kitchen. NYS Dept. of Agriculture #31AAAA
The treats are prepared in small batches, to preserve the taste and quality of the product, and to ensure that there is no waste. It takes about 5-7 days to produce your order. But Nicole PROMISES – they will be worth the wait!
If you’re shopping for someone else, gift certificates are available.  And Nicole also offers chocolate samplers where you’ll get a one pound assortment each month for 3 months, 6 months, or an entire year! (Talk about a gift that keeps on giving.)

Be sure to check out Nicole’s Homemade Treats on etsy! You can also connect with Nicole at her blog and on twitter @Nikid70.  Go ahead and indulge!

Photobucket
Disclosure:  Nicole’s Homemade Treats is a paid sponsor on my blog.  If you’d like become a sponsor, please check out my PR page or email me for details.

Homemade Peanut Butter Cups

I’m really excited to bring you this week’s recipe!  It is a homemade version of one of my all time favorite candies—the peanut butter cup!
I first saw this recipe in Taste of Home magazine a few years ago, and I marked the page but never got around to trying the recipe. (This tends to happen a lot with me.)  But a few days ago, I was wanting to make some kind of new spring/Easter treat, so I started looking through my old magazines, and found these again.  I had all the ingredients I needed, and they were pretty easy to make, so I decided to give it a whirl!
I have to warn, these things are very tasty!  They remind me of the gourmet peanut butter cups that you order, except they’re much cheaper, and the peanut butter is more sweet, almost like a Reese Cup!  And since these are so easy to make, I’d say if you make them once, you’ll probably be tempted to make them again and again.  So don’t say I didn’t warn you!  Hope you enjoy!
Recipe for Homemade Peanut Butter Cups:
Ingredients:
1 cup creamy peanut butter, divided
4-1/2 teaspoons butter, softened
1/2 cup confectioners’ sugar
1/2 teaspoon salt
2 cups (12 ounces) semisweet chocolate chips
4 milk chocolate candy bars (1.55 ounces each), coarsely chopped
Colored sprinkles, optional
Directions:  In a small bowl, combine 1/2 cup peanut butter, butter, confectioners’ sugar and salt until smooth; set aside.
In a microwave, melt the chocolate chips, candy bars and remaining peanut butter; stir until smooth.
Drop teaspoonfuls of chocolate mixture into paper-lined miniature muffin cups. (I didn’t have any miniatures, so I used the regular sized cups and started with about a tablespoon of chocolate in each cup, but I recommend making miniatures, because these things are rich!)
Top each with about a teaspoonful of peanut butter mixture. (For the regular sized cups, I actually used a cookie scoop to measure, so it was just under a tablespoon of peanut butter.  Then I rolled it into a ball See pic below.)
Then top with another teaspoonful of chocolate mixture. (tablespoon for regular size cups)
For fun and extra added cuteness, decorate with sprinkles! Refrigerate until set. Store in an airtight container.
This makes 3 dozen minature cups, and anywhere from 12 to 18 regular sized cups, depending on how you distribute the ingredients and how big you make the cups.
This post is sponsored by Petite Rouge. Are you looking for the perfect finishing touch? Petite Rouge has it. Simple, elegant blossoms to brighten up any outfit. Dainty enough for your smallest princess. Sophisticated enough for your growing girls. Clip on a headband or wear alone.

I’m linking up at these weekly linky parties.

Photobucket
If you’d like to sponsor some posts on Simply Sweet Home, please email me for details.